Showing posts with label carnatpar. Show all posts

8.21.2012

How to schedule a post in Blogger {updated}

Dionna of Code Name: Mama and I are writing a few blogging tutorials of particular use for our Carnival of Natural Parenting participants. This one will help in scheduling your article to post on Carnival day!

This is an updated version for the new Blogger interface. If you're still using the old Blogger interface, visit this post instead.


Here's a little tutorial on how to schedule a post in Blogger (Blogspot) for a specific time and day.

This is useful if you want a post to go live at a certain time but will not be available to hit the publish button yourself (such as if you want your Carnival post to go live just after midnight but you'll be asleep by then).

It can also help your blog maintain a businesslike image if you schedule all or certain important posts to go live at a predictable time each day or week (such as a giveaway linky that readers can count on to show up at 9:00 a.m. each Thursday, for example).

(Note to my Carnival friends: You do not have to schedule your post; it's just a how-to in case you want to for your own convenience.)

8.20.2012

How to find (or change) your permalink in Blogger {updated}

Dionna of Code Name: Mama and I are writing a few blogging tutorials of particular use for our Carnival of Natural Parenting participants. This one will help in determining your post URL in advance!

This is an updated post for the new Blogger interface. If you're still using the old Blogger interface, go to this post instead.


Here's a little tutorial on how to determine your post's permalink in Blogger (Blogspot) before you've published a post. This is useful if you want to figure out ahead of time what your URL will be once you've published. You can also choose your own custom permalink if you wish.

Find your predetermined URL

Blogger has finally made this easy for us — yea! Here's how you find your permalink in the new interface:

Click any picture to embiggen.

In any post, go to your Post Settings in the right sidebar. (If it's not already expanded, which is the default, click to expand it.)

Click on Permalink.

You'll see that Automatic URL is the default selection. If you're happy with that, simply copy and paste the URL that appears there to give to anyone who needs your permalink ahead of time (such as in a blog carnival).

Note: If you're planning a post for the future, the month (or year, if applicable) will change to whenever it's published. Therefore, if you're scheduling a post that will take place in a future month, be sure to fill in the correct month (and year) when copying/pasting the URL. You can schedule your post first before copying/pasting to make sure the permalink will be correct.

And that's all — you're done! You don't need to read on unless you want to.

Create a custom URL

If you want to be fancier and craft your own URL, you can now do so!

This can be very beneficial for SEO. (Just saying that phrase made me feel like a spammer.) You can include the keywords that search engines would look for, or make the URL memorable to you, or even include a funny joke within it. (I won't judge.)

1.12.2011

Choosing who can comment in Blogger: Allowing the option of name and URL

Dionna of Code Name: Mama and I are writing a few blogging tutorials of particular use for our Carnival of Natural Parenting participants. This topic is loosely related to the carnival, because certain options allow for easier commenting on Blogger blogs.

Do you want to adjust your comment settings in Blogger to determine which readers can comment?

Choosing what permissions to grant commenters (from requiring registration to allowing anonymous commenters) can affect how easy it is for people to comment — and, therefore, how likely readers will be to convert to commenters. Specifically, you might receive more comments if you allow commenters to type in their own name and URL or comment anonymously, because it can be appealing for certain commenters.

Everything has its pros and cons, of course, which we'll cover in a bit. For now, here's where you find the options, what they mean, and what they look like in action.

The four commenting permission options in Blogger

Blogger has four permissions options for its commenting system. Go to your Dashboard, then choose the Settings tab, then Comments. (There's a main tab labeled "Comments," as well, but we want the sub-tab under Settings.)


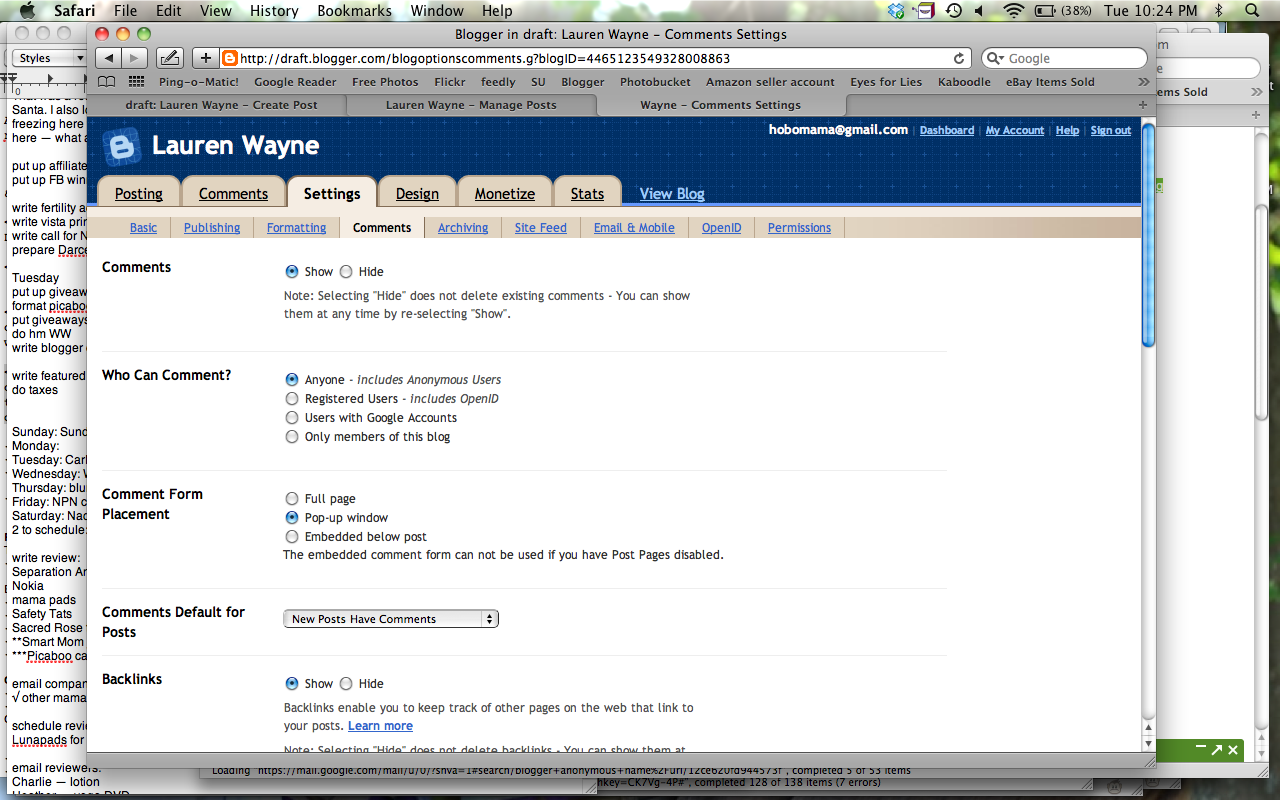
Look for "Who Can Comment?"

Here are the options. Start from the bottom up to go from most restrictive to least:

  1. "Only members of this blog" — Commenters have to be contributors or administrators of the blog and must be logged in to Blogger to comment.
  2. "Users with Google Accounts" — This is the default for Blogger. Anyone commenting must have a Google account and sign in to Google.
  3. "Registered Users  - Includes OpenID" — This opens up commenting to people who don't have a Google/Blogger account but still requires that they identify themselves in some way by logging in with an outside account. This expands the accounts commenters can sign in, in addition to Google, with LiveJournal, WordPress, TypePad, and AIM. Commenters choose their preferred account, enter their URL or username, and then OpenID takes them to a separate page to authorize with their password.
  4. "Anyone - Includes Anonymous Users" — This is the most open of all the commenting options, and is the only one that allows for Name and URL entry. It also is the only one that allows anonymous commenters.

Once you decide which option you prefer, select the little circle next to your choice. Then scroll to the end of the page and make sure to click Save Settings.

Here's what they look like in action, both from the perspective of the commenter, and what a comment looks like live when it's published. Then we'll talk a little bit more about why you might choose each of the four options.

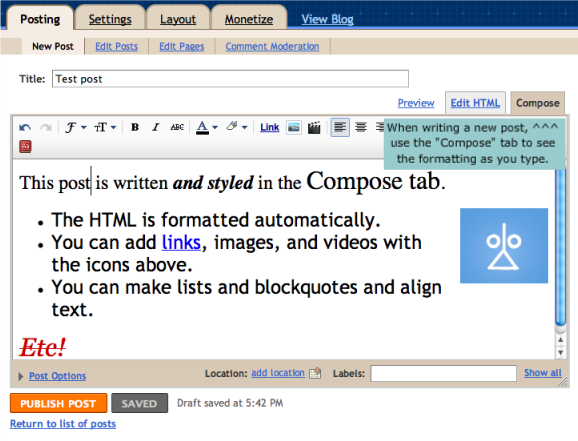
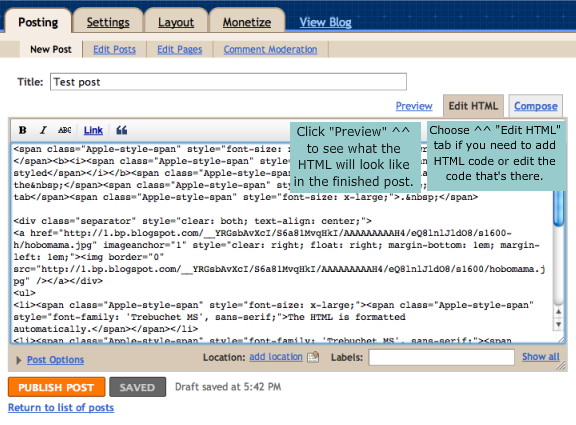
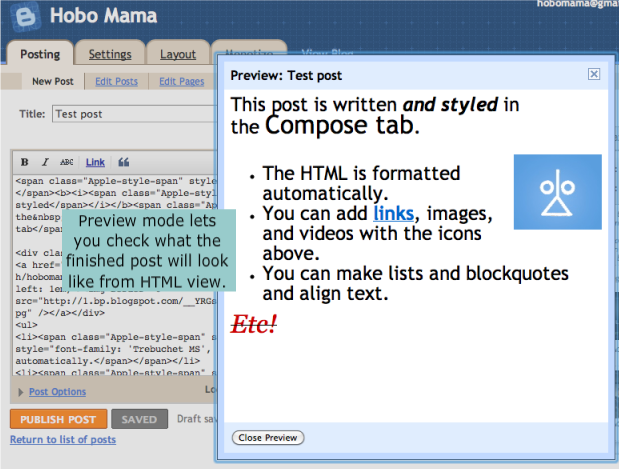
What the commenting options look like


Here is what each option looks like, first from the commenter's perspective on the comment form, and then live once published. (Your comment form might look different, depending on which form option you chose, but the permissions options will be the same.) In these examples with the comment form, I've selected option #4 up above, allowing all users, including name/URL and anonymous. If you've selected a more limited option, you simply won't see the extra options on the comment form, and Blogger will give a special message if only Google accounts are permitted to let commenters know that anonymous comments are not allowed.


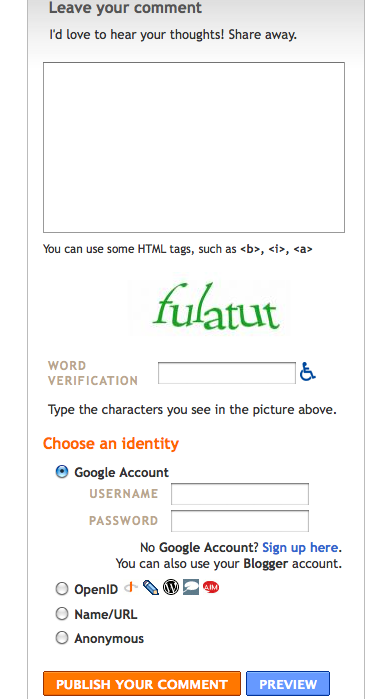
The first option is to use a Blogger/Google account. (This is the only option you'll see for #1 and #2 in the permissions options above, and this option will remain visible for #3 and #4.) Commenters can sign in on the comment form; if they're already signed in, their Google profile name will already show up in place of the username/password sign-in section and they can opt to sign out if desired.

Live, the comment will show the display name they chose for their Google/Blogger profile, as well as any avatar they uploaded, and it will link to the profile. The profile can then direct a reader to the commenter's blog and other information. Here's what it looks like in action:


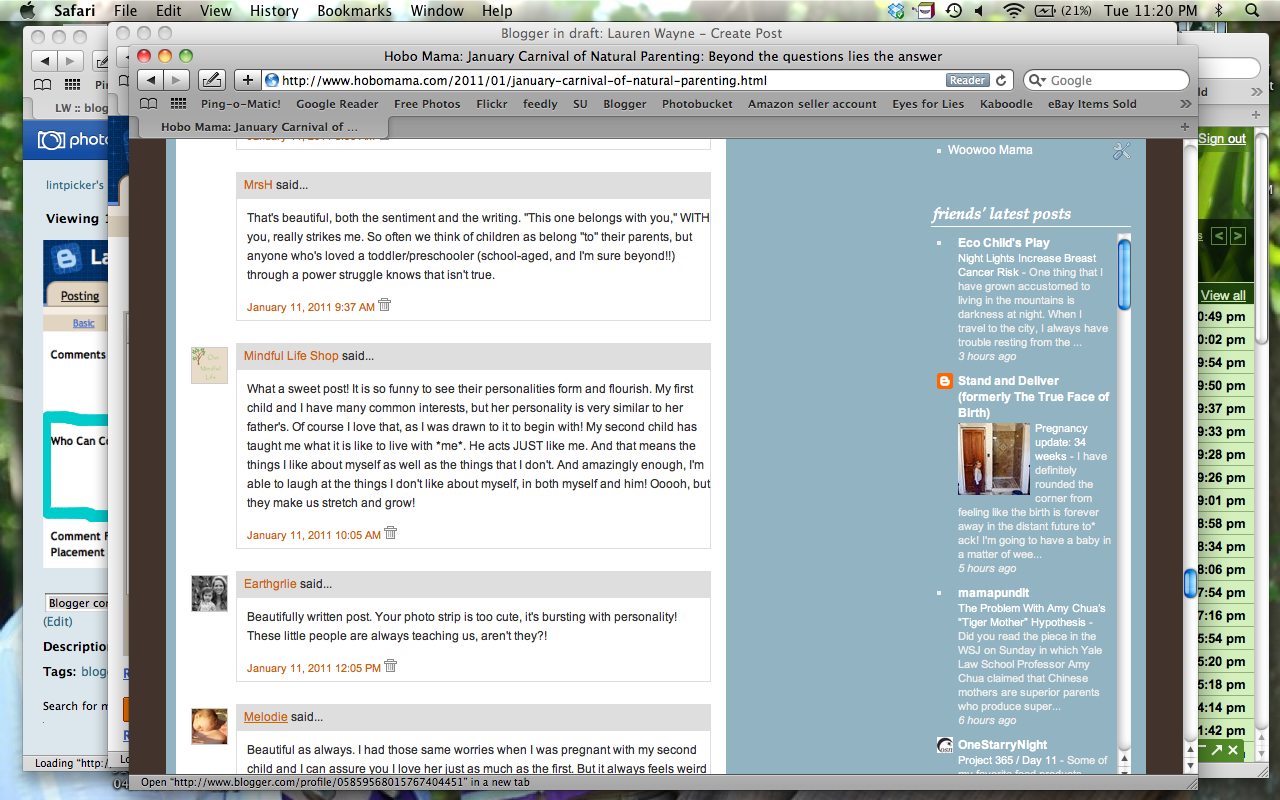
I was hovering my mouse over the link, so the linked profile is shown in the bar along the bottom.


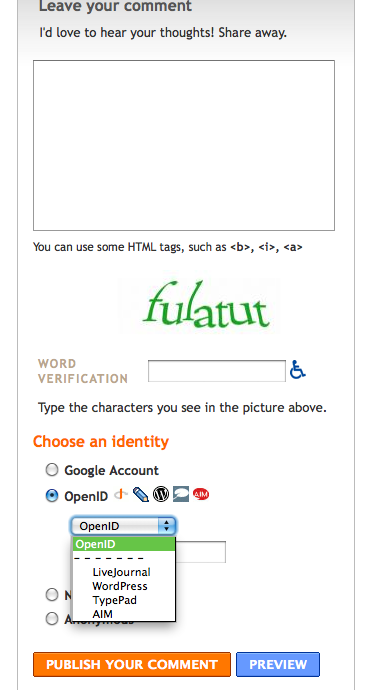
As mentioned before, OpenID allows commenters to sign in with LiveJournal, WordPress, TypePad, or AIM. (This corresponds to permissions option #3 as well as #4 from above.)

Here's what an OpenID comment looks like online:


You can see the OpenID icon next to the person's name, and that their registered website is linked up.
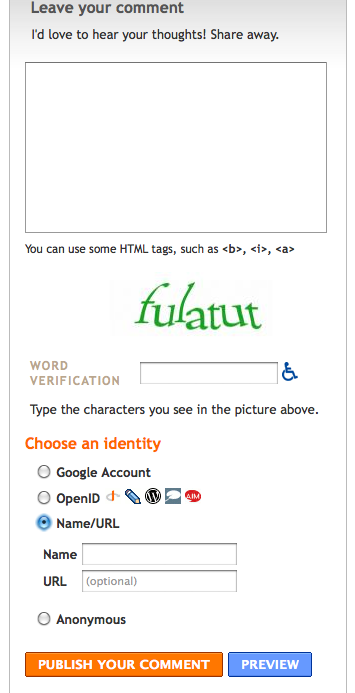


This is the Name/URL option. Entering a URL is optional. Therefore, a person can comment, for all intents and purposes, anonymously using this option by entering a name (or pseudonym) in the Name field but no URL below. (This you will see only with permissions option #4 above.)


This is what name and URL look like published. The name for the commenter shows whatever the commenter has entered in the Name field, there's no avatar associated, and the linked site is whatever was entered into the URL field. Again, commenters can choose not to enter a URL, in which case the name would show up without any link, similar to Anonymous below.


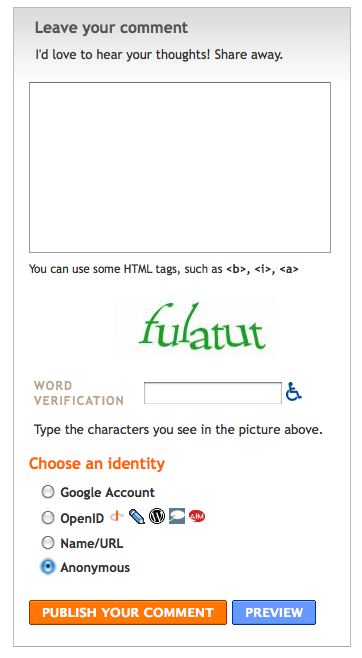
This is the completely Anonymous option. No information is taken from the commenter at all. (This also you will see only with permissions option #4.)


This is what an anonymous comment looks like. As you can see, there's no linking at all, and it's fully anonymous. Name/URL comments without a URL will look the same, with whatever name was entered into the Name field in place of "Anonymous."


Pros and cons of the four options


You have to consider your own comment policy when choosing your permissions options. How open or restricted do you want your blog to be to commenters?

I'll go through each of the four options and describe why you might choose each.
  1. "Only members of this blog" — This would be useful, as far as I can see, only on a private or semi-private group blog — for instance, if you started a blog so that a group could share ideas with each other, or if your family had a blog where each member could post pictures and updates but you weren't inviting public exposure. You will obviously limit the comments you receive, because no uninvited outsiders can comment at all. This can be useful if you want to keep discussion limited to team members.
  2. "Users with Google Accounts" — This is a good option if you want to have a safeguard up for who can comment. It's likely to keep the laziest spammers and trolls away, because it requires signing into an established Google account. However, it doesn't guarantee that you as the blogger will know where commenters are coming from; Google profiles can be marked as hidden. For commenters who have their own sites, it doesn't give as much instant gratification in terms of linking to their blogs, because it's a two-step process: Click on profile link, then click on the website from the profile (if linked there). Google profiles aren't that customizable, either. A plus for commenters is that many, many people have Google accounts now, so it's likely they'll already be signed in to one, making commenting straightforward. It will, however, exclude anyone who doesn't have a Google account and doesn't want to create one, or who doesn't want the Google account publicized, even with a hidden profile.
  3. "Registered Users - Includes OpenID" — OpenID allows bloggers from other platforms to log in as authorized users and leave a comment. This will give some traceability to comments, which again reduces the likelihood of spam or troll comments. A downside for commenters is that OpenID isn't as readily understood as the other commenting options. Because it goes to an extra page for logging in, there can be fear (sometimes justifiable) that a comment draft will be lost before the log-in process is completed (or if it cannot be completed, due to a mistyped password or the like). It also doesn't allow for personalized avatars next to the commenter's name, just the default OpenID icon.
  4. "Anyone - Includes Anonymous Users" — This, the most open of all the commenting options, will greatly please bloggers who wish to have a clear link to their own website, and will also relieve genuine commenters who don't have a handy account to log into to comment. However, it also opens you up to the most troll and spam comments, due to the ease of the anonymous functions. See below for some further thoughts on this. Some blogs might be conducive to supporting anonymous commenters, such as if you regularly write about sensitive subjects and wish for there to be frank conversation, if you want numbers of commenters over quality of discussion, or if you want ease of quick and repeated commenting, such as for a giveaway site. (Again, setting your comment policy will help you determine your own goals.) You will probably attract the most commenters with this option, because it allows for the easiest commenting and the most possibilities for commenters to choose from.

Here's my opining on the four options. I used to allow #3, the Registered Users option with OpenID. However, I eventually switched to #4, for the purpose of allowing Name/URL comments. However, I dislike that I can't turn off anonymous comments separately. I feel like there should be an option before #4 that allows a WordPress-like comment option (name and email address required, with URL as an optional field), but no anonymous users. Sure, trolls and the like could still enter a fake or unused email address and a pseudonym (or "anonymous"), but at least they'd be traceable to some extent, and the accountability would, I think, cut down on the nasties.

I'd also like to be able to track and manage IP addresses from commenters, so that I can block repeat offenders, whitelist the good guys, and identify problem commenters from the back end.

(As we're making our wish lists, take a second to vote on Blogger ideas you like best, and let's cross our fingers they're implemented soon!)

If you are in the same boat of wanting to open your blog to the most commenters you can but would rather avoid spam and trolls, there are a few actions you can take, in rough order from most difficult to easiest:

  1. Switch to WordPress or an alternate blogging platform. This isn't a sarcastic joke; I know people who have switched for the comments alone. For me personally, it's not worth it. I'm comfortable with Blogger — to the extent that I switched this blog from WordPress. But switching to WordPress would indeed give you WordPress-like commenting features!
  2. Install an alternative commenting system. The two I know of for Blogger are Disqus and IntenseDebate. I went back and forth on the idea of one or the other, and even tried them out on a test blog, but they both had their drawbacks as well. Also, you'll want to be fairly confident with fooling around with your template's html and other settings if you want to install outside comments (which means you're probably not reading my tutorials, see?). For now, I'm sitting tight and waiting for Blogger to improve…
  3. Heighten your moderation of comments in Blogger. The good news is, Blogger has finally implemented a spam filter, so many spam comments are indeed caught in that net now (not all, but the most obvious and offensive ones generally are). You can add to your defenses by going to Dashboard --> Settings --> Comments again and scroll down to the sections marked "Comment moderation" and "Show word verification for comments?" I'll go through these options more thoroughly in a future post, but for now, just know that you can choose whether comments post automatically, or whether you get to review them ahead of time (either in email or in your main Comments tab). Know, too, that you can at any time delete a comment that doesn't square with your policy, and you can mark spam comments as such to improve the filtering over time. For word verification, you can choose whether commenters must type in a random "word" to comment, as seen in the comment form screenshots above. This greatly cuts down on the amount of automated robo-spam. You can also turn off comments entirely on certain posts, such as after a determined number of days or if you're receiving more spam than usual on particular posts. There are pros and cons to all these comment moderation choices, so I'll discuss that in more detail later. Basically, the fewer restrictions you have, the easier it is for people to comment, and the more freely they are likely to comment. This includes genuine readers with insightful things to say — and spammers selling you their latest pills, as well as mean anonymous types swooping in to flame you and scurry. It depends, again, on how open you wish to be, what environment you want to cultivate on your blog, and how hands-on you want to be about your comment moderating.


So, those are the current options Blogger has for allowing types of comments. Here's hoping for even more options in the future!

What commenting options have you enabled on your blog, whether on Blogger or another platform? What commenting options make you most likely to comment?

6.02.2010

Install the DoFollow Plugin for Wordpress

Today I would like to welcome Tom (aka CodeNamePapa), who has written a guest post about how to give your fellow bloggers and Carnival participants a little link love on your site. Tom is an IT guru, and he is one half of the natural parenting duo responsible for one amazing son. You can normally find Tom's wife Dionna over at Code Name: Mama where she shares information, resources, and her thoughts on natural parenting and life with a toddler.

[Editor's note: If you are a Blogger user, stay tuned for a follow-up post on DoFollow for Blogger.]

Hello. I'm here to talk about something you may or may not spend a lot of time thinking about: the inner workings of your comments' links for self-hosted Wordpress sites.1

I could make this the shortest guest post ever and simply say, "Do your commenters a favor and install the DoFollow plugin from Semiologic." But, since I enjoy being "a tech nerd" (or whatever Dionna calls me) I've written plenty more on the subject at hand — if you'd like to have some background information (or don't want to install plugins willy-nilly) please read on.

NoFollow vs. DoFollow for Wordpress blog comments


I'm going to break this post up into three sections:
  1. How do Google's bots search/scan my site, and what is PageRank?
  2. What is NoFollow?
  3. What is DoFollow?

1. Google bots & PageRank:

In a nutshell, part of how Google and other search engines work is as follows:
  • Google has computers (aka "bots") set up to scan the internet for new pages and content.
  • Eventually, a bot will scan your site.
  • Once the bot has seen enough, it will use the links it finds and skip to the next page/article/site to scan.
  • The bot uses links that may be pointing internally to your own site or they may point externally to someone else's site.
"PageRank" is Google's algorithm that determines how important/popular your site is.2 A small part of the formula involves how many pages link to YOUR page. For example, if you have a brand-new site, you'll have low PageRank because no one else knows about your site yet. Older sites or sites that everyone knows about will have higher PageRank because they have more content, and more sites link to that content.

The description above is super-simplified and not a complete explanation of how it works (no one actually knows how it works — except maybe Morpheus), but for this post it will suffice in order to explain the next two points.

2. What is NoFollow?

NoFollow was created about 5 years ago to combat comment spam. Since it was implemented, the default Wordpress setup adds a "nofollow" attribute to any links in a comment. As a search bot reads through your site, it will see the links in comments — but once it sees rel="nofollow" it will ignore the link and move on.

The benefit of this is that should spam comments exist on your site, Google won't use those spammy links as evidence that the spam site has important content, and the spam site won't have its PageRank raised. Why does that matter? Because if a spam site has high PageRank, it could conceivably start appearing higher on a search results page when YOU use Google to find something. I think we can agree that it's a good thing for spam sites not to be boosted in search results.

NoFollow keeps the web a little safer by not rewarding spammers for getting their links displayed on your site and scanned by the search bots. This page — http://codex.wordpress.org/Nofollow — does a lot better job of explaining it in-depth.

You may be wondering, "What about real sites from real people? Shouldn't real sites from loyal readers experience the benefit that a link on my site would provide?" This is where the Do Follow plugin comes in.

3. What is DoFollow?

A link that is considered "dofollow" (i.e. a link that does not have a "nofollow" tag) would tell the Google bot "follow this link and have fun crawling that page, too." The link itself doesn't need to say rel="dofollow" — the bots will follow any link unless it's told not to (i.e. unless the link says rel="nofollow").

What plugin do we recommend to get rid of "nofollow" in comment links? We are using the Do Follow plugin from Semiologic. The plugin simply strips the "nofollow" tag from links in comments, thereby making that link "Do Follow" just like any links you'd place within your own content.

Further explanation can be found on Semiologic's site. You can install the plugin from your Wordpress Admin panel (Plugins, Add New, search for "Do Follow", and Install).

4. Don't Let Spammers Off So Easily

By using the DoFollow plugin, there is a slight risk that a spam link could be scanned by a search bot. Of course, there are additional steps available to keep this from ever happening.

One step is to configure Wordpress to hold all comments for moderation — this means you will sort out manually what comments are spam and which are real. You can also configure Wordpress to automatically approve a comment if that commenter has gotten a comment approved previously (these options are available in your Wordpress Admin screen under Settings, Discussion).

The best way to do the bulk of comment filtering is with the Akismet plugin. It's a tool that has saved us from countless hours sifting through comments to decide which are real and which are spam.

How do you install Akismet? Well, once Wordpress installs, Akismet is already installed, too! All you have to do at that point is activate Akismet from the plugins panel. If you are a Wordpress.com user (meaning they host your site for you) Akismet is running in the background 24/7 without your having to do anything.

Give a Little Link Love to Fellow Bloggers


By installing the DoFollow plugin (or similar), you are giving a little bit of link love to bloggers who take the time to leave comments on your site. Will it encourage people to comment? Probably not3 — but it's one small way you can thank those who provide feedback on your writing.

Have you installed DoFollow or a similar program? Have you noticed any differences?


1 If you are a Wordpress.com user (you host your site through Wordpress.com rather than just using their blogging software on your own privately-owned site), it does not look like you can install plugins of this type.
2 To see what your PageRank is, just visit the PageRank Checker.
3Although you can find various badges and lists to advertise yourself as a DoFollow blog if you think it would inspire your readers.

4.07.2010

How to schedule a post and get its permalink in WordPress

Dionna of Code Name: Mama and I are writing a few blogging tutorials of particular use for our Carnival of Natural Parenting participants. Today I would like to welcome Tom & Dionna, who have written a guest post about scheduling a post in Wordpress and figuring out what its URL will be, to help in posting to the carnival and emailing us the link. Tom is an IT guru, Dionna is a lawyer turned work-at-home mama, and together they form the natural parenting duo responsible for one amazing son. You can normally find Dionna over at Code Name: Mama where she shares information, resources, and her thoughts on natural parenting and life with a toddler.

Here is a tutorial on how to schedule a post in Wordpress and figure out what its permalink (URL) will be (this post complements Lauren's earlier post for Blogger users on figuring out a post URL in advance and scheduling a post in Blogger).

*This tutorial assumes your permalinks are in date and/or title format.

These tips will come in handy if you want to:

  • have your carnival entry post at a certain time while you're not otherwise available
  • email us the post URL in advance (such as when using the carnival's monthly Google form)


How do I schedule a post?

Before you can determine what your permalink will be, you must schedule your post. If you try to get the permalink before scheduling the post, your permalink will be incorrect. Here are the steps to schedule your post:

1. Add a new post:

1-1-AddNew

2. Edit scheduling.

This is the important step — to get your permalink with the correct date and title, you have to schedule this post for the date you want it to publish. Click "Edit" (next to "Publish immediately") to start this process.

1-2-Edit_Scheduling

3. Confirm the date.

Put the correct date/time in place for your post to publish, then click OK to confirm. For example, if you are scheduling a post for the Carnival of Natural Parenting, the Carnival is always live on the second Tuesday of each month.

1-3-Confirm_Date


How do I determine what my post's permalink will be?


4. Title the post.

Go ahead and title your post now. Your post title can be edited later if need be, but know that doing so will also change your permalink.

1-4-Title_Post

5. My permalink is wrong!

As you type, your permalink will auto-fill underneath the title window - but wait! That permalink has the wrong date! We'll fix this in Step 6...

1-5-Permalink_Wrong

6. Save the draft.

Saving the draft will update the permalink with the correct "date" and title embedded.

1-6-Save_Draft

7. My permalink is now correct!

Check it out, the permalink updated with the "correct" date — the one you specified in your Scheduling window.

1-7-Permalink_Correct

8. Overview screenshot.

At this point, here's a shot of my test post — notice the permalink is right, the "Schedule For" area shows the correct time, etc. Click this image for a full-size view.

1-8-Final_Picture

We hope that was helpful! If you have any questions or need clarification, please leave a comment or contact Dionna and Tom directly at Code Name: Mama.

4.06.2010

How to schedule a post in Blogger

UPDATE! Blogger has a new scheduling function and layout. See this updated post for more information and a how-to.

Dionna of Code Name: Mama and I are writing a few blogging tutorials of particular use for our Carnival of Natural Parenting participants. This one will help in scheduling your article to post on Carnival day!

Here's a little tutorial on how to schedule a post in Blogger (Blogspot) for a specific time and day.

This is useful if you want a post to go live at a certain time but will not be available to hit the publish button yourself (such as if you want your Carnival post to go live just after midnight but you'll be asleep by then).

It can also help your blog maintain a businesslike image if you schedule all or certain important posts to go live at a predictable time each day or week (such as a giveaway linky that readers can count on to show up at 9:00 a.m. each Thursday, for example).

(Note to my Carnival friends: You do not have to schedule your post; it's just a how-to in case you want to for your own convenience.)

1. Click on "Post Options" at the bottom of the posting box.

You can click on any of these pictures to see them bigger.


Before you schedule, make sure your post is exactly the way you want it to go live. Use the "Preview" function that's next to "Edit HTML" at the top of this box. There's more info on using "Preview" in this post on editing HTML in Blogger.

If everything looks good? Then click "Post Options" to expand the drop-down options menu.

2. Click on "Scheduled At" to show the schedule box.


The default is "Automatic," which posts at the date and time you click "Publish Post."

However, you can choose your own posting date and time by clicking "Scheduled At." It will drop down a new box.

3. Fill in your preferred date and time.


To schedule a post, fill in the date and time you want your post to go live — for instance, 12:01 AM on the carnival day as a suggestion!

For U.S. English(-language) settings, at least, the formatting is "(M)M/DD/YY" for the date and "(H)H:MM AM/PM" for the time. (Note: The time zone is whatever your settings are set at. You can change the time zone at Settings --> Formatting --> Time Zone.)

Then click "Publish Post." Now your post is scheduled! It will go live at the time you scheduled.

4. Receive a confirmation that your post is scheduled.


Once you click "Publish Post," you will be rerouted to the "Edit Posts" page.

There will be a highlighted confirmation at the top telling you your post will be published at the date and time you specified. Check that it's correct.

In the list of posts, your scheduled post will have "scheduled" next to the date. Again, make sure the date is correct.

If you need to make changes, click on "Edit Post" and repeat the steps. Make sure to click "Publish Post" again if you want to reschedule. If you click "Save as Draft," it will unschedule your post and save it instead.

5. My version of Blogger looks different!


If you have an older version of Blogger, it will look something like this instead:


It's actually just as easy or even easier to schedule in the older version. Once you click on "Post Options," you'll automatically see the date and time boxes. Just fill in your preferred date and time and click "Publish Post" to schedule.

(Note: You can switch to the Updated Editor under Settings --> Basic --> Select post editor.)

Warnings about scheduling your post

  • Be careful that your post is completely ready. Use the Preview function (at the top your post box next to "Edit HTML") to make sure everything will look the way you want it to when it goes live if you won't be around to check and make changes.
  • If you want to edit your post in any way before the scheduled date, you must click "Publish Post" again when you're done to reschedule the publishing. If you change your mind and don't want it to publish automatically, however, you can click "Save as Draft" instead. That will switch it to the usual draft form.

Convert your time zone for deadlines

Dionna of Code Name: Mama and I are writing a few blogging tutorials of particular use for our Carnival of Natural Parenting participants. This one will help in making sure you get your carnival submission in by the right time, no matter where in the world you live!


All right, this is probably one of the lighter tutorials for our carnival participants, but it does come up every month, and I might as well have a blog post to point people to.

All the writers outside of the Pacific time zone I set the deadline for want to know: When is the article due in their time?

This tutorial can also help anyone who's writing for an editor across time-zone lines or entering a contest with a firm deadline.

Submissions for the Carnival of Natural Parenting are due by 11:59 p.m. Pacific time. Now, I'm not encouraging anyone to wait until the very last second to turn their entries in (although I generally do just that), but it's good to know the latest you can click "send" on the email, isn't it?

But if you live nowhere near Pacific time and can't do the math in your head:

You need a time zone converter.


Here's one:

World Time Server


The top line is showing you 11:45 p.m. (Daylight Saving Time) for Pacific time, the time zone I chose, because I live in Seattle. I wanted as much time as possible to turn in my article. I'm like that.

Find your own country, city, or state in the drop-down menu where it says "In."

Voila! Now you know what your actual deadline is.

Here's a cheat sheet for some of our most common entry time zones, adjusted for 11:59 p.m. PDT. If I say "next day," that means that time on the date after the stated carnival due date (for this carnival, then, April 7).

Time Zone Adjusted Time
Hawaii Time 8:59 p.m.
Alaska Aleutian Time 9:59 p.m.
Alaska Time 10:59 p.m.
Pacific Time 11:59 p.m.
Mountain Time 12:59 a.m. (next day)
Central Time 1:59 a.m. (next day)
Eastern Time 2:59 a.m. (next day)
Atlantic Time 3:59 a.m. (next day)
Western Africa Time 6:59 a.m. (next day)
Greenwich Mean Time 7:59 a.m. (next day)
Central European Time 8:59 a.m. (next day)
Eastern European Time 9:59 a.m. (next day)
India Standard Time 12:29 p.m. (next day)
Western Australia 2:59 p.m. (next day)
Japan Standard Time 3:59 p.m. (next day)
Australia New South Wales Time 4:59 p.m. (next day)
New Zealand Time 6:59 p.m. (next day)

What time zones am I forgetting? I'll add places if you leave a comment with a request.

Hope that helps you as you plan your procrastination!

April 11, ETA: I realized you might like a chart for Eastern time as well, since some of our Carnival day deadlines are in Eastern. Here you go, a conversion of noon EDT!

Time Zone Adjusted Time
Hawaii Time 6:00 a.m.
Alaska Aleutian Time 7:00 a.m.
Alaska Time 8:00 a.m.
Pacific Time 9:00 a.m.
Mountain Time 10:00 a.m.
Central Time 11:00 a.m.
Eastern Time 12:00 p.m.
Atlantic Time 1:00 p.m.
Western Africa Time 4:00 p.m.
Greenwich Mean Time 5:00 p.m.
Central European Time 6:00 p.m.
Eastern European Time 7:00 p.m.
India Standard Time 9:30 p.m.
Western Australia 12:00 a.m. (next day)
Japan Standard Time 1:00 a.m. (next day)
Australia New South Wales Time 2:00 a.m. (next day)
New Zealand Time 4:00 a.m. (next day)

P.S. A Facebook comment from mamamilkers said about this post: "I think you made have just taken nerd to the nth degree ;)" I'll take that as a compliment...

Photo copyright © Jenny Rollo, who lives on Australia NSW Time

4.05.2010

How to edit HTML in Wordpress

Dionna of Code Name: Mama and I are writing a few blogging tutorials of particular use for our Carnival of Natural Parenting participants. Today I would like to welcome Tom & Dionna, who have written a guest post about editing HTML in Wordpress, to help in pasting the carnival code blurbs. Tom is an IT guru, Dionna is a lawyer turned work-at-home mama, and together they form the natural parenting duo responsible for one amazing son. You can normally find Dionna over at Code Name: Mama where she shares information, resources, and her thoughts on natural parenting and life with a toddler.

When you are writing posts in Wordpress (for example, when you are preparing your entry for the Carnival of Natural Parenting), it is often helpful to know how to edit in HTML. This tutorial (like Lauren's earlier tutorial on editing HTML in Blogger) will show you how to:
  • add HTML code to a post and
  • copy your post's HTML for use elsewhere.

How do I add HTML code?


Most people probably use the Visual tab for writing blog posts in Wordpress (if you use the HTML tab exclusively, this mini-tutorial is stuff you already know). Let's look at the basic steps for adding HTML code to a post.

1. Identify "Visual" or "HTML":

2-1-Visual_or_HTML-300x229

You know you're in the Visual tab if you have all of these extra formatting options that work like Microsoft Word. The HTML tab has very few options available.

2-2-Visual_Post

2. Write your post in the "Visual" tab. Once you've got your post written and saved, it's time to insert the HTML code.

3. Switch to the "HTML" tab:

2-3-Switch_to_HTML

4. Paste your HTML code.

This is the screen where you can add in HTML code. Simply navigate to the area of the post where you want to insert the code and paste it in.

Let's say, for example, that you have received the intro blurb for this month's Carnival of Natural Parenting from Dionna (at Code Name: Mama) and Lauren (at Hobo Mama). The intro blurb should go at the very top of your post, so copy the code from the Carnival email, position your cursor at the beginning of the post, and paste. Voila!

If you have the ending blurb (the list of all of the Carnival participants), you'd copy and paste that at the very end of your post. Easy peasy.

A helpful hint: if you are copying HTML code from a Word document, then you are also copying all of Word's weird styling and formatting code automatically. Instead of copying and pasting straight from Word, copy it, paste it first into Notepad, TextEdit, or a similar simple text editor, then copy and paste from Notepad into Wordpress. Notepad does not retain any styling/formatting code, and Wordpress will be happier.

2-4-Paste_Code

5. Save the draft.

Before you switch back to the Visual tab to see how pretty everything looks, you should save your draft.

A word of warning: Wordpress doesn't always "work right" when you switch between Visual and HTML and go back-and-forth and switch it more and more. We don't know why. Our advice would be to switch between them, make your changes, and then "Save Draft" prior to switching back to the other tab. Without doing this (who knows why) Wordpress will "lose" the code you just typed/pasted in HTML, or it won't display your text the way it was formatted in Visual.

2-5-Save_Draft

6. Preview before you Publish.

Once it's saved, feel free to check out the Visual tab, or "Preview" your post to see how it will look on your site.


How do I copy my post's HTML code for use elsewhere?


There are at least two instances that we can think of that it would be helpful to copy/paste a blog post.

First: if you have written a long post and want to split it into several smaller pieces, you are more likely to retain all of your formatting by copying and pasting from the HTML tab rather than from the Visual tab.
Second: if you are submitting a guest post to another site, it is customary to send your post in HTML format.

And it's really quite easy. Just write and save your post, switch to the HTML tab (see Step 3 above), hit "Control + A" ("Control" = "Command" in Mac) to select all of your text, "Control + C" to copy it, and then paste it (either into an email or a Notepad document).

We hope that was helpful! If you have any questions or need clarification, please leave a comment or contact Dionna and Tom directly at Code Name: Mama.

4.03.2010

How to determine your Blogger post URL in advance

UPDATE! Blogger now allows users to view and edit their permalinks. See this updated post for more information and a how-to.

Dionna of Code Name: Mama and I are writing a few blogging tutorials of particular use for our Carnival of Natural Parenting participants. This one will help in determining your post URL in advance!

Here's a little tutorial on how to determine your post's link in Blogger (Blogspot) before you've published a post. This is useful if you want to figure out ahead of time what your URL will be once you've published. There's also a trick to choosing your own post URL, which I will share at the end.

(Note to my Carnival friends: You do not have to do this; it's just a how-to in case you want to — for instance, if you'll be busy on the morning of the Carnival and want to get sending us the post URL taken care of in advance.)

Let's take a look at how this works.

The title of this post is "How to determine your Blogger post URL in advance," but here's the post URL:
http://www.laurenwayne.com/2010/04/determine-blogger-post-url-in-advance.html

The post URL is the address of the specific post. It's what shows up in the address bar at the top of your browser when you've clicked on a post's title in a blog (not just on the blog's homepage, or the URL would look just like: http://www.laurenwayne.com).

In some blogging platforms, you can view your post URL in advance and edit it to be what you want. In Blogger so far, nuh-uh. It seems to be a change that's a-coming, but till then — we have to make do.

What you have to understand is the rules behind how Blogger creates the URL. Then you can:
  • know what your URL will be ahead of time
  • actually choose what your URL will be, if you so desire (say, to increase SEO)

How Blogger determines your URL


Blogger takes whatever you type into the Title box at the top of your post and creates the URL from that.

Your URL will have these parts:
http://[blog URL]/[year]/[month as two digits]/[post title up to 39 characters].html

See the parts again here:
http://www.laurenwayne.com/2010/04/determine-blogger-post-url-in-advance.html
http://[blog URL = www.laurenwayne.com]/2010 [year]/04 [month]/determine-blogger-post-url-in-advance [37 characters, including the hyphens] .html

Here is an online character counter to help you determine how many characters your title is:
http://www.javascriptkit.com/script/script2/charcount.shtml

Blogger's URL rules:

  • Blogger takes up to the first 39 characters.
  • The 39 characters includes spaces, which it changes into hyphens.
  • Blogger ignores the words "the," "a," and "an."
  • Blogger ignores punctuation, such as colons, commas, or dashes. (Hyphens, however, are retained as hyphens.)
  • If 39 characters would cut into the middle of a word, Blogger stops before that word.
  • If you've used the exact title before in that month, Blogger will follow the same rules for the post title but then append an underscore and a two-digit number to the end of the duplicate, such as "_07" or "_20" to distinguish them. This doesn't come up a whole lot, but I wanted to mention it since sometimes it does. For instance, if you do a Wordless Wednesday every week with the title "Wordless Wednesday" alone, Blogger will add an underscore and two-digit identifier to the subsequent posts with that same title. The underscore and numbers can go over the 39-character limit. (You can see an example here, from a post I double-imported by accident, but that's a tutorial for another day...)
So here are a couple other samples of how Blogger would create a post URL:
  • The post title of "How to determine your post URL in Blogger" would become http://www.laurenwayne.com/2010/04/how-to-determine-your-post-url-in.html (The word "Blogger" makes it 41 characters, so the URL would stop beforehand.)
  • A post title of "The way to determine your Blogger post URL in advance" from November 2008 at laurenwayne.blogspot.com would become http://www.laurenwayne.blogspot.com/2008/11/way-to-determine-your-blogger-post-url.html ("The" is dropped, and "in advance" is over the character limit.)

(If you are a Carnival participant and just wanted to know how to determine your post URL in advance, you can stop here. Whatever title you've chosen, just count the number of characters, including spaces but leaving out "the" and "a," and stop when you get to 39. Then cobble together the other elements of the post URL, and you can email that to us. Again, you don't have to do this. I know it's complicated and messy, so don't feel obligated to figure it all out. I'm only putting the information out there in case you want to for your own reasons.)

Now, for anyone who likes this sort of thing — if you want a different post URL from your post title, as I have? Read on.

Choosing your own URL

Now, you'll note that the title of my post: "How to determine your Blogger post URL in advance" doesn't match my post URL: http://www.laurenwayne.com/2010/04/determine-blogger-post-url-in-advance.html

That's because I've chosen to optimize my post title in this case to make it more attractive to search engines. (Or so I think...)

If I had let Blogger auto-create the post URL from my preferred title, it would have been http://www.laurenwayne.com/2010/04/how-to-determine-your-blogger-post-url.html and I would have lost the "in advance" part. I decided that was more important than the "how to" or the "your."

To force Blogger to create the URL I want, I follow this process:

  1. I figure out what the best use of my 39 characters would be.
  2. I put those 39 characters into my post title box: Determine Blogger post URL in advance
  3. I publish the post and check that the URL worked as I'd hoped. (Cross your fingers!)
  4. If all is well, I quickly go back in to the edit the post and change the title to my preferred title: How to determine your Blogger post URL in advance
  5. I hit Publish again, and now I have the right title and my preferred URL.

Downsides of creating your own URL that doesn't match the post title?

You have to go back in and change the title to be what you want it, tout de suite.

Regardless, anyone who's signed up for an email subscription will automatically receive the "wrong" title. People who access your blog in readers or through your website will see the updated title as soon as you correct it. I like to put the correct title at the top of the post, both for ease in grabbing it to paste into the title box quickly, and so that email readers will get the right title somewhere.

If you have an automated service that, say, Tweets your RSS feed whenever something posts, it will likely also grab the wrong title unless you are really fast at updating the title.

So it's a little messy, but that's the price you pay (for Blogger's shortsightedness...). Let's hope Blogger will eventually catch up on this issue and let us view and edit our post URLs in a much more streamlined fashion!

(I read somewhere that it's supposed to be a feature of Blogger in Draft right now, but it's not working for me, and I've been working in Draft view for months. Sigh...)

3.21.2010

How to edit HTML in Blogger

Dionna of Code Name: Mama and I are writing a few blogging tutorials of particular use for our Carnival of Natural Parenting participants. This one will help in pasting the Carnival code blurbs!

Here's a little tutorial on how to edit HTML in Blogger when you're creating or editing a post. This is useful if you want to:

  • add HTML code to a post,
  • edit specific HTML code,
  • or copy your post's HTML to use elsewhere.


If you're used to creating your posts in the Compose mode in Blogger, you're used to a WYSIWYG (what you see is what you get) experience, and you don't need to know HTML — Blogger automatically codes everything for you.

But it's easy to switch to HTML view if you need to.

(Click on the images to see them larger.)


Check the tabs at the top of your post box. If you're in Compose mode (you can tell if it's in the darker tan and not underlined), whatever you type will be formatted as if you're typing into a word processor. You can add formatting like bold and italic, insert images and videos, format alignments and lists, and perform tasks like spell check.

But if you need to see or edit the HTML, click on the underlined "Edit HTML" to switch tabs.


In Edit HTML mode, you can view the HTML code. If you know how to edit HTML, go for it! If you don't but have an HTML blurb you want to paste in, just search for the location you want it to go and paste it in. To make sure it all looks the way you want, either switch back to Compose mode or click on Preview.


Preview will give you a glimpse of what the code will look like in the finished post.

You can see it looks basically the same as in Compose mode. If you have a standard template, though, Preview is actually more helpful than Compose for getting a sense of what your post will look like, because the box will be constrained to your template's width and it will use your template's default font. That way it's easier to make sure images are where you want them, for instance. You can click Preview from either Edit HTML or Compose.

Hope that helps! Leave a comment if you have any further questions and I'll try to make things clearer.

For more information, check out Blogger Help's overview of the post editor.
Related Posts Plugin for WordPress, Blogger...