
UPDATE! Blogger has a new scheduling function and layout. See this updated post for more information and a how-to.
Dionna of Code Name: Mama and I are writing a few blogging tutorials of particular use for our Carnival of Natural Parenting participants. This one will help in scheduling your article to post on Carnival day!
Here's a little tutorial on how to schedule a post in Blogger (Blogspot) for a specific time and day.
This is useful if you want a post to go live at a certain time but will not be available to hit the publish button yourself (such as if you want your Carnival post to go live just after midnight but you'll be asleep by then).
It can also help your blog maintain a businesslike image if you schedule all or certain important posts to go live at a predictable time each day or week (such as a giveaway linky that readers can count on to show up at 9:00 a.m. each Thursday, for example).
(Note to my Carnival friends: You do not have to schedule your post; it's just a how-to in case you want to for your own convenience.)
1. Click on "Post Options" at the bottom of the posting box.
You can click on any of these pictures to see them bigger.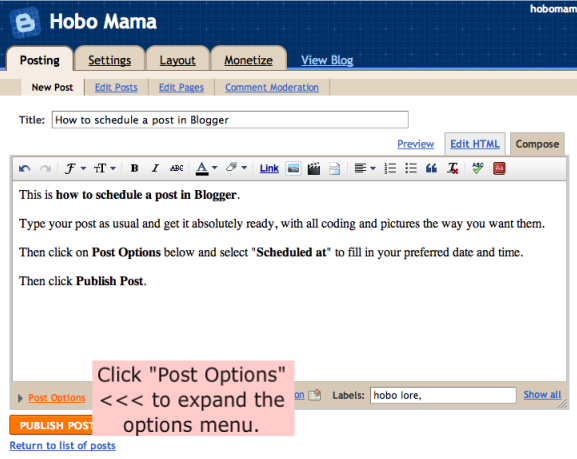
Before you schedule, make sure your post is exactly the way you want it to go live. Use the "Preview" function that's next to "Edit HTML" at the top of this box. There's more info on using "Preview" in this post on editing HTML in Blogger.
If everything looks good? Then click "Post Options" to expand the drop-down options menu.
2. Click on "Scheduled At" to show the schedule box.
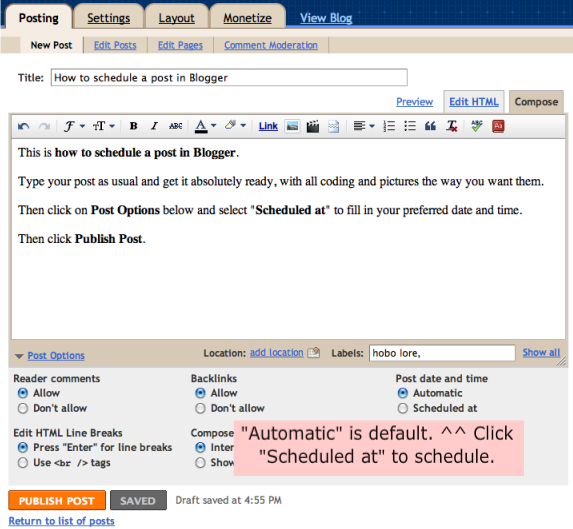
The default is "Automatic," which posts at the date and time you click "Publish Post."
However, you can choose your own posting date and time by clicking "Scheduled At." It will drop down a new box.
3. Fill in your preferred date and time.

To schedule a post, fill in the date and time you want your post to go live — for instance, 12:01 AM on the carnival day as a suggestion!
For U.S. English(-language) settings, at least, the formatting is "(M)M/DD/YY" for the date and "(H)H:MM AM/PM" for the time. (Note: The time zone is whatever your settings are set at. You can change the time zone at Settings --> Formatting --> Time Zone.)
Then click "Publish Post." Now your post is scheduled! It will go live at the time you scheduled.
4. Receive a confirmation that your post is scheduled.
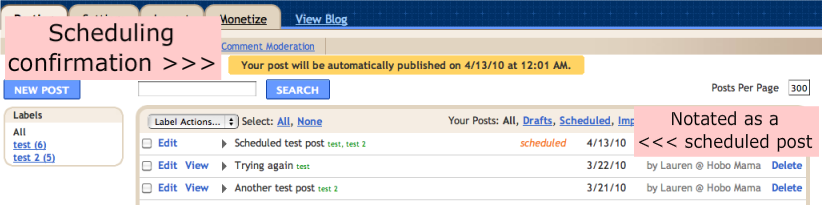
Once you click "Publish Post," you will be rerouted to the "Edit Posts" page.
There will be a highlighted confirmation at the top telling you your post will be published at the date and time you specified. Check that it's correct.
In the list of posts, your scheduled post will have "scheduled" next to the date. Again, make sure the date is correct.
If you need to make changes, click on "Edit Post" and repeat the steps. Make sure to click "Publish Post" again if you want to reschedule. If you click "Save as Draft," it will unschedule your post and save it instead.
5. My version of Blogger looks different!
If you have an older version of Blogger, it will look something like this instead:
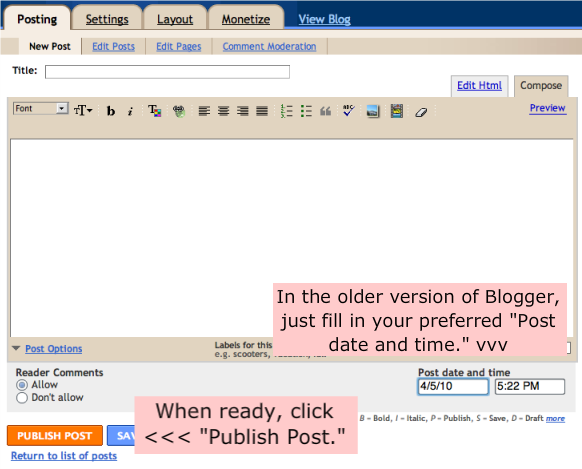
It's actually just as easy or even easier to schedule in the older version. Once you click on "Post Options," you'll automatically see the date and time boxes. Just fill in your preferred date and time and click "Publish Post" to schedule.
(Note: You can switch to the Updated Editor under Settings --> Basic --> Select post editor.)
Warnings about scheduling your post
- Be careful that your post is completely ready. Use the Preview function (at the top your post box next to "Edit HTML") to make sure everything will look the way you want it to when it goes live if you won't be around to check and make changes.
- If you want to edit your post in any way before the scheduled date, you must click "Publish Post" again when you're done to reschedule the publishing. If you change your mind and don't want it to publish automatically, however, you can click "Save as Draft" instead. That will switch it to the usual draft form.


9 comments:
Thanks for the info! Just an addition, for any carnival participants:
If you have to enter a code for your carnival, be sure to put it in the "Edit HTML" section, as it sometimes won't read it right otherwise. I've noticed some codes work in the regular edit board, but others don't and it's just easier to do it this way.
Ah, we anticipated your need!
How to edit HTML in Blogger: http://www.laurenwayne.com/2010/03/how-to-edit-html-in-blogger.html
Thanks for pointing that out, because it's very important.
I think I'll work on adding a little tutorial round-up to each tutorial, because I don't yet have a central place for them all. Thanks for reminding me!
Lauren, you saved my day! :) Thank you for this post!
Dude! I never would have noticed that little 'post options' menu. Thanks.
This was so helpful...Thank you Lauen you are a star! x
This information is either incorrect, or blogger have changed the format since this artice was posted. I'm from the UK and if you try to enter the date as: (M)M/DD/YY as you suggest, you get a red error message telling you that the date format should be: DD/MM/YY. You also get the same message if you try to enter AM/PM in the time.
I've tried twice now to publish a post, and it just doesn't do it. I've made sure I've got my timezone set correctly, but still no luck
Billy: I'm in the USA, so you must be right that the UK version is different. Go ahead and try entering it the way it tells you (DD/MM/YY & the 24-hour clock) and see if that works for you. I don't have a way of testing it here, unfortunately.
@ Lauren
Thanks for the reply, Lauren. I used the format the editor was suggesting and it worked! It must have failed last time because I hadn't set my timezone at that point.
The confusion from your post came from this line in the artice: "For U.S. English settings, at least, the formatting is...", which I understood to mean for English users. I now see that you mean for English-speaking people.
Thanks for the info. This worked just fine.
Post a Comment