
I've been wanting an HTML signature in rich text for my Gmail account for when I send business emails, so I can promote my websites, Twitter account, and Facebook pages — but all in a streamlined and attractive manner.
Gmail doesn't currently support rich text or html formatting in the sig box, which is on the Settings page.
Here was the best I could do in plain text:
~*~
Lauren Wayne
www.HoboMama.com
www.HoboMamaReviews.com
www.LaurenWayne.com
www.Twitter.com/Hobo_Mama
www.Facebook.com/HoboMama
www.facebook.com/pages/Hobo-Mama/322453825286
Unwieldy, isn't it?
I don't like how lengthy the Facebook URLs are, and I don't like that the sig as a whole is a whopping 10 lines long. For Gmail to automatically parse the html, I had to keep at least the "www" part intact, which meant I had to use a plain URL rather than just, say, a blog name (www.HoboMama.com vs. Hobo Mama or HoboMama.com).
So, since I didn't like that, what did I like? Well, here's what I ended up with, using my super-cool and sneaky method:
•••
Lauren Wayne
Hobo Mama • Hobo Mama Reviews • LaurenWayne.com
Twitter • Facebook • Facebook Page
And here, my friends, is how I got there:
First of all, you need a place to edit your html. If you know how to hand-code html and preview it online, go to it. I found the easiest way in a WYSIWYG sort of way was to use a Blogger account. For my purposes, I used my standard Hobo Mama account.
- In Blogger/Blogspot, create a new post. You can title it "gmail signature" or something else memorable in case you want to come back to it. You won't be publishing it, just saving it as a draft, and you can always delete it after you're done tweaking your signature if you want to keep your account clean.
- Click on the Compose tab. Type in your signature as you want it to look. Use the Link function to add URLs to keywords. Change fonts and colors as you wish. You can add in special characters like bullets. You could even add images, such as a company logo. In fact, you could make your whole signature just one big image if you'd rather and know how to edit image files.
- Copy the finished signature.
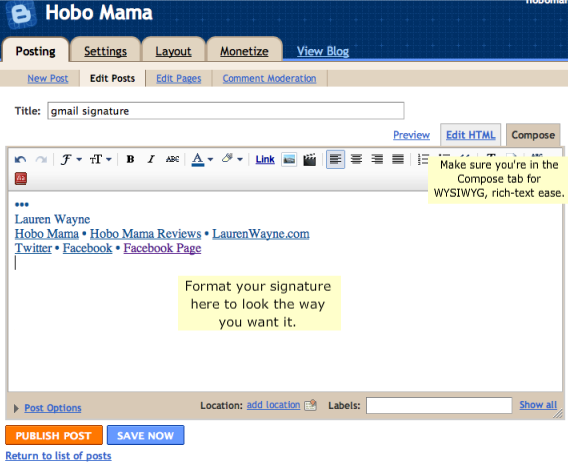
(Click on images to see them bigger.)
All right, now we head over to Gmail. As I said, you can't use any html or rich-text formatting in the signature box, so we'll skip that box. You could simply copy and paste your signature into each email individually, but that's cumbersome. The method I came up with isn't as easy as having a traditional signature, but it takes only a second or two each time you compose an email and it uses the Canned Responses feature in Gmail Labs.
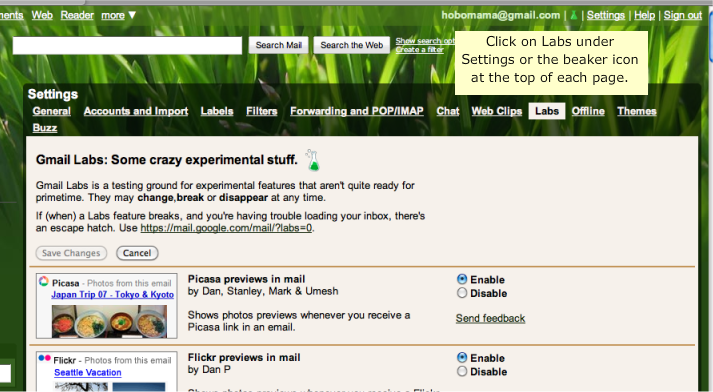
- Go to Settings in Gmail (top right corner).
- Click Labs along the top tabs.
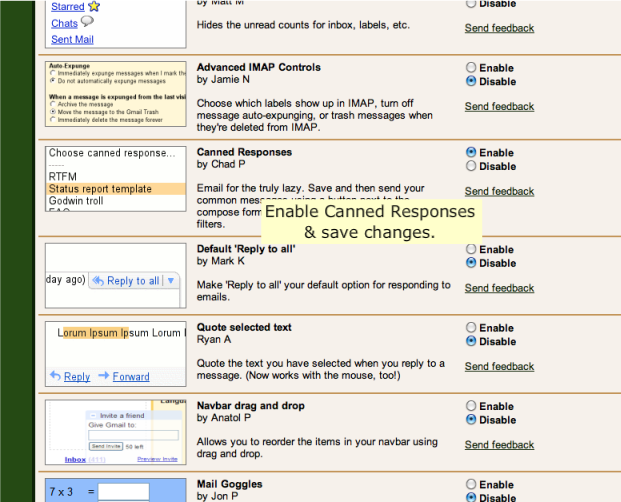
- Scroll down or do a search for Canned Responses and select Enable next to it (yes, "email for the truly lazy"). At the top or bottom of the Labs page, click Save Changes.
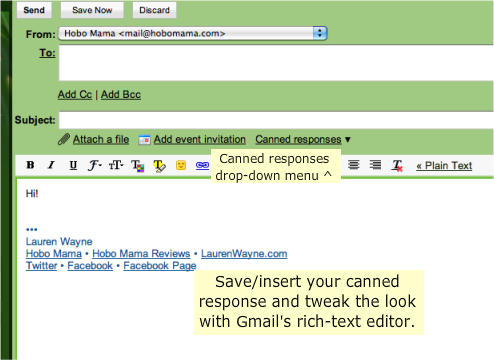
- Now click on Compose Mail. Make sure you've selected Rich Text as your messaging view. Paste your signature into the message box. It should paste exactly as you had it formatted in the Blogger box. You can change the font or layout further using Gmail's rich-text editing.
- As an optional extra, if your signature font is formatted in a way unlike the way you would like your message to be (for instance, my signature is in blue, but I prefer my message font to be in black), add in a simple line of text above your signature that you usually use to start a message. In my case, I added "Hi!" I formatted "Hi!" in my preferred black message font. [ETA: I just realized what would be even easier and more convenient would be to add how you usually CLOSE your emails, such as your name!]
- Now that you've enabled Canned Responses, there should be a line that says Canned Responses just above your message box. Click on Canned Responses and select Save --> New canned response... A box will pop up and ask you for a name to save it under; you can choose something like "business signature."
- Now you can Discard your draft message.
- Next time you go to email someone, either through Compose or Reply, click on Canned Responses --> Insert [business signature or whatever you called it].
- Voila! Your signature appears. You can tweak it in the message box if you'd like, or go back to Blogger to do major revamps. If you want to save a change, simply click on Canned Responses --> Save --> [business signature] again, and OK the warning that pops up that you're saving over a saved canned response.
I know this method isn't quite as convenient as having a signature automatically appear whenever you click Compose, but it's the most streamlined way I could find for now!
The good news is this method lets you choose which messages you want to put a signature on. You could even have multiple signatures, such as a personal one and a business one, and choose which signature you want each recipient to see. You could put your address and contact info in emails you send to publishers, for instance, but your URLs alone for emails to colleagues, just saving each signature under a different name.
Hope this tutorial helped you! Let me know, or give me your own tips.


0 comments:
Post a Comment