Google Reader has a way to share items and create a public feed with all your reading recommendations.
I first heard about this idea from Paige of Baby Dust Diaries, in a footnote on her Sunday Surf. (If she has an awesome, longer tutorial somewhere I'm missing, she or someone can let me know!)
In this how-to, I'll pass on what I learned from Paige and teach you how to set up your own Shared Items feed in Google Reader, add to it easily from Google Reader, and publish the feed to your blog.
In a future how-to, I'll talk about some further Google Reader goodies, including a way to add items to your shared feed from outside Reader, and even if you're not subscribed to a feed for an article you want to reference. I'll also talk about how to show off a public feed on your blog or other site.
Absolute basics
You need to have a Google Reader account and be subscribed to your favorite blogs. I'm going to skip ahead at this point and assume you've got that part figured out, but if you need help, let me know and I can do a separate tutorial!Add to your shared items
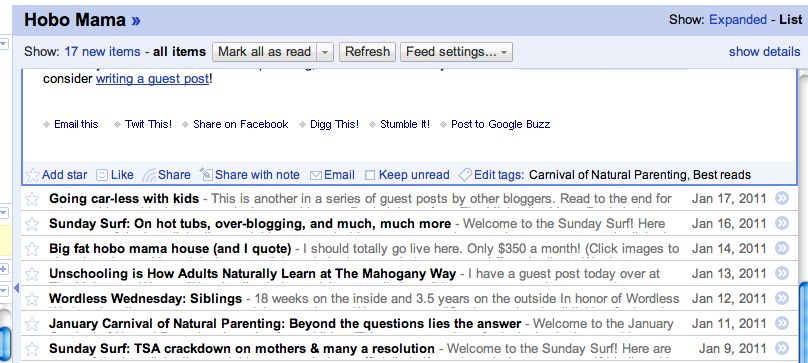
Whenever you open an article in Google Reader and scroll to the end, you'll see these options. The two relevant ones are "Share" and "Share with note."
To add an article to your shared items, simply click on either share option.
"Share" will add it automatically to your shared items. The little feed icon will turn orange.
"Share with note" lets you add a comment to your item. A box pops up like so:
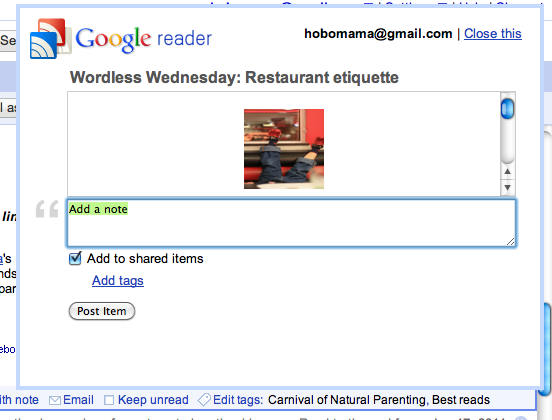
You type in your comment and click "Post Item."
(Notice you could also add a note but uncheck "Add to shared items," if you wanted a private note to yourself.)
"Your shared items" in Reader
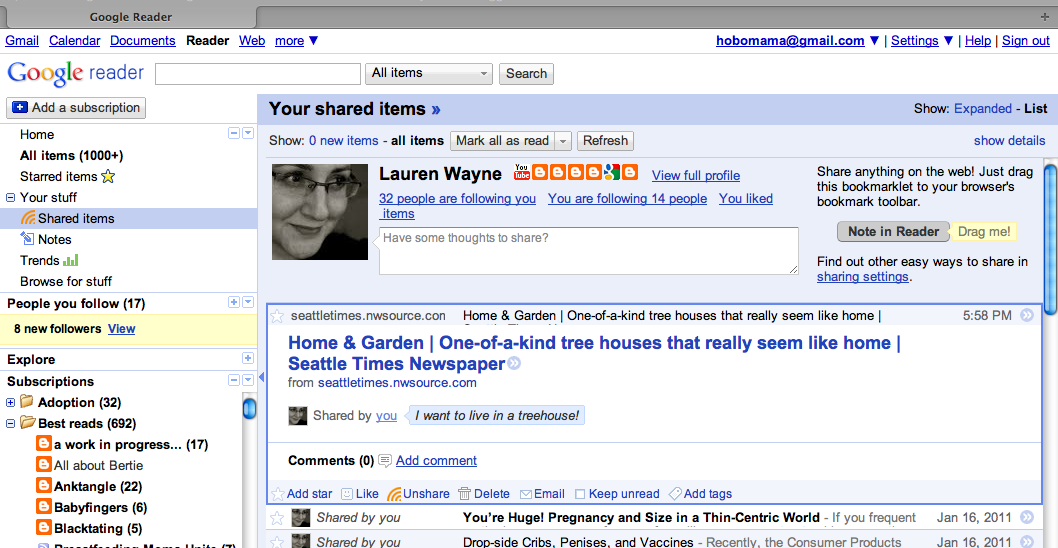
To see the items you've shared, go to "Your stuff" in the left sidebar. If there's a plus-sign (+) next to "Your stuff," click on it to show the drop-down menu. Select "Shared Items." If you want to see only the items you've left notes on, click on "Notes."
You can see an article I shared and the note I wrote to go along with it in the blue box ("I want to live in a treehouse!").
(In case you're wondering, I blurred out my feeds because I give them weird names ;) and, yes, I have more than 1,000 unread items, which means I've broken the Google counters.)
How to unshare an item
If you want to take back your share, look at the bottom of the post where the orange icon is. The word will now say "Unshare," so just click it again to remove it from your shared items.If you wrote a note, click "Delete" next to the little trash can instead (the icon that used to be a pencil and paper).
(Look at the picture above to see both the "Unshare" and "Delete" icons.)
Make your shared items public!
So now you've shared them, but who's seeing them? We have to go mess with the settings to make sure it's all the people you want!The link for Sharing Settings is http://www.google.com/reader/view/#friends-manager-page. It's linked on various pages, such as toward the top of "Shared items" and "People you follow."
You can also navigate there (it's a little hard to find, but in case they change that link!) by going this route:
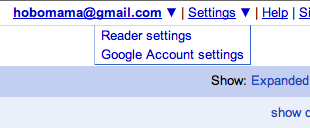
Click "Settings" in the top right header, and wait for the drop-down menu. Select "Reader settings."
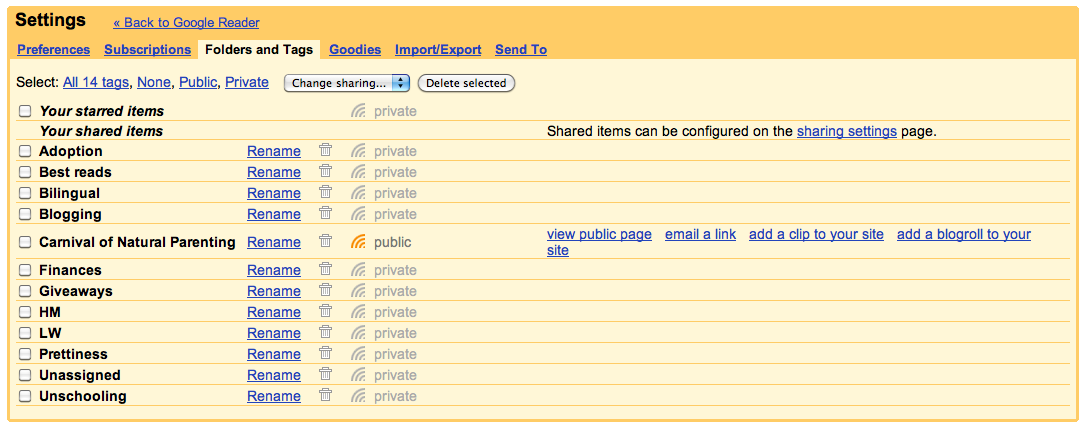
Click the tab that reads "Folders and Tags." There you can see the message next to "Your shared items," "Shared items can be configured on the sharing settings page," and "sharing settings" is linked. Ta-da!
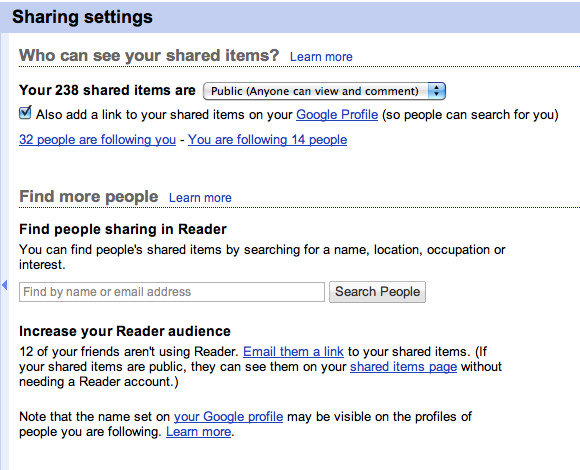
The top option lets you choose whether your shared items are "Protected" (you choose which groups can view them, based on your Google Contacts) or "Public" (open to anyone online). You can also see whose recommendations you're following, and who's following yours, and you can search for new public shared item feeds to track.
Set your style

Now that you have a public feed, you also get to style your Shared Items page, on the same "Shared settings" page. There are four (rather limited) options, so choose whichever one makes you happiest.
You can also choose a custom URL (such as http://www.google.com/reader/shared/hobomama), which makes it easier to tell friends about your new public feed.
We'll talk more about emailing the link below, and we'll get into adding a clip to your blog in a future installment, but feel free to play around!
Your public feed
Now when you click either on "Preview your shared items page in a new window" or paste or type that new URL into a window, you will see what your public sees.
Reader pulls information from your Google profile (such as your name and links to other public accounts), so make sure your Google profile is displaying information the way you want it.
Share your shared items!
Now you can hand out the URL of your public feed (e.g., http://www.google.com/reader/shared/hobomama) to let people know to follow along or subscribe.People can also follow you in Google Reader by entering your name under "Find more people" on the "Sharing settings" page. They'll then click on "People you follow" in the left sidebar to see your shared items mingled with the items of other public feeds.
In "Sharing settings," there are two opportunities to email a link to your shared feed to your friends. They don't even need a Google account (just internet access) to view your shared items feed. If they do have a Google account, you could recommend that they follow you in Reader.
Have fun and start sharing!
And stay tuned for advanced Google Reader goodies!
Incidentally, feel free to follow my shared items public feed! I share articles about parenting, blogging, and writing, along with other fun tidbits, such as about treehouse living. You can also follow me in Google Reader by entering "Lauren Wayne" under "Find more people" on the "Sharing settings" page and finding my cute little face.


1 comments:
Oh this us way cool! Thankyou!
Post a Comment