1.12.2011

Setting up thumbnail linkies & choosing the right dimensions

In honor of Wordless Wednesday, I bring you an entirely not-wordless post on crafting user-friendly thumbnail linkies — those link-ups that allow users to attach a small linked image and title on your blog, brought to us in this incarnation by Linky Tools (formerly McLinky). It's perfect for Wordless Wednesday, giveaways, recipe and craft roundups, and any other image-heavy blog hopping or blog carnivals.

There are other purveyors of thumbnail linkies, but I'm talking exclusively about Linky Tools in this tutorial.

I would specifically like to draw your attention to the length of the input box. For the user, this is the title of the thumbnail they enter.

First, an overview:
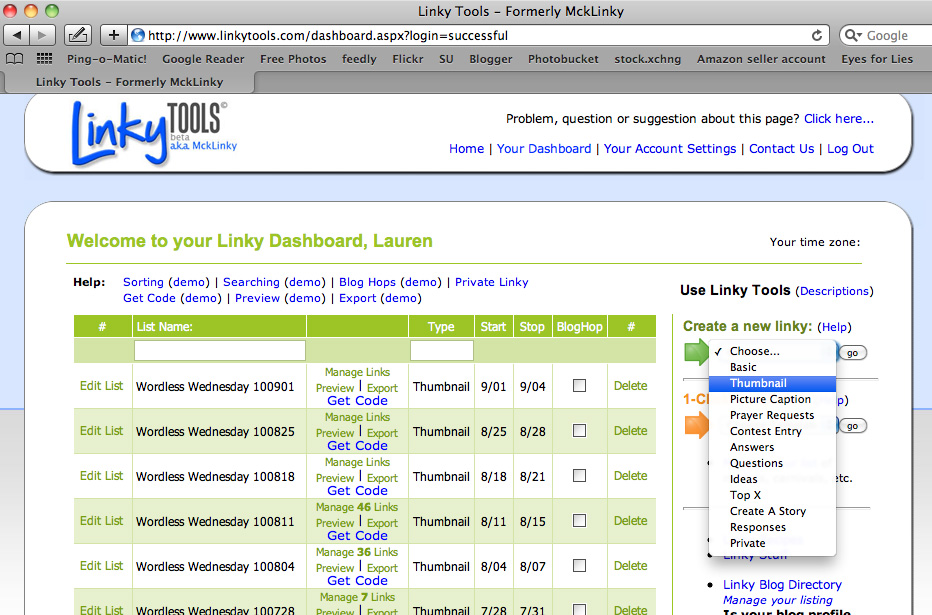
(Click on images to view them larger.)


To create a thumbnail linky, simply go to your dashboard (you have to have created a free account beforehand), head to the right to "Create a new linky," and select "Thumbnail" from the drop-down menu before hitting "Go."


This is the default thumbnail linky page.

From the top down, here's what's on the page.

  • First, you enter a List Title. This is for your eyes only, just to keep track of the linkies in your dashboard. I date mine and note what the linky was for (e.g., Wordless Wednesday 110112).
  • The Length of User Title Entry is the fairly awkward terminology to describe how long the text box is the linker-upper will see. It's the title to the thumbnail that the user types in, and you determine how many characters they're allowed. The default is a puny 20 characters, so this is what you'll almost certainly want to change.
  • Size of Thumbnails (or, as it inexplicably but somewhat humorously reads, ThuThumbnails) is how big the images will be on your page. The default is the smallest, 40 pixels.
  • Start and Stop Date/Time (not in picture). This lets you set the duration. Ending the linky after a reasonable entry time helps cut down on spam links coming in later on. I keep Wordless Wednesday linkies open till Saturday, to give people a few days to straggle in. Giveaway linkies set to open on a certain day might stay open till the next week's linky goes live. The start date defaults to the current time you draft the linky. If you want to pre-date it or post-date it, you can do so. For instance, if I'm drafting a Wordless Wednesday post on a Tuesday, I typically set the start date to Wednesday at midnight, just to be matchy.

Choose the right sizes:
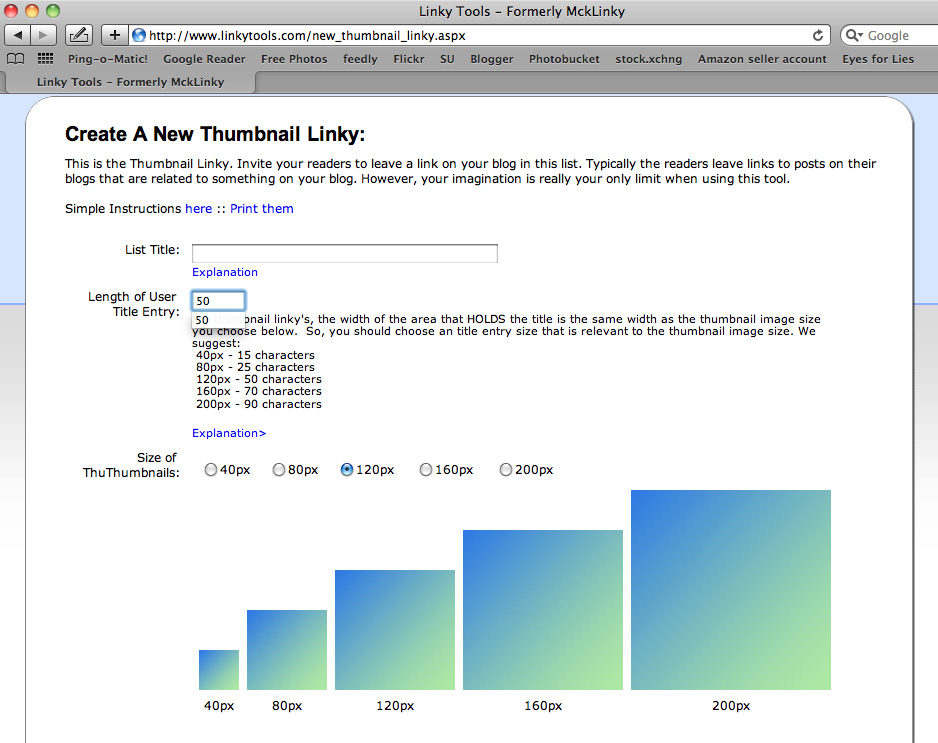

Here's where you can choose the size of the thumbnails and adjust the length of the user-entered title.

To skip down to the thumbnail sizes, Brent Riggs has helpfully provided blue-green squares demonstrating each size, noted below the squares as pixels (length and width), from 40 to 200.

I've found that most useful thumbnail linkies are between 80px and 160px. I use 120px. Very link-intensive pages often choose 40px. It somewhat depends on how many thumbnails you expect to receive, because the smaller ones will load faster, while the bigger ones will be more aesthetically pleasing.

Whichever size you choose, make sure you change the Length of User Title Entry.

Change it out from the default of 20 characters to a character length appropriate to the thumbnail size.

You can see Brent's help text:
"For thumbnail linky's, the width of the area that HOLDS the title is the same width as the thumbnail image size you choose below. So, you should choose an title entry size that is relevant to the thumbnail image size."
Then there is a suggested list of appropriately matching thumbnail sizes and character lengths. I recommend paying attention to the suggestions, because they generally work.

For instance, I use 50 characters to match my preferred thumbnail size of 120 pixels.

The problem with setting too few characters? Users won't have enough room to enter the title of their post, particularly for a giveaway linky, which usually demands a blog name, giveaway item, and end date. Twenty characters is nowhere near enough for most people to jam in that amount of info, so something in that case has to be left out. There might have to be a balance made in favor of larger thumbnails to allow users sufficient space to enter the characters they need (more characters for giveaways, fewer for Wordless Wednesday and other more casual link-ups).

The problem with setting too many characters? Some users will max out the character length, but then if the thumbnail is too small (or the blog's template calls for a font that is wider than average), some of the lines of text will be chopped off and lost. Since it's impossible for a user to self-edit an entry, there's no convenient solution for the user once that happens. There's only leaving it as is, double posting with a new and smaller title, or emailing the blog owner for help in the editing.

(Click to see images actual size.)

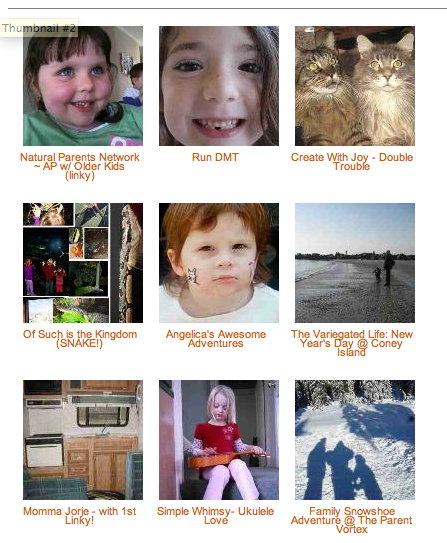
120 pixels with 50 character limit titles (from my blog) — the images are clear, and the titles fit in whole. However, this size might be too bulky for blogs with many links.
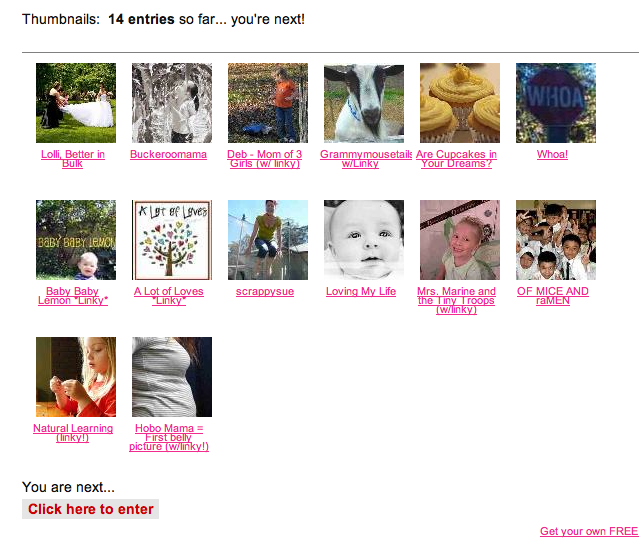

These above are 80 pixels in size with a balanced title length. (Again, click to see the image actual size.) Every title fits, although they're a little squishy vertically, which is presumably due to an interaction with the blog's template fonts and can't easily be altered (without altering the template, which seems like overkill for such a small problem).
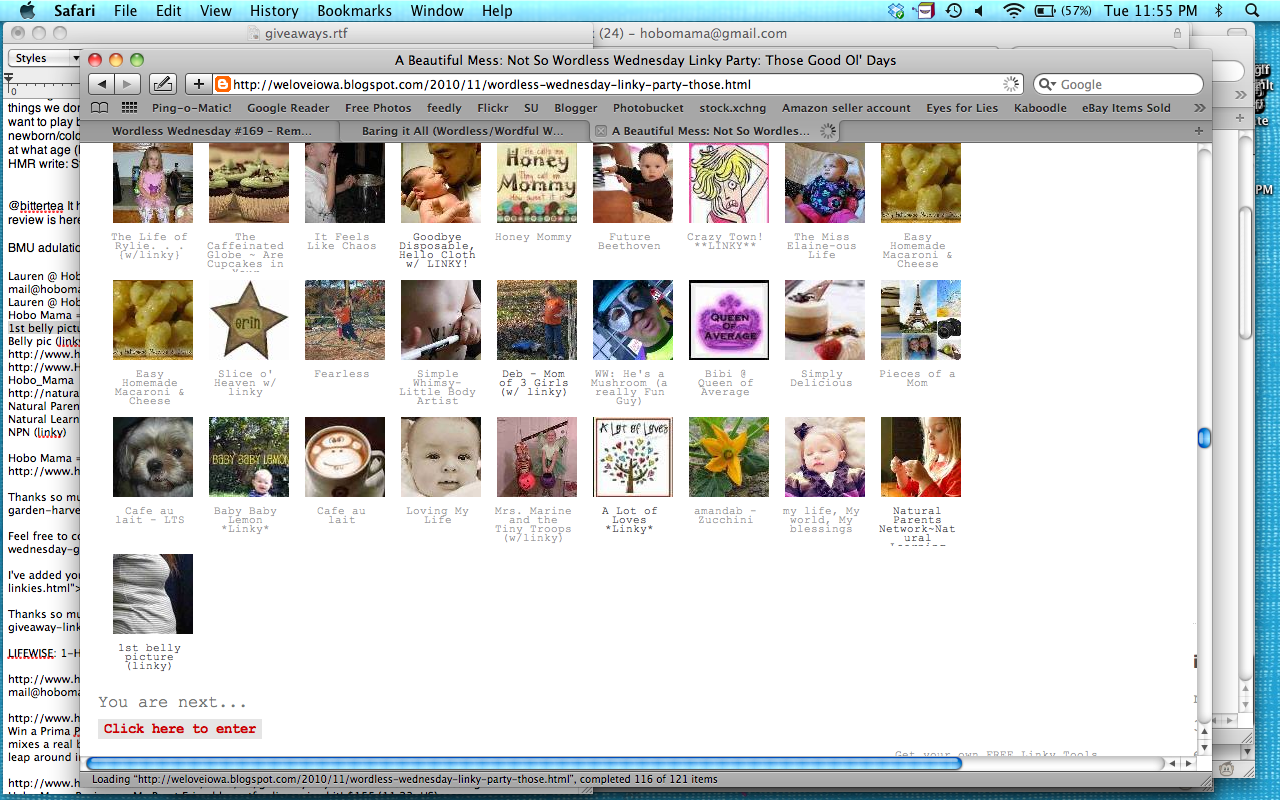

40 pixel size above (the smallest) with a character limit that's a little too big for the image width. Click on the image to view it actual size. You can see that the bottom right title for Natural Parents Network cuts off at the bottom. Even though it wasn't over the character limit, using that many characters exceeded the allowable display size. The 40 pixel size is petite, which makes images harder to see, but is useful for blogs that anticipate a lot of links and need a faster loading time.


So be sure to choose your image size and character length thoughtfully.

Grab the code:

Once you've chosen all your options, you can then save and create your linky. It will deposit you back onto the Dashboard, where you can get your code.
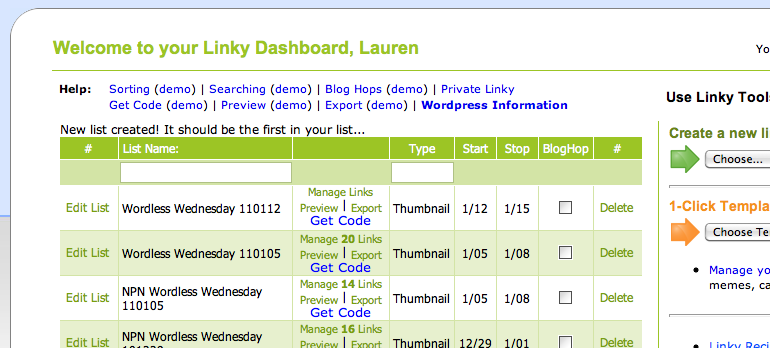


(Note that you can also Manage Links by deleting any that are objectionable and Edit List at the lefthand side to quickly change your options, such as thumbnail size, character limit, and duration.)

Once you click "Get Code," a box will pop up. One final warning: If your system is anything like mine, it will pop it up so that half the box (the relevant half for me, as it turns out) is hidden up past the top of my screen. I have to scroll up to see the full box, but that's what's needed.
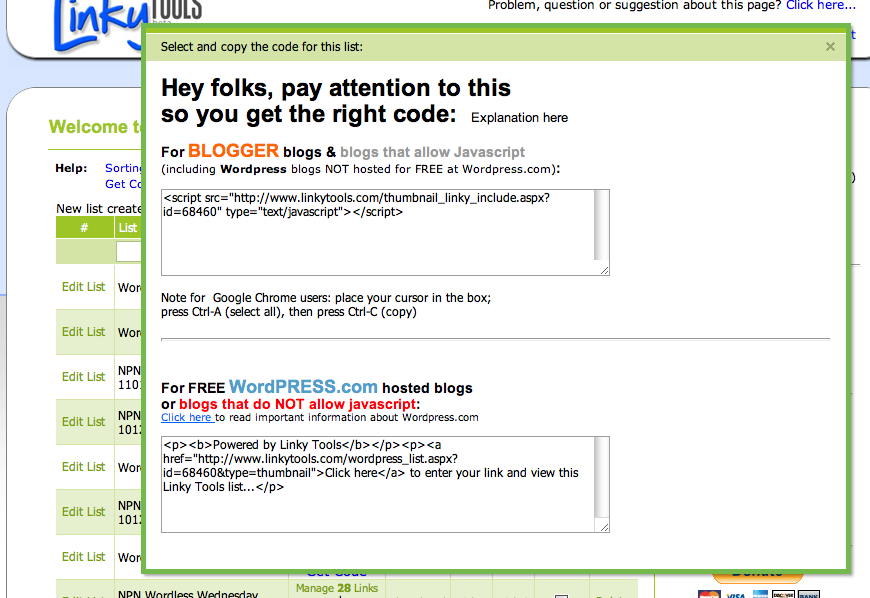


Blogger, self-hosted WordPress blogs, and other blogs that allow Javascript should use the top code. (That's most people, in other words.)

Blogs hosted for free at WordPress need to use the bottom code. WordPress-hosted blogs don't allow Javascript, so Linky Tools hosts the linky in a separate window off-site. This is for blogs ending in .wordpress.com. If that's you, go with the second option.

If that's not you, go with the first.

And that's all. Paste it into your blog post. (See here for how to paste HTML into Blogger and here for how to paste HTML into WordPress.)

Once you publish your post (assuming you didn't set your start date to the future), your cute little thumbnail linky will be live and ready to accept that first eager linker.

Enjoy!

12.01.2010

Wordless Wednesday: NaNoWriMo word count


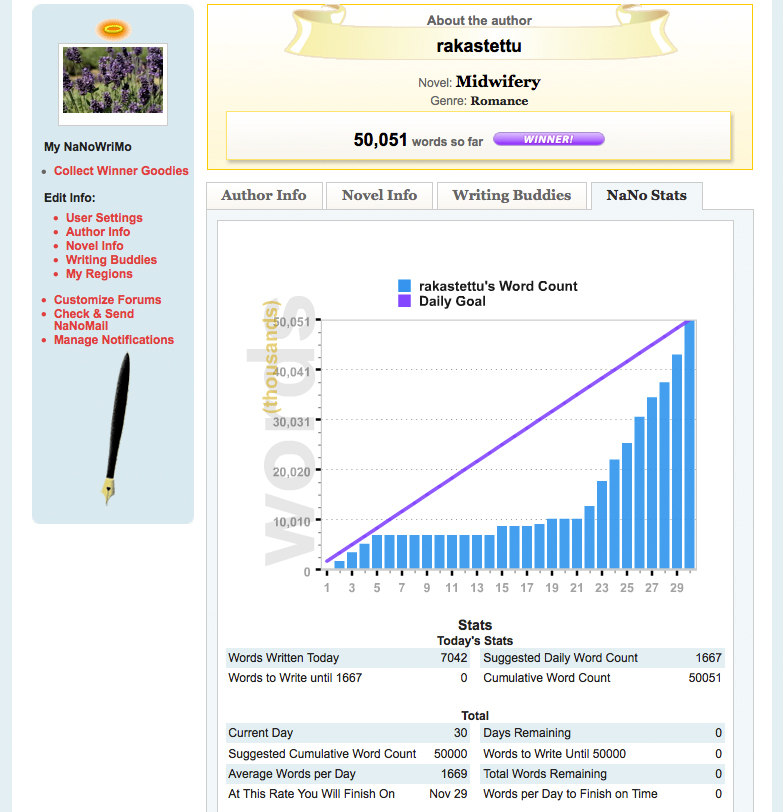
That word count graph is accurate and makes me laugh pretty hard. (You can click on it to see it bigger.) The purple line is where I was supposed to be each day, and the blue bars are where I actually was. But here I am now, on the other side! Procrastination pays off.

Linked up at Hobo Mama and Natural Parents Network!

11.14.2010

Amazon, boycotting, and blaming the marketplace


So. There was a book about how to be a better ped.ophile on Amazon, and there was outrage, and the book was pulled. The author is being investigated by police, at the same time he's being protected from the death threats against him. The blogging and Twitter community, rightly outraged at crimes against children, is advocating for a boycott against Amazon.

I am not. Not so far, at least.

I know I'm not alone, and yet I know my stance is less popular among the parenting bloggers in whose community I write. I hesitated to write anything about this, for fear of being tagged "the person defending the ped.ophile" (which I'm not), but I couldn't get back to sleep when I woke up too early this morning for all the thoughts swirling through my head. So here they go onto a screen so I can let it go.

I don't feel like linking to all the many, many articles floating around out there, because I want to just write. I apologize for the lack of thoroughness.

Some premises:

1. Ped.ophilia is sickening. Committing crimes against children is reprehensible. I have friends who have suffered such abuse, and it's heartbreaking. A book suggesting advice for those involved to get away with such crimes is a book I cannot endorse. There's actually little proof that the book contained what it's being rumored to contain. So far, the authorities have not found anything incriminating in it. I'm not going to read it to find out. I think the title alone is revolting.

2. Amazon's pulling a book from its shelves is not censorship. Governments censor; booksellers do not. Booksellers are always allowed to choose what to sell and what not to sell. Amazon's original statement that to pull such a book would be censorship, and it chooses not to indulge in same is hogwash. They retracted it by the act of pulling the book after continued protest. I'm heartily disappointed in Amazon's initial response and later non-response to the issue. I suggest a better initial response would have been "We're aware of the issue and are having our lawyers investigate the situation. We cannot comment further at this time." A better after-the-fact response would have been … something.

Ok, so that's where I'm starting from. Ped.ophilia and child rape = horrifying. Not responding well = foolish.

But I can't endorse a boycott from these facts alone.

First of all, what was the point of suggesting a boycott? Originally, it was to get the offending book removed. Well, it is. So why are people still revved up? Because there are still yucky things being sold on Amazon, newly brought to our attention. I've looked at some of them, and they certainly are sickening. But, then, why isn't the response to do exactly what we've already done with the first offending book: protest to Amazon to remove them? Why leave Amazon entirely?

Here are some other facts about Amazon I either know or surmise:

1. Amazon does not vet, read, and endorse every product on its shelves. How do I know this? Because I have self-published a book for my family, for sale on Amazon, and there's no way anyone important read it through first. It doesn't contain anything offensive, as far as I'm aware, but Amazon doesn't know that. It hasn't checked, and it never will, unless someone complains about it (like my mom…). It's completely ludicrous to suggest that Amazon read every book or inspect every product it distributes. Amazon is a marketplace. It is not a publishing house.

2. Self-published books and other niche products should be allowed to exist. If we pressure Amazon enough, maybe they'll ban every book and product that doesn't come from a major publishing house or big corporation. Swell. (Not really.) See above for my perspective on having self-published a book that would never have found a home at a publisher's; I've enjoyed other such books, and I appreciate that Amazon allows little sellers (like creators of some of the best baby products I know) to have an easy way to reach customers.

3. It is hard to determine what should and should not be banned. I think there's a pretty overwhelming consensus that a book counseling ped.ophiles on how to get away with crimes should be banned (although, as I pointed out, I'm not convinced that's what the book was about). But from there on out, there are diverging opinions. Should a fictional book like Lolita be banned? I haven't read it, so I can't speak about it in literary terms; the very premise sickens me so I've avoided both the book and the movies. Should books advocating crimes be banned? These include how to grow pot, how to make bombs, how to skirt gay marriage laws. Some people would say yes, others no. Should all smut be banned? Again, some people think so, and others do not, and there's a wide range of opinion on what falls into that category. What about books advocating hate and intolerance? But then we'd need to boycott every bookseller and public library. Boosted by the recent controversy, dog owners are trying to get dog fighting books removed; I sense a trend starting. For my part, should Babywise be banned? In my opinion, it contributes to the ill health of children; is that reason enough? But if I succeeded in getting Babywise removed from shelves, that means the Babywise supporters might be able to fight back and have the Sears library removed. Who gets to decide?

4. Amazon is right to be leery of removing books based on initial disapproval. Because of the conundrum presented above, I can understand why Amazon's fallback position in most cases is, We're a free marketplace, and we don't tend to ban books just because they're unpopular with some people. I would expect them to slap me down if I suggested banning Babywise.

5. I don't know the legal ramifications to Amazon of pulling books from Amazon's shelves. In other words, I don't know if authors or publishers can or would sue Amazon for refusing to sell certain materials. Don't misunderstand me; I'm not asking here, Would they win a lawsuit? Just, could they make life very difficult for Amazon by initiating one? For a small fry, I'd imagine it's not an issue. A bigger publishing house might try for it, since they'd have the lawyers and the funds. While it's Amazon's right to sell what it wants to, in a litigious society it might be dangerous to pull something without a very good reason, so I can see why they'd be cautious about doing so.

6. Boycotts don't work. Oh, I know, I'm involved in one myself, and sure, there was that one famous bus boycott that worked. But Sam grew up with his family boycotting hither and yon, and all the businesses they boycotted are still doing just fine. For instance, they boycotted Waldenbooks when Sam was a boy because Waldenbooks was selling child p.ornography. It wasn't until Sam was an adult that he stopped and went, "Huh-wha? No way was Waldenbooks selling child p.ornography." To this day, he has no idea what they were boycotting; maybe Waldens stocked Lolita. Then again, so does the public library. I can get behind an occasional or long-standing boycott: either to effect a specific change, or to protest and shed light on an unethical business, respectively. With Amazon, it seems to me the boycott's original goal was to get the book removed. Ok, done. Move on.

7. What works better than boycotts is specific action. In this case, protest to Amazon about what you don't like. Let me know to protest, too. As has been proven now, if there's a loud enough collective voice, Amazon will respond to our demands.

8. Don't blame the marketplace for a lousy product. I've mentioned this before, but it bears reiterating. Amazon is a marketplace, not a publisher or manufacturer. I don't boycott eBay because I had a bad experience with a single seller. Now, if I have a criminal experience with a single seller (as has happened to Sam, with a bootlegger), I do contact eBay and expect them to step in and rectify the situation — which happened in our case, and also in this latest Amazon debacle. I didn't avoid scoring deals on Craigslist because they had a smutty section that made me want to vomit; I did avoid that section and others protested it, and the pressure worked on them as well.

9. There's ambiguity in whether the whole should be avoided because of the part. There are some calling for the boycott of Amazon who have not boycotted other businesses that behave in ways they find deplorable. For instance, I made sure my BlogHer ads don't display WHO Code-violating ads; for most people, this is good enough, even if they believe strongly in the WHO Code. But maybe we should all be boycotting BlogHer instead. (I'm sure there are people who think so.) Amazon has long advertised formula and promoted discounts on bottles and violated the WHO Code in other ways; should we have been boycotting them all along? And, before anyone goes there, do I see a difference between child rape and formula use? Um, yes. My point is that we don't always abandon a company because of one aspect we disagree with; sometimes we merely protest that area and/or avoid using it or benefiting from it ourselves. Where's the line between when we boycott and when we don't? We've protested BlogHer's inclusion of WHO Code-violating ads, and yet they still exist and BlogHer is still profiting from them. Compare this with Amazon's act to take down the book we found offensive and no longer profit from it. Why are we advocating a boycott of the latter and not the former? (If it's not clear, I'm not advocating boycotting either.)

I think that was all I wanted to say on the matter, though I might need to respond to comments.

To sum up:

1. Ped.ophilia is wrong. My heart breaks for anyone victimized by the crime.

2. The book was disgusting on its face. I'm glad it's gone.

3. Amazon has behaved (is still behaving) idiotically.

4. I don't think there's a good reason to boycott. If the point of the protest is to get intolerable books removed, then keep protesting intolerable books.

That's all.

I hesitate to ask, but what do you think? I'm willing to keep an open mind to counter arguments.

Image courtesy inquisitr.com

11.01.2010

NaNoWriMo fun to get you started

Well, since I'm already feeling a little depressed and overwhelmed that today is the first day of National Novel Writing Month 2010 (the same month as our new site launch, plus a pregnancy, trip out of town, parenting, work, my regular writing, and all that — yes, I am that monkey), the least I can do is a little round-up of a few NaNo goodies that have brightened my perspective.

    NaNoWriMo Word Count Desktop
  • "Nanowrimo Word Count Desktop" from Domestic Dork: How cute and inspirational is this to have as your desktop image! (Click over to get it full size and download it.)

  • And here are a couple that are particularly keen for Mac geeks (like yours truly), because I think this is the year I'm going to jump into writing software (wish me luck):
    • Scrivener is offering a free trial version of its writing software for NaNo-ers, a 2.0 preview for Mac users and a beta version for Windows users. Once you win (because of course you'll win, right?), you'll get 50% off the purchase price in December. If by some odd chance you don't, you can get 20% off, which is still nice. And you have the option to save your work in progress to a word processor if you choose not to continue with the software.

      Bonus:
      "When you launch this NaNo 2010 edition of Scrivener and choose File > New Project, you will find a special NaNoWriMo novel template selected in the "Fiction" section of the project templates chooser. We've put this template together especially for WriMos - it will create a project with the 50,000 word target set up for you and includes the option of exporting a garbled document for uploading to the NaNo servers."

    Now I have to decide which to try out (or which first). I just hope I won't get sucked into the abyss of monkeying around with software and will concentrate on the hard work: getting those words down. What I like about the idea of writing software, at least, is that it might help me organize myself during or after the fact. I had to outline my previous novel after I'd written it so I could more easily move around chunks and see what was missing. It's unwieldy to try to do that with one long Word document. I also had trouble keeping track of characters' names and details (this is true in real life as well…), so I hope the software might help me keep a better log.


  • Be sure to download your fun badges and post your widgets. Why participate in NaNo if you don't get to brag about it?


All right, that's all I've got for now. Have fun writing. I still have to get my words in today! As you might be able to tell from my little word count widget in the sidebar that's reading a big fat zero…

10.10.2010

Uploading a new blog button without changing the button code

UPDATE 2017: Due to Photobucket's banning on third-party hosting, this will no longer work on Photobucket unless you pay for the highest-tier account (which you shouldn't bother). This will still work if you use a dedicated image hosting service — I chose Amazon S3 for now. You can use the same tips below, which I've updated to show my new image URLs.

If you have a blog button or badge (a little square logo advertising your site) hosted on Photobucket, you might have been in the tricky position of wanting to change the button without making everyone who has your button already change the button code on their blog.

There is a relatively simple(ish) way to make it a bit harder on your end but easy-peasy and seamless to everyone else. The next time their pages load, your new button will appear, with no effort on their part. Much easier than sending out pleas to change the code, yes?

The trick is to upload your new button to your web hosting site using the same file name, which will therefore give it the same URL as the old button.

Note: This trick will not, as far as I know, work if you've uploaded your image to Blogger or Flickr, and I don't know if it works on WordPress-hosted images. Which frankly is a good enough reason to advise you to use Photobucket[your own hosting service] for important images, so you have more control. If you host your own images on a server, then the following tips can still apply — but you probably already knew how to do this.

How to keep a direct link in Photobucket[your own hosting service]

For instance, here is the HoboMama.com blog button:

Visit Hobo Mama Natural Parenting Blog button for HoboMama.com


Here is the direct link for that image:
http://images.hobomama.com/hobo-mama-button-200x200.jpg

The piece of information after the last slash is the name of the image file, so hobo-mama-button-200x200.jpg

If you wanted to upload a new picture but keep the same direct link URL, here's what to do, in this order (very important):

  1. Create the new image in your photo-editing software and save it with the same name as the original (e.g., hobo-mama-button-200x200.jpg).
  2. Go to Photobucket[your own hosting service] and find the image you want to replace. Click "delete" on the old image, acknowledging that you will be breaking all the links that are looking for this image (but only temporarily!). Make sure you have a backup of the image on your computer in case you want it in the future. (Optional: You can always re-upload it to Photobucket[your own hosting service] with a different file name [for instance, rename it hobo-mama-button-200x200-archive.jpg before uploading] if you want it archived online.)
  3. Upload your new image to Photobucket[your own hosting service], in the same folder as the old one. The new direct link will be the same as the old one (http://images.hobomama.com/hobo-mama-button-200x200.jpg), as long as you were careful to name your file the same as the old file.

It's important to delete the old image before uploading the new image. Otherwise, Photobucket[your own hosting service] will rename the new file slightly to differentiate between the two and the direct link will be different.

And, again, if you have different folders within Photobucket[your own hosting service], make sure to upload to the same folder, since that becomes part of the URL as well (Elements/ in my example).

This trick comes in handy for regular blog buttons, but also for advertisements and giveaways. Say you wanted to advertise on someone else's blogs, such as for your Etsy shop. You might make your ad seasonal but do all the changes on your end. So, you could create an ad with summer products, and then easily switch it out to winter products later in the year. As long as you kept the file name the same (e.g., hobo-mama-ad.jpg) and deleted the old ad image, you wouldn't have to have your advertisement hosts change their code at all to be current.

Or, for a special giveaway event, such as some review blogs do — a baby shower bash or a holiday-themed event — you could name your button for that something like hobo-mama-reviews-giveaway-event.jpg and then just keep updating the image but under the same name each time. That way, your event button on people's blogs would never be out of date!

Hope that helps, and that all your bloggy fans will appreciate the new image that magically appears on their screens!

10.09.2010

How to make a blog button grab box

If you have a blog button or badge now (a little square logo advertising your site), do you want to know how to make a little box so people can grab the code? Like so:

Visit Hobo Mama Natural Parenting Blog button for HoboMama.com


It's actually really easy. All you need to do is figure out the code for the button, and then place it within this placeholder code:

<form><textarea rows="5" cols="20" readonly="readonly"> INSERT BLOG BUTTON CODE HERE </textarea></form>

You can alter the size of the grab box by experimenting with different numbers for rows and cols (columns). The "readonly" command is optional, but it prevents people from accidentally deleting or editing the code in the box as they're copying and pasting.

Tomorrow I'll give you a tip on updating your image without making your fans change their button code. And if you missed yesterday's post on creating the code, check it out here.

10.08.2010

How to make a blog button code

Do you want a blog button or badge, a little square logo to advertise your site, business, or giveaways? Once you have a basic image uploaded to an image host, it's easy enough to figure out the code.

Visit Hobo Mama Natural Parenting Blog button for HoboMama.com

Here's my basic button code:

<div align="center"><a href="http://www.HoboMama.com" target="_blank" title="Hobo Mama"><img src="http://images.hobomama.com/hobo-mama-button-200x200.jpg" width="150" height="150" alt="Hobo Mama: A Natural Parenting Blog" /></a></div>

From the top down, here are the elements in my button code. You can feel free to copy what you like.
  1. I've chosen to center mine, which is the opening and closing div tags.
  2. Then I have a link to my website: <a href="http://www.HoboMama.com" target="_blank" title="Hobo Mama"> I've chosen target="_blank" so that it opens in a new window when someone clicks on it, and I put my website name in the title tag, so that anyone hovering a mouse over the image will see what page it links to. (You can try it on the top image to see what I mean.)
  3. Now it's time for the real point of this code, which is the image for the button itself: <img src="http://images.hobomama.com/hobo-mama-button-200x200.jpg" width="150" height="150" alt="Hobo Mama: A Natural Parenting Blog" />
    • The src tag is where you put the direct link to your button. (I recommend using Photobucket or [Photobucket no longer possible as of 2017] self-hosting the image, because you'll have some control over changing the file in the future if you ever want to alter the image without changing the button code.)
    • The width and height are how big you want your button to appear, and of course the people who grab your button can alter the size as they wish. A 125x125 is a good standard size. I made mine a little larger — for attention, I guess. You can see from the file name that the button image is actually 200x200, so that fans could make the button as large as that without degrading the quality. I recommend making your button image similarly a bit oversized in case of zealous fans!
    • The alt tag lets you give your image a name, so that it will show up in search engine results. I recommend putting a good, brief description of your blog here. It will also help fans who have lots of buttons keep track of which one's yours when they're looking at the code alone.
  4. Then make sure to close off all the tags you opened: </a></div>
Make sure you test out the button before giving the code to anyone else. Try publishing it in a blog post or your sidebar and make sure the image shows up the way you want it, and that if you click on it, it goes to the right page. Tomorrow I'll have a post on putting your code into a grab box so your fans can get your code for themselves!
Related Posts Plugin for WordPress, Blogger...