
 Paige of the Baby Dust Diaries is a NASA research librarian by day — and mother to Aellyn and inspiring blogger — well, I was going to say "by night," but let's say be accurate and say all the time. She has volunteered to write a few guest posts on topics that come naturally to her in her line of work. Visit Paige over at The Baby Dust Diaries for more on natural parenting, breastfeeding, gentle discipline, infertility, and life with a miracle baby.
How To Use FeedBurner To Maximize Your Blog — Part 1: The Basics
By Paige of The Baby Dust DiariesIn my day job I create, manage, and teach others how to maximize social media at NASA. Every time I write something like this article about utilizing Twitter, in my mind I'm writing a version for all my blog friends. Since Lauren and Dionna have put such great tutorials here to help specifically for the Carnival of Natural Parenting, I thought it might be nice to share some of the tools I use for blogging as well.
One of the tools I think every blogger should use is FeedBurner. FeedBurner is now owned by Google, but I've been using it since its inception and it just gets better and better. The main goal of FeedBurner is to maximze your blog's RSS feed — allowing people multiple ways to easily subscribe to your content. It actually does much more than that!
Manage Your Feed
If you do nothing else from this article you should definitely do this. Sign your blog's feed up for FeedBurner and change your subscription links to reflect this. First I'll explain why and then exactly how to do this.Why?
First, it makes it easier for readers to subscribe to your blog. Instead of seeing raw xml like this (click on pictures to see them larger):Your readers will see a friendly page with multiple options for subscribing to your feed including email:
Second, it makes your blog's feed free from the specific blog platform you are using. For example if you are on Blogger your feed address is something like http://www.babydustdiaries.com/atom.xml and if you are on Wordpress it looks like http://www.babydustdiaries.com/?feed=rss2. Now, first some RSS readers don't accept all formats, so a feed that ends in atom.xml might not be compatible. More importantly if you ever need to move your blog (like I recently had to from Blogger to Wordpress) all of your readers would need to be notified and go out of their way to resubscribe to your feed.
With FeedBurner you are given a custom feed address similar to http://feeds.feedburner.com/TheBabyDustDaires that will never change. This means when I went from Blogger to Wordpress it was transparent to my readers who were already subscribed. They didn't have to do anything!
How?
It couldn't be easier to sign up for FeedBurner (and it's free!). FeedBurner will even "discover" your feed if you don't know the URL.
- You can sign in to FeedBurner with your Google account (the same if you have Gmail, or a Google Reader Account) or you can create an account.
- Once you are in, just put the URL of your blog (e.g. http://myblog.blogspot.com) in the FeedBurner box and hit enter. You will then be prompted to give your feed a name and custom address
You want to write down this URL since we'll be using it in a moment. (And you can always find it again at the top of your feed's page under Edit Feed Details.) Click Next. - Next FeedBurner asks if you want to track usage of your feed. You can choose what is important to you here and you can always change your mind later. Click Next.
- Now we want to direct your blog's feed to the new address.
In Blogger:
From your Dashboard go to Settings > Site Feed and then enter your FeedBurner address (inlcuding the http://) in to the Post Feed Redirect URL box.
In TypePad:
From your Dashboard go to Configure > Feeds section.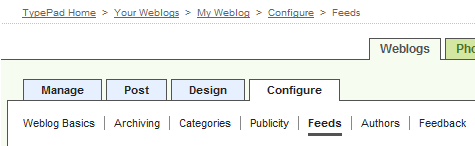
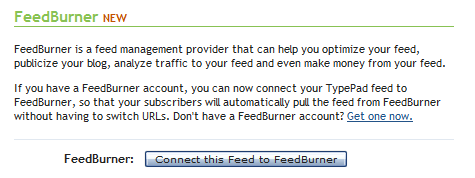
Click on Connect this Feed to FeedBurner.
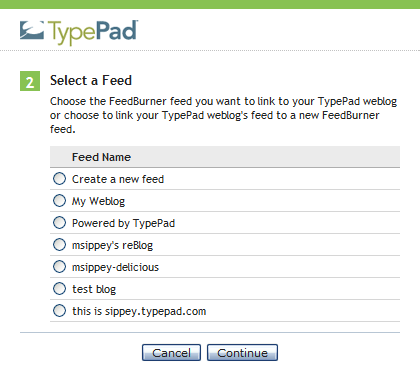
Enter your FeedBurner username and password and click Sign In.

Select the FeedBurner feed you just created and click Continue.
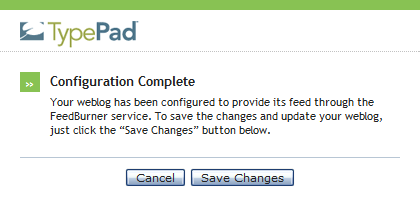
Click Save Changes.
In Wordpress:
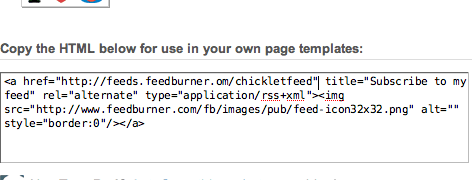
You can use the following method for self-hosted or Wordpress.com hosted blogs. Self-hosted blogs can also use this plugin. Feedburner has what they call a "Chicklet" or image tag that directs users to your feed.
In FeedBurner click on the Publicize tab.

Locate and click the Chicklet Chooser service.
The form shown below loads into the right side of the screen:
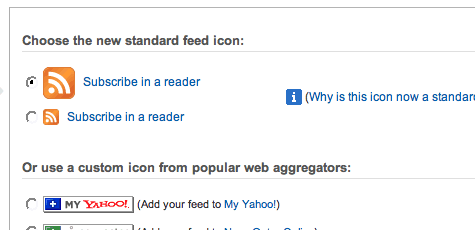
This form contains several options for buttons that promote (and link to) your FeedBurner feed.
Click the radio button next to the button you want to display on your site.
Copy the HTML shown in the bottom section of the Chicklet Chooser. You will paste this HTML into your WordPress site template.
From the WordPress Dashboard, click the Appearance and then the Widgets option. Drag the text widget from the Available Widgets area to your Sidebar. Click the right side of the widget to expand it.
Paste the code you copied from FeedBurner in an earlier step into the content field.
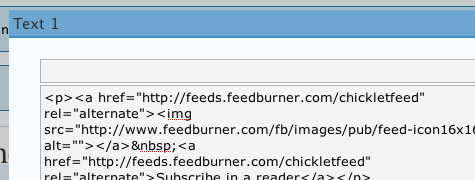
Click Save Changes.
This Chicklet method also works on many other platforms. You can use a custom image instead of one of the ones they offer by hosting your own image and changing the code for the <img src="http://this is the URL for your image">.
That's the basics of using FeedBurner for your blog! Stay tuned for Part 2 for some advanced FeedBurner goodies!
If you have any questions I'd be happy to help! Contact me by commenting here or email me at babydustdiaries (at) gmail (dot) com.


0 comments:
Post a Comment