Showing posts with label miscellaneous tutorials. Show all posts

3.31.2016

How to change your Google spreadsheet's language & related formatting settings

I was having a problem with a Google Sheets spreadsheet and am writing this post in case anyone is having a similar one. It's that type of nitpicky problem that wasn't a huge deal but was affecting my workflow — my spreadsheet thought I was in the UK when I'm really in the US.


What difference does it make if a spreadsheet thinks I'm writing in UK English vs. US English? Well, for me, it came down to the dates column. It really, really wanted my dates to be in this format: DD/MM/YYYY. Whereas we weird Americans tend to like it this way: MM/DD/YYYY, with the month first. I automatically type them like so: 3/16 (for March 16), expecting the spreadsheet to autoformat my entry to 3/16/2016. But…it wasn't. It just sat there: 3/16, and left aligned, as if I'd typed in text instead of a numeric value. If I typed in the words March 16, then it autoformatted it to 16/03/2016, which, though accurate in its own way, was not what I wanted.

So! I tried a couple things first that didn't solve it entirely. First of all, under Format --> Number --> More Formats --> More date and time formats…, I was able to find a way to change that column specifically to be the date format I prefer. But, it didn't "stick." Anytime I typed in a new date, the sheet still didn't seem to know what to do with it. I worked around it by copying and pasting the correctly formatted dates, but that was inadequate.

I also went to my universal Google account settings and found that, somehow and sometime, I had indeed been set to UK English, so I switched that back to US. I refreshed my spreadsheet and hoped that would be the end of it. Nope, still UK. I restarted my browser. Nope.

Then, I found it: File --> Spreadsheet settings…. Hurrah!

You can set your locale, and sure enough, mine was set to United Kingdom. As the Google help notes, "This affects formatting details such as functions, dates, and currency." I'd indeed noticed instead of a dollar sign ($) in my toolbar, there was a pound symbol (£).

You can also change your time zone (useful to know if you're trying to keep track of specific times entries were added to your spreadsheet) and your display language.


Click to embiggen.

2.17.2012

How to send from multiple email addresses in one Gmail account


You now know how to log into multiple Gmail accounts at once and forward other Gmail addresses to a single account.

The next step in our Gmail simplification program is to look like you're still responding to emails from multiple accounts, even though they're really all consolidated.

1. Go into your Gmail Settings.


Click on the gear icon toward the upper righthand corner of your Gmail screen (located underneath your profile icon or name). In the drop-down menu that appears, select "Settings."

2. Go to "Send mail as" settings.

Click images to embiggen.

Select "Accounts and Import" along the top tabs in Settings.

Scroll to "Send mail as:" and select "Add another email address you own."

2.16.2012

How to forward email to another Gmail account

As I discussed in "How to log into multiple Google accounts," it is possible to have multiple Gmail windows open in the same browser.

However, it can be even easier for you to have all your Gmail come to a single account, assuming it's prudent to combine them.

For my needs, I have several Gmail addresses that I need to check that all relate to my blogging: my main hobomama Gmail account, mail forwarded from my personal domains (such as {at} LaurenWayne.com), and mail sent to various addresses {at} NaturalParentsNetwork.com (CarNatPar, Lauren, Advertising). Before combining these, I had to log into each Gmail account separately to read the messages, even though it's entirely appropriate to combine them all into a single account for the purposes of checking my inbox and sending replies.

(Note that I've kept my personal email separate, however. I figure that might lead to too much confusion, so I check it separately.)

Here's how you can check multiple Gmail accounts under one login:

1. Go to your Gmail settings of the account you do NOT want to log into from now on.


Click on the gear icon toward the upper righthand corner of your Gmail screen (located underneath your profile icon or name). In the drop-down menu that appears, select "Settings."

What I mean by "the account you do not want to log into" is, this is the account you'll be forwarding mail out of, to flow into the account you'd prefer to check. So right now, set up the forwarding in the reject account.


2. Configure your email forwarding FROM that account.

Click images to embiggen.

  • Select "Forwarding and POP/IMAP" from the tabs along the top of Settings.
  • Click "Add a forwarding address" and do so. It will send a confirmation code to the forwarding address, so now you have to log into that account to receive it.
  • Confirm the code with the first (reject) account. You can click the link in the email Gmail sent you, or there is a box on that same page that will read "Verify [email address]" with a box for the confirmation code. (Will all this require some logging in/out and back-and-forth? Perhaps, if you haven't enabled multiple log-in, or you're forwarding to a non-Gmail account. But it will save you time in the future, so keep on!)
  • Select "Forward a copy of incoming mail to," and the address you've confirmed should now be in your drop-down menu of forwarding addresses.
  • Choose what to do with mail forwarded out of this account. Do you want it kept in the inbox, marked as read, archived, or deleted? To keep things tidy but preserve copies in case I choose to separate the accounts in the future, I choose "archive Gmail's copy." What you choose here will affect only the emails as they exist in this account, not as they appear when forwarded. In other words, I selected "archive," but the forwarded emails still appear unread and in my inbox in the preferred account.

2.15.2012

How to log into multiple Google accounts


Two Gmail accounts open in the same browser simultaneously,
with no computers exploding


If you want to check multiple Gmail accounts or access (some) other Google accounts without logging in and out or opening a new browser, here's a tutorial to show you the easy way to handle this.

All you need to do is enable multiple sign-in and then sign in to each account, switching among them as needed.

1. Enable multiple sign-in for Google accounts within your web browser.

Go to https://accounts.google.com/b/0/MultipleSessions, select "On - Use multiple Google Accounts in the same web browser," and save.

2. Log into another account.


For most Google products, look in the top righthand corner to find a little down arrow next to your profile icon (if you have one) or your login email address. When you click the arrow, the drop-down menu above will appear. Click on "Switch account."


Presumably you will see yourself signed into only one account, marked "default." Click "Sign in to another account…" to do just that.

2.14.2012

How to tag Facebook pages from your fan page


I'm banned from Facebook for today due to suspected malware violations,1 which means I'll write about Facebook from afar.

Here's an(other) Facebook issue that was bugging me for months: I didn't seem to have the ability to tag other Facebook pages from my own fan pages.

So, for instance, I'd be on my Hobo Mama Facebook page and want to @ another fabulous fan page, and sometimes it would let me, but mostly it wouldn't.

I clicked around online, trying to find a fix, but nothing seemed to help. Until … I combined advice I received with one other crucial step: waiting a bit.

So, here is my two-step process to tag any page from your Facebook fan page. (Note that this doesn't work to tag people or personal profiles, as that doesn't seem to be a fan page functionality.)

11.15.2011

Customize your Facebook links in status updates

Here's a nice, simple tutorial for how to make the links you put into your Facebook status box look the way you want them to.

I believe it was Kelly of KellyNaturally.com who first clued me in to changing the descriptive text, and she's actually someone I've been talking with recently about frustrating Facebook changes that have restricted our customizations. That said, I hope most or some of the following still work for you (or will in the future)!


(Click images to see them larger.)


When you paste or type a link into the status box, Facebook will try to pull up a title, URL, description, and thumbnail for you. Sometimes this is helpful. Sometimes this is a big bucket of fail.

Randomly, Facebook used to pull the post description from my first comment. I believe this is some weird Blogger–Facebook glitch. It was not ideal.

Since adding my meta keywords and blog description, Facebook now draws from that — in this case, A blog about natural parenting — which is marginally preferable though still off.


But I can change it to be what I want.

Hover your mouse over the description, and you'll see it highlights.


Click it, and now it's editable.

3.14.2011

How to purge your email inbox


I am NOT an expert on reducing email clutter and controlling what comes in each day. Best to start with a caveat. That said, I recently cleared my personal Gmail account from over 2,000 unread messages (you read that correctly) to 42.


Here are a few of the tips and tricks that I sometimes follow to help me keep a handle on inbox overload (some of which I should really attend to more often!).

9.06.2010

New rich-text signatures in Gmail

Just as a short update to my post on creating HTML signatures in Gmail:

Gmail has finally released a long-awaited function for creating a signature in rich text format.


Click the image to see it bigger. Ignore that it's in German. That's a quirk of mine.

This screen is in Settings in Gmail (which you can reach by clicking the link in the top right corner). The box where my signature is is where you paste in or craft your own signature, and the rich-text icons allow you to control and customize font styles, colors, sizes, and alignment, or to add lists, links, and images.


So that should be easier, all around! I just pasted my previous HTML signature into the rich-text box, and it transferred perfectly. You could also build one from scratch, and you can include URLs and images as you wish, so you can link to your website or social media pages and include an avatar or business logo.

You can even have a different signature for each reply-to address, so if you wanted to have a personal signature and a business signature, that's possible. Or if you run separate businesses (such as a blog and a store), you might have one signature that goes to readers and one that goes to customers. As an author, you could include an image of your book cover and a link to the Amazon buying page.

There's really no downside to having a simple but effective signature. I encourage you to take advantage of the signature function, and personalize the emails your readers receive. Thanks to Gmail for realizing rich-text was the next (overdue) step forward!

6.29.2010

"Usernames must be at least 5 characters long" Facebook bug for custom URLs

If you've been getting this obnoxious error message —

"Usernames must be at least
5 characters long"


— when you're trying to set your Facebook custom URL, you're not alone.

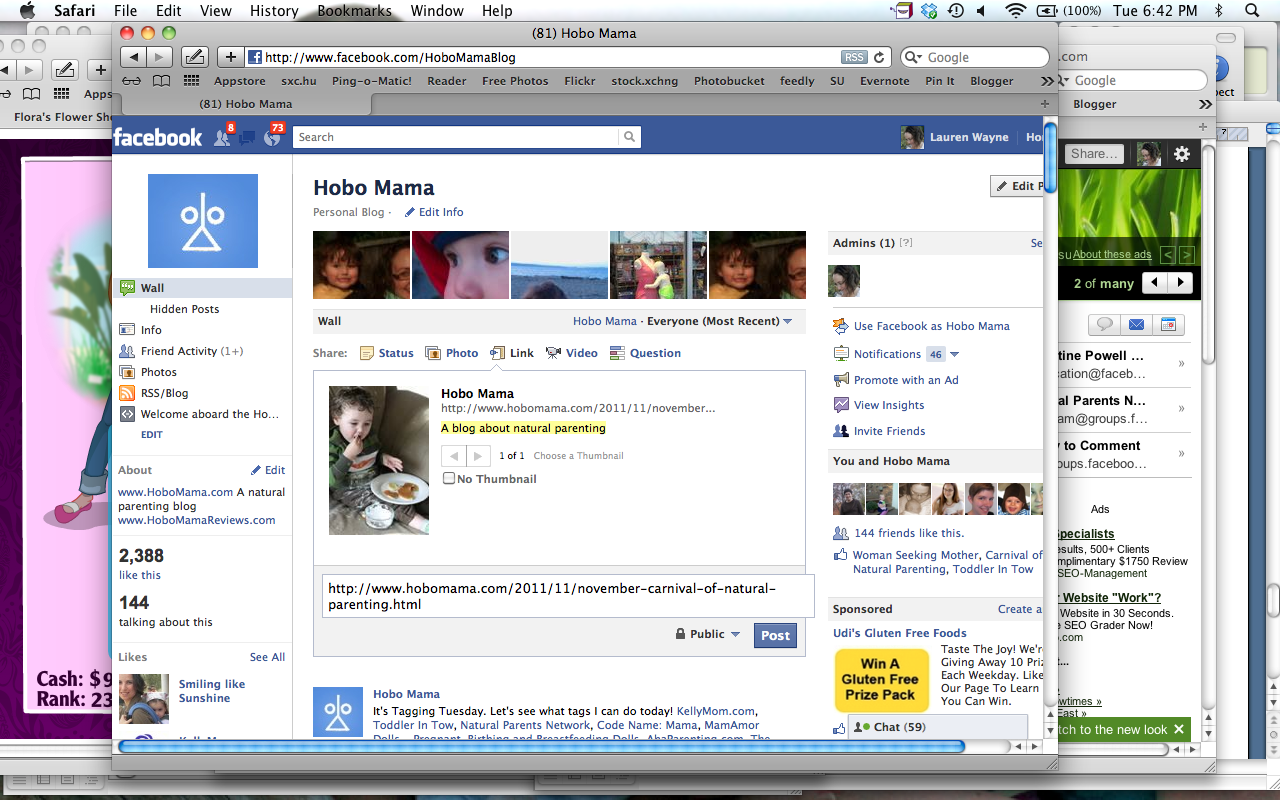
I was having this problem lately. After much thought, trial and error while typing in possibilities, and a public opinion poll, I had decided on the custom URL for my Hobo Mama page: http://www.facebook.com/HoboMamaBlog

I toddled off to the Facebook link to claim my URL — http://www.facebook.com/username — which works both for personal Facebook pages and for business/blog/etc. fan pages.

I typed my choice into the little box and hit "Check availability." And, um … no. Facebook scolded me with an incomprehensible message: "Usernames must be at least 5 characters long."

HoboMamaBlog, I read. HoboMamaBlog. I stared at it. I squinted. Yes, even without all the bother of actual counting, that sucker was definitely over 5 characters.

Well, good old Google to the rescue.

I found this Hubspot blog post by Ellie Mirman: "How to Create a Facebook Page Vanity URL." Ellie in the post did not explain the error and offer a workaround — but Ellie in the comments section helpfully did!

Piecing Ellie's advice together with some advice I found on a Facebook forum that I for some reason can't locate at the moment, I played around with entering my name, erasing it, clicking "Check availability" while there was nothing in the box, then typing it in again. It still took a few tries, but eventually: It took! I have my new Facebook page URL!1

So, basically, it's a known bug. Facebook is aware of the issue (I'm told), but so far this is the best workaround.

Assuming you don't yet have a Facebook custom URL, here are the details on how to get one:

First, the 
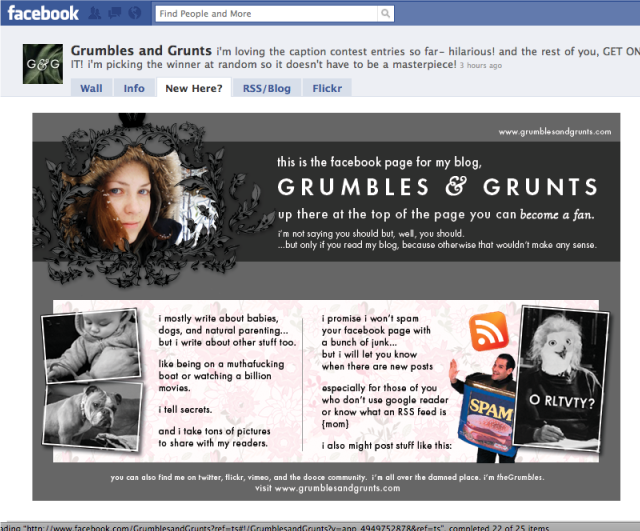
why: It's easier! You can tell people to find you on Facebook by saying, "Go to Facebook slash HoboMamaBlog." Rather than saying, "Go to facebook.com/pages/Hobo-Mama/322453825286." Oof, what a mouthful! The former also fits better on business or calling cards, darling. And, you know, why not? It's fun; it's cute; it shows you care.

So you want one? Good.
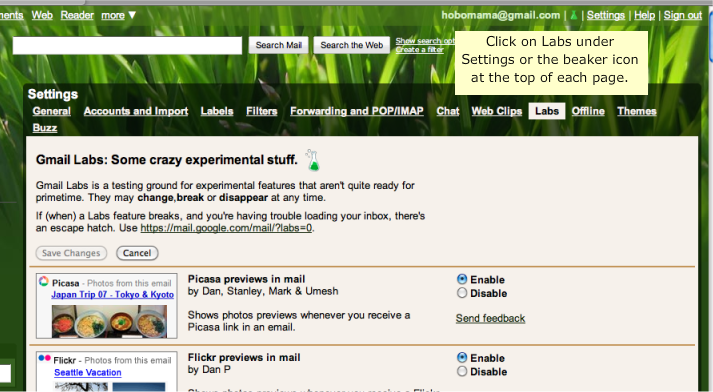
Where: Go to http://www.facebook.com/username.


You can click on images to see them bigger.


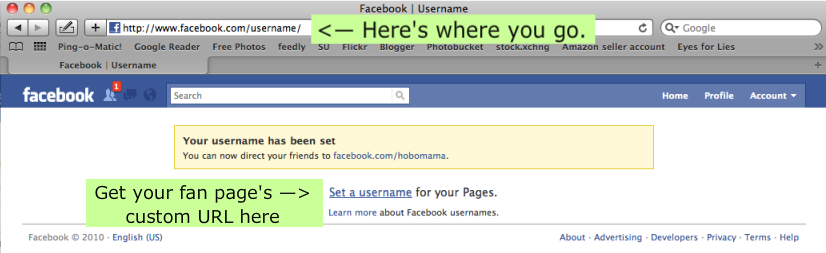
Personal first: You will have to set a personal user name first if you don't already have one before setting any for your pages. My personal Facebook name is http://www.facebook.com/hobomama (and feel free to friend me if you like). As you can see, I "stole" hobomama from myself so it was no longer available when I wanted it for my blog's Facebook page, which meant I belatedly had to come up with something else.

Permanence: Do think long and hard about what you want your permanent URLs to be, for all your Facebook profiles and pages, because so far Facebook is being hard-nosed about allowing changes to usernames. Basically, you can change your personal one once. You cannot change your business (page) ones. You cannot transfer a username to or from someone else. (So on that note, triple check your spelling, too!)

Eligibility: All verified Facebook accounts are allowed to set a personal username. Fan pages, however, must have 25 fans before you can set a username for a fan page.2 (This is to prevent name squatting.)

What's in a name:
  • Usernames can only contain alphanumeric characters (A-Z, 0-9) or a period ("."). I was kind of bummed that no other punctuation was allowed, such as an underscore. If you use a period for your own aesthetic sensibilities, know that it does not make your username unique from the same name without the period(s). That is, "hobo.mama" is considered the same as "hobomama." I did check, thanks to Toni Lamn's suggestion.
  • Usernames must be at least 5 characters long. Har har har. But it's true. "HM" wouldn't fly.
  • You can't claim someone else's username. (Duh.)
  • You can't claim a copyrighted username — or you might be able to, but Facebook can then take it away if a rights holder complains. So even if your last name is McDonald and you're managing your family fan page, don't bother registering "mcdonalds" as your username.
  • "Certain words" are not allowed. I think we can all guess what might be on that list. But, really, do you want your mother to see such a username? Shame on you for even considering it. Unless you're not Facebook friends with your mom. Then it might sort of rock.
  • You're also not allowed to use super generic words like "pizza" or "flowers," to prevent (again) people from squatting on popular SEO terms.

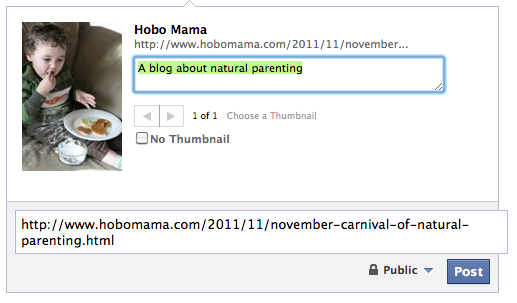
How: Type in your username and click "Check availability." If you get the infamous "5 characters" error and your username is, in fact, more than 5 characters, then backspace, click "Check availability" anyway, then type again. Rinse, repeat. Hopefully one of those times Facebook will obey and let you go through with the process. You'll get a big warning that this will go on your permanent record. If you are happy with same, go ahead and confirm. Congratulations! You have a personal username, i.e., custom URL with Facebook.


Down to business: So, if you have a Facebook fan (er, "like") page and want a username for that one (or multiple pages), then you just go back to the same link — http://www.facebook.com/username — and start again.
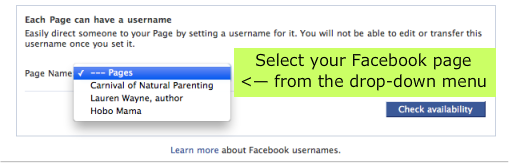
  • Click "Set a username for your Pages" underneath the yellow box telling you your personal username has already been set.
  • You'll see a drop-down menu with all the pages where you're an administrator. Select the one you want.
  • The same rules for usernames as above apply.
  • The same error might also apply, so use the delete-and-click workaround.
  • Remember the important differences between fan page usernames and personal:
    • You need at least 25 people "liking" your page before you're allowed to set a name.
    • The name you choose will be permanent. Full stop.
  • Once you're ready, click to confirm.
That's it! Now you should be the owner of a brand-new Facebook Page custom URL. If you have multiple pages, just repeat the process again.

More info can be found in the Facebook help section on the subject.

Enjoy! And visit me. And like me! I'm nice.

http://www.facebook.com/pages/Lauren-Wayne-author/104277789602502?ref=ts (sigh — so long, so ugly)
http://www.facebook.com/HoboMamaBlog
http://www.facebook.com/CarNatPar
(I set that one, too, while I was at it.)


Thanks again to Ellie for posting the workaround!


1 I only have a custom URL so far for my Hobo Mama page, because my Lauren Wayne page is soooo lonely that I do not as yet qualify for one. Anyone want to "like" me there? Anyone?
2 Did I mention I need more fans? I need more fans.


4.06.2010

Convert your time zone for deadlines

Dionna of Code Name: Mama and I are writing a few blogging tutorials of particular use for our Carnival of Natural Parenting participants. This one will help in making sure you get your carnival submission in by the right time, no matter where in the world you live!


All right, this is probably one of the lighter tutorials for our carnival participants, but it does come up every month, and I might as well have a blog post to point people to.

All the writers outside of the Pacific time zone I set the deadline for want to know: When is the article due in their time?

This tutorial can also help anyone who's writing for an editor across time-zone lines or entering a contest with a firm deadline.

Submissions for the Carnival of Natural Parenting are due by 11:59 p.m. Pacific time. Now, I'm not encouraging anyone to wait until the very last second to turn their entries in (although I generally do just that), but it's good to know the latest you can click "send" on the email, isn't it?

But if you live nowhere near Pacific time and can't do the math in your head:

You need a time zone converter.


Here's one:

World Time Server


The top line is showing you 11:45 p.m. (Daylight Saving Time) for Pacific time, the time zone I chose, because I live in Seattle. I wanted as much time as possible to turn in my article. I'm like that.

Find your own country, city, or state in the drop-down menu where it says "In."

Voila! Now you know what your actual deadline is.

Here's a cheat sheet for some of our most common entry time zones, adjusted for 11:59 p.m. PDT. If I say "next day," that means that time on the date after the stated carnival due date (for this carnival, then, April 7).

Time Zone Adjusted Time
Hawaii Time 8:59 p.m.
Alaska Aleutian Time 9:59 p.m.
Alaska Time 10:59 p.m.
Pacific Time 11:59 p.m.
Mountain Time 12:59 a.m. (next day)
Central Time 1:59 a.m. (next day)
Eastern Time 2:59 a.m. (next day)
Atlantic Time 3:59 a.m. (next day)
Western Africa Time 6:59 a.m. (next day)
Greenwich Mean Time 7:59 a.m. (next day)
Central European Time 8:59 a.m. (next day)
Eastern European Time 9:59 a.m. (next day)
India Standard Time 12:29 p.m. (next day)
Western Australia 2:59 p.m. (next day)
Japan Standard Time 3:59 p.m. (next day)
Australia New South Wales Time 4:59 p.m. (next day)
New Zealand Time 6:59 p.m. (next day)

What time zones am I forgetting? I'll add places if you leave a comment with a request.

Hope that helps you as you plan your procrastination!

April 11, ETA: I realized you might like a chart for Eastern time as well, since some of our Carnival day deadlines are in Eastern. Here you go, a conversion of noon EDT!

Time Zone Adjusted Time
Hawaii Time 6:00 a.m.
Alaska Aleutian Time 7:00 a.m.
Alaska Time 8:00 a.m.
Pacific Time 9:00 a.m.
Mountain Time 10:00 a.m.
Central Time 11:00 a.m.
Eastern Time 12:00 p.m.
Atlantic Time 1:00 p.m.
Western Africa Time 4:00 p.m.
Greenwich Mean Time 5:00 p.m.
Central European Time 6:00 p.m.
Eastern European Time 7:00 p.m.
India Standard Time 9:30 p.m.
Western Australia 12:00 a.m. (next day)
Japan Standard Time 1:00 a.m. (next day)
Australia New South Wales Time 2:00 a.m. (next day)
New Zealand Time 4:00 a.m. (next day)

P.S. A Facebook comment from mamamilkers said about this post: "I think you made have just taken nerd to the nth degree ;)" I'll take that as a compliment...

Photo copyright © Jenny Rollo, who lives on Australia NSW Time

3.25.2010

Create a Facebook landing page for new fans

I was wondering how companies and blogs had sweet landing pages, and now I know!

If you don't know what a Facebook landing page is — and you have a blog or website or product or company or whatever you're promoting with a Facebook fan page — then you need to find out and get yourself one!

It's an html page that shows up whenever a potential fan clicks on your Facebook page link.

It's a way to give a quick snapshot of who you are and what you do, or to showcase a special deal or current offer.
  • If you're an author, you could put up an image of your latest book cover and invite people to click through and buy, or sign up for your blog.
  • If you're a blogger, you could tell potential fans what you like to write about and how they can get in touch.
  • If you're a store, you could highlight a current coupon code or the season's new line.
  • If you're a business, you could put up your mission statement and contact information.

Want to see some landing pages in action?


Love love love the Grumbles & Grunts one (of the Grumbles & Grunts blog), and that's what first inspired me to find out what a landing page was and how I could get me some of that action!


I want mine to look pretty like that sometime.

Other examples:


If anyone can come up with some more natural parenting-friendly examples, please leave the link. I seriously had so much trouble finding anyone I know who has a landing page, so I'm glad I'm getting the word out! :)

How to make a landing page


I don't want to reinvent the wheel. Do what I did — follow this Mashable tutorial:

HOW TO: Build a Facebook Landing Page for Your Business


Easy as pie. The how-to is 4 steps long, and it was very clear-cut.

Testing your landing page


If you're anything like me and you try to preview the functionality of a visitor clicking on your link and finding the landing page — you will be disappointed. I say this because I assume you are your own fan? (If not, why not?)

Once you're a fan, you will no longer see the landing page as the default view when coming upon a Facebook page. It will instead default to the Wall tab. If you couldn't see some of the examples I put in the example list, for instance, it's probably because you're a fan of those sites.

But you can still check the html by clicking on the tab at the top of your fan page. You can also log out of Facebook and then surf to your Facebook page to make sure the landing page is what shows as the default view for non-fans.

Wanna see my landing page?


I don't yet have a public LaurenWayne.com Facebook page because it just now occurred to me to make one.

But here's my current Hobo Mama landing page.


I'd like to make it more sophisticated at some point, but it will do for now, to give visitors a quick intro to my blogs and all the ways to connect with me!

[ETA: All right, I made a Lauren Wayne Facebook page but it doesn't have a landing page yet... Feel free to fan me, and you can see any updates in the future!]

Share your landing pages in the comments. I'd love to make new Facebook friends.

3.07.2010

HTML signatures in Gmail: An easy how-to

Update, September 2010: Gmail has finally unveiled a rich-text signature function that replaces this method, though you can still read on for benefits and tips of creating an email signature.


I've been wanting an HTML signature in rich text for my Gmail account for when I send business emails, so I can promote my websites, Twitter account, and Facebook pages — but all in a streamlined and attractive manner.

Gmail doesn't currently support rich text or html formatting in the sig box, which is on the Settings page.

Here was the best I could do in plain text:
~*~
Lauren Wayne

www.HoboMama.com
www.HoboMamaReviews.com
www.LaurenWayne.com

www.Twitter.com/Hobo_Mama
www.Facebook.com/HoboMama
www.facebook.com/pages/Hobo-Mama/322453825286

Unwieldy, isn't it?

I don't like how lengthy the Facebook URLs are, and I don't like that the sig as a whole is a whopping 10 lines long. For Gmail to automatically parse the html, I had to keep at least the "www" part intact, which meant I had to use a plain URL rather than just, say, a blog name (www.HoboMama.com vs. Hobo Mama or HoboMama.com).

So, since I didn't like that, what did I like? Well, here's what I ended up with, using my super-cool and sneaky method:
•••
Lauren Wayne
Hobo MamaHobo Mama ReviewsLaurenWayne.com
TwitterFacebookFacebook Page

And here, my friends, is how I got there:

First of all, you need a place to edit your html. If you know how to hand-code html and preview it online, go to it. I found the easiest way in a WYSIWYG sort of way was to use a Blogger account. For my purposes, I used my standard Hobo Mama account.

  1. In Blogger/Blogspot, create a new post. You can title it "gmail signature" or something else memorable in case you want to come back to it. You won't be publishing it, just saving it as a draft, and you can always delete it after you're done tweaking your signature if you want to keep your account clean.
  2. Click on the Compose tab. Type in your signature as you want it to look. Use the Link function to add URLs to keywords. Change fonts and colors as you wish. You can add in special characters like bullets. You could even add images, such as a company logo. In fact, you could make your whole signature just one big image if you'd rather and know how to edit image files.
  3. Copy the finished signature.


(Click on images to see them bigger.)

All right, now we head over to Gmail. As I said, you can't use any html or rich-text formatting in the signature box, so we'll skip that box. You could simply copy and paste your signature into each email individually, but that's cumbersome. The method I came up with isn't as easy as having a traditional signature, but it takes only a second or two each time you compose an email and it uses the Canned Responses feature in Gmail Labs.

  1. Go to Settings in Gmail (top right corner).
  2. Click Labs along the top tabs.
  3. Scroll down or do a search for Canned Responses and select Enable next to it (yes, "email for the truly lazy"). At the top or bottom of the Labs page, click Save Changes.
  4. Now click on Compose Mail. Make sure you've selected Rich Text as your messaging view. Paste your signature into the message box. It should paste exactly as you had it formatted in the Blogger box. You can change the font or layout further using Gmail's rich-text editing.
  5. As an optional extra, if your signature font is formatted in a way unlike the way you would like your message to be (for instance, my signature is in blue, but I prefer my message font to be in black), add in a simple line of text above your signature that you usually use to start a message. In my case, I added "Hi!" I formatted "Hi!" in my preferred black message font. [ETA: I just realized what would be even easier and more convenient would be to add how you usually CLOSE your emails, such as your name!]
  6. Now that you've enabled Canned Responses, there should be a line that says Canned Responses just above your message box. Click on Canned Responses and select Save --> New canned response... A box will pop up and ask you for a name to save it under; you can choose something like "business signature."
  7. Now you can Discard your draft message.
  8. Next time you go to email someone, either through Compose or Reply, click on Canned Responses --> Insert [business signature or whatever you called it].
  9. Voila! Your signature appears. You can tweak it in the message box if you'd like, or go back to Blogger to do major revamps. If you want to save a change, simply click on Canned Responses --> Save --> [business signature] again, and OK the warning that pops up that you're saving over a saved canned response.


I know this method isn't quite as convenient as having a signature automatically appear whenever you click Compose, but it's the most streamlined way I could find for now!

The good news is this method lets you choose which messages you want to put a signature on. You could even have multiple signatures, such as a personal one and a business one, and choose which signature you want each recipient to see. You could put your address and contact info in emails you send to publishers, for instance, but your URLs alone for emails to colleagues, just saving each signature under a different name.

Hope this tutorial helped you! Let me know, or give me your own tips.
Related Posts Plugin for WordPress, Blogger...