Showing posts with label images. Show all posts

6.26.2017

Photobucket phail, or How to ruin a hosting site

UPDATE July 3: Photobucket keeps sending me autoresponses and demands for payment, so that's no help. BUT, I did find a viable workaround for myself, so I've posted what I'm doing right now at the end.


The pirate's sign that you must
pay the ransom or forfeit your photos
A few days ago, without any advance warning, Photobucket sneakily changed its terms of service to disallow third-party hosting, or hotlinking, on nearly all of its plan tiers. Most people use Photobucket explicitly for the ability to link from images on Photobucket to other locations such as blogs and forums, so this seems like a baffling move.

Until you realize the scam that's afoot: The only way to get your images to show up again is to pay Photobucket $400, upfront, as an annual subscription to its most expensive plan.

Ah, I see. It's a ransom demand.

I'm livid. I'd been using Photobucket to host my images on my Blogger blogs for ten years. For several of those years, I paid Photobucket an annual subscription for the benefits of unlimited bandwidth and extra storage.

3.24.2016

Optimizing your blog images for Pinterest: 9 tips {Updated!}

Since things have changed so much since the last time I wrote about this topic, I figured an update was in order for the way Pinterest works with blog images now.

Many bloggers report amazing traffic from Pinterest if you leverage the platform just right, garnering viral repins and multiple clicks through to a blog. Here are ways to fine-tune your blog images to be Pinterest-friendly.

  1. Include an image in every post.

    If you want to be pinned, this is a must. Technically, a pinner can skirt around this by uploading an image to use as a placeholder for your post, but how dedicated are your readers really? Even if you're a writer, a words person, not a graphics person (I get it — I do!), you need an image in your blogpost. And even if you're not on Pinterest yourself — even if you never set foot in the app or have an account — your blogposts could be gaining traction there as soon as someone pins them. So it's worth making your posts pinnable! The minimum size, by the way, is 100X200 pixels, which is teensy and not going to play well on Pinterest. Read on.

     
  2. Use the standard Pinterest size for best results.

    The largest pin size is 735 pixels wide, and the longest pin that can be read in mobile without clicking on an "expand pin" button is 1102 pixels long. So there's your optimal pin size: 735x1102. (You can round it to 1100 if that's easier to remember, and it doesn't actually need to be exact.) That's the width that will pop up when you click on a pin on desktop. You can technically make your pins infinity long, so if you have more to include (such as in an infographic or a step-by-step pictorial tutorial), then go for it. The whole length will be shown on desktop, but be aware that the whole length won't show automatically on mobile without an extra click.

    Examples of how pins look on desktop & mobile:

    Pins can show as super long on desktop.

    Longer pins will be truncated on mobile.


10.24.2013

Where to find free images for blog posts

Where to find free images for blog posts == LaurenWayne.com

You know that punching up your blog articles with pictures lends a thousand-plus words to your text — but you also want to make sure the photographs and drawings you find are legally yours to use under copyright law and ethical guidelines. You generally can't just grab a photo off Google Image Search or someone else's blog without permission.

There are many stock sites that will allow you to purchase photos, but bloggers rarely want to spend cash for their frequent and frequently ill-paid postings.

So: Here are my top 10 resources for royalty-free, payment-free, copyright-legal, fair-use images for your blog posts.

1.11.2013

3 easy ways to make your blog Pinterest-friendly


The pinners are everywhere, and they want to pin your post!

Here are my top three ways to get pinned and repinned on Pinterest!

1. You need an image in your post!

Preferably big and pretty. Pinterest is visual, and the people who use it tend to like their boards to look nice. If your post has no image (or just a video), Pinterest will refuse to let it be pinned. So, seriously: You need at least one photo or illustration in your post!


1.12.2011

Setting up thumbnail linkies & choosing the right dimensions

In honor of Wordless Wednesday, I bring you an entirely not-wordless post on crafting user-friendly thumbnail linkies — those link-ups that allow users to attach a small linked image and title on your blog, brought to us in this incarnation by Linky Tools (formerly McLinky). It's perfect for Wordless Wednesday, giveaways, recipe and craft roundups, and any other image-heavy blog hopping or blog carnivals.

There are other purveyors of thumbnail linkies, but I'm talking exclusively about Linky Tools in this tutorial.

I would specifically like to draw your attention to the length of the input box. For the user, this is the title of the thumbnail they enter.

First, an overview:

(Click on images to view them larger.)


To create a thumbnail linky, simply go to your dashboard (you have to have created a free account beforehand), head to the right to "Create a new linky," and select "Thumbnail" from the drop-down menu before hitting "Go."


This is the default thumbnail linky page.

From the top down, here's what's on the page.

  • First, you enter a List Title. This is for your eyes only, just to keep track of the linkies in your dashboard. I date mine and note what the linky was for (e.g., Wordless Wednesday 110112).
  • The Length of User Title Entry is the fairly awkward terminology to describe how long the text box is the linker-upper will see. It's the title to the thumbnail that the user types in, and you determine how many characters they're allowed. The default is a puny 20 characters, so this is what you'll almost certainly want to change.
  • Size of Thumbnails (or, as it inexplicably but somewhat humorously reads, ThuThumbnails) is how big the images will be on your page. The default is the smallest, 40 pixels.
  • Start and Stop Date/Time (not in picture). This lets you set the duration. Ending the linky after a reasonable entry time helps cut down on spam links coming in later on. I keep Wordless Wednesday linkies open till Saturday, to give people a few days to straggle in. Giveaway linkies set to open on a certain day might stay open till the next week's linky goes live. The start date defaults to the current time you draft the linky. If you want to pre-date it or post-date it, you can do so. For instance, if I'm drafting a Wordless Wednesday post on a Tuesday, I typically set the start date to Wednesday at midnight, just to be matchy.

Choose the right sizes:


Here's where you can choose the size of the thumbnails and adjust the length of the user-entered title.

To skip down to the thumbnail sizes, Brent Riggs has helpfully provided blue-green squares demonstrating each size, noted below the squares as pixels (length and width), from 40 to 200.

I've found that most useful thumbnail linkies are between 80px and 160px. I use 120px. Very link-intensive pages often choose 40px. It somewhat depends on how many thumbnails you expect to receive, because the smaller ones will load faster, while the bigger ones will be more aesthetically pleasing.

Whichever size you choose, make sure you change the Length of User Title Entry.

Change it out from the default of 20 characters to a character length appropriate to the thumbnail size.

You can see Brent's help text:
"For thumbnail linky's, the width of the area that HOLDS the title is the same width as the thumbnail image size you choose below. So, you should choose an title entry size that is relevant to the thumbnail image size."
Then there is a suggested list of appropriately matching thumbnail sizes and character lengths. I recommend paying attention to the suggestions, because they generally work.

For instance, I use 50 characters to match my preferred thumbnail size of 120 pixels.

The problem with setting too few characters? Users won't have enough room to enter the title of their post, particularly for a giveaway linky, which usually demands a blog name, giveaway item, and end date. Twenty characters is nowhere near enough for most people to jam in that amount of info, so something in that case has to be left out. There might have to be a balance made in favor of larger thumbnails to allow users sufficient space to enter the characters they need (more characters for giveaways, fewer for Wordless Wednesday and other more casual link-ups).

The problem with setting too many characters? Some users will max out the character length, but then if the thumbnail is too small (or the blog's template calls for a font that is wider than average), some of the lines of text will be chopped off and lost. Since it's impossible for a user to self-edit an entry, there's no convenient solution for the user once that happens. There's only leaving it as is, double posting with a new and smaller title, or emailing the blog owner for help in the editing.

(Click to see images actual size.)

120 pixels with 50 character limit titles (from my blog) — the images are clear, and the titles fit in whole. However, this size might be too bulky for blogs with many links.


These above are 80 pixels in size with a balanced title length. (Again, click to see the image actual size.) Every title fits, although they're a little squishy vertically, which is presumably due to an interaction with the blog's template fonts and can't easily be altered (without altering the template, which seems like overkill for such a small problem).


40 pixel size above (the smallest) with a character limit that's a little too big for the image width. Click on the image to view it actual size. You can see that the bottom right title for Natural Parents Network cuts off at the bottom. Even though it wasn't over the character limit, using that many characters exceeded the allowable display size. The 40 pixel size is petite, which makes images harder to see, but is useful for blogs that anticipate a lot of links and need a faster loading time.


So be sure to choose your image size and character length thoughtfully.

Grab the code:

Once you've chosen all your options, you can then save and create your linky. It will deposit you back onto the Dashboard, where you can get your code.


(Note that you can also Manage Links by deleting any that are objectionable and Edit List at the lefthand side to quickly change your options, such as thumbnail size, character limit, and duration.)

Once you click "Get Code," a box will pop up. One final warning: If your system is anything like mine, it will pop it up so that half the box (the relevant half for me, as it turns out) is hidden up past the top of my screen. I have to scroll up to see the full box, but that's what's needed.


Blogger, self-hosted WordPress blogs, and other blogs that allow Javascript should use the top code. (That's most people, in other words.)

Blogs hosted for free at WordPress need to use the bottom code. WordPress-hosted blogs don't allow Javascript, so Linky Tools hosts the linky in a separate window off-site. This is for blogs ending in .wordpress.com. If that's you, go with the second option.

If that's not you, go with the first.

And that's all. Paste it into your blog post. (See here for how to paste HTML into Blogger and here for how to paste HTML into WordPress.)

Once you publish your post (assuming you didn't set your start date to the future), your cute little thumbnail linky will be live and ready to accept that first eager linker.

Enjoy!

3.22.2010

Use image alt and title tags to drive traffic to your webpage or blog

I was checking out my Google Analytics tonight, which I actually don't do that often, since it somehow got marooned on another account.

I've noticed something the last few times I've visited: Go under Traffic Sources --> Referring Sites. Consistently in my #1 spot?

Google Image Search, http://images.google.com


You know what this means? It means I'm doing something right (yea!).

The information in my images is driving traffic to my blog. If Google Image Search isn't high on your list of referring sites, make sure you're doing what you can to attract new readers or customers to your website — all through the power of your pretty, pretty pictures.

Fill in the alt tags on your images

When you have an image on a post or on a webpage, the source code looks something like this:

<img src="http://images.hobomama.com/20100122_1475.jpg" align="right" alt="Hobo Baby with train conductor's hat and harmonica" title="Hobo Mama" width="200" />

You can see that I've included an alt tag that amply describes the picture. Do you want to make sure that's true? Here's the photo for your viewing pleasure:

Hobo Baby with train conductor's hat and harmonicaNow, granted, this might not be the best photo to draw traffic to my site, since I'm likely to pick up people searching for hobo babies, harmonicas, or conductor's hats — none of which my blogs are actually about.

But I have gotten consistent results from people searching for other common keywords that show up all the time in my Hobo Mama blog and related images: breastfeeding, elimination communication, toddler, baby, pregnancy, birth, babywearing, baby signing, Mayim Bialik (what? people don't routinely search your blog for news of Blossom?), and so on. And all of those keywords I do write on regularly, so it's a beneficial stream of traffic for me — the type of traffic that's likely to stick around.

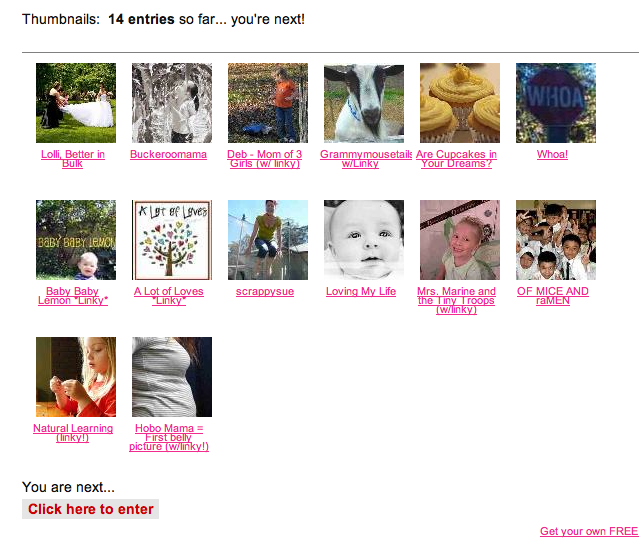
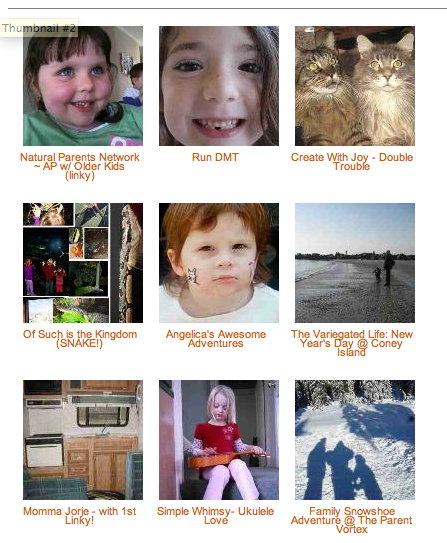
For instance, take a gander at this Google Image Search for "elimination communication toddler":

Google Image Search for elimination communication toddler

Those top four photos are all me, baby. I mean, not of me, obviously, or even by me — but hosted on my site. And since that's a niche interest, it's likely that only people genuinely interested in the topic will be searching for such pictures and will therefore want to click through.

If they do, my lovely blog posts on the subject will greet them:

Google Image Search click through to Hobo Mama on EC toddler

Take-home message? 

If you have an author website, make sure you tag your book cover images with an alt that includes both the title of the book and your name as the author, something like "My Wonderful Book by Author McWriteypants." This works well for Amazon Associates links as well. If you're using the Blogger plug-in, those alt tags are automatically filled in for you now (snap!). If it's an author photo, don't make the alt tag "author photo" — make it "Author McWriteypants author photo." Then you'll get anyone searching for author photos in general, and for yours in particular.

If you have a blog, do as I do and make sure every picture includes some keywords that describe the picture and reference back to your writing topics. Don't fill the alt tags with unnecessary gobbledygook, because it will mark you down as a spammer, but do use them to their fullest reasonable limits. It's an extra step, but it's worth it. If you use Photobucket to host your photos and you fill in the Title box, Photobucket will fill in the alt tag for you in the version of the code labeled "HTML Code," so you can save some time there since you were probably going to title your images in Photobucket anyway.

What about title tags?

From the research I've done, alt tags are definitely more important in search engine ranking, so prioritize alt tags if you're going to slack off on one or the other.

Title tags are intended for an image that is linking to something else. Note that I put the title "Hobo Mama" in my img code. Hover over the picture of my hobo baby and see how the title shows up in a little box where your mouse is. A title basically is to tell you what the image is linking to.

The title can be fancier than the webpage name. You could put "Click here for more scintillating blogging about hobo babies and their instruments," for instance.

Change the file name and other attributes, too

There's some evidence that Google also indexes the file name of the image. So, an image file name of "hobo-baby.jpg" would be better than my crappy actual one of "20100122_1475.jpg."

Note the hyphens in "hobo-baby.jpg." The keywords are read as separate words if there are dividers such as hyphens or underscores between them.

Other tips?

Put in width and height identifiers, to make indexing easier on Google and big, juicy images more readily accessible.

Consider a watermark to alert image surfers to your site and discourage image thieves. You can also put image copyright information into the alt or filename text.

In conclusion, my lovely image gifters

Use the alt tag every time you want your image to be searchable (and don't if you don't, such as if you'd prefer to keep it more or less private).

The alt tag should describe the image. In fact, people with visual impairments will use the alt tags (read aloud by the computer) to see the image, so imagine that you're describing the image to someone who can't see it and make that your alt tag.

Use the title tag if you want to and if your image is linking to something else. Make the title tag descriptive of the link (e.g., "See picture at high resolution" or "Subscribe to Hobo Baby Harmonica Digest" or whatever is the case).

Change your file names to something descriptive if you remember before you go through all that bother of uploading. (Sigh.)

Remember that the surrounding text also influences how well Google ranks your images, so just keep being reasonable (using images that fit the theme of your site's content), and this synergy will happen on its own.

The result? Happy readers who can get useful information from your functional images — and happy search engines, who have new material to mine — and happy you, who gathers new readers as they float in from Google Image Search on your most common keywords.

How has Google Image Search helped attract readers to your blog, and have they been the good, stick-around kind? How faithful are you at putting alt tags in place?
Related Posts Plugin for WordPress, Blogger...