Showing posts with label html. Show all posts

2.04.2013

Basic links for Amazon Associates to copy & paste

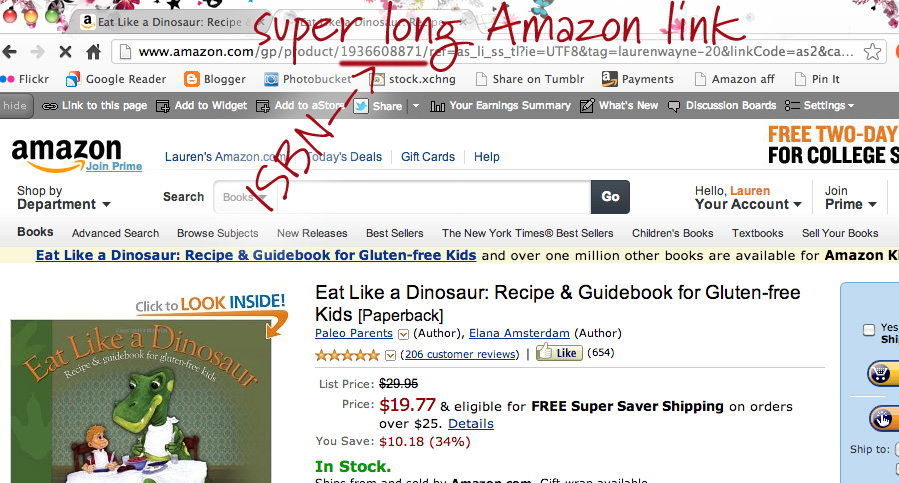
From this:


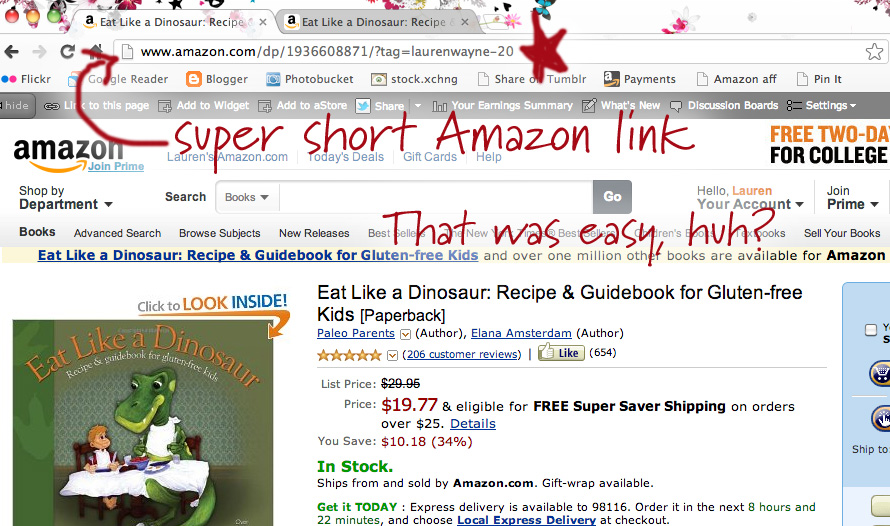
to this:


Here are some very easy codes to use to make Amazon links from any Amazon item page. If you don't feel like signing into your Amazon Associates account to get the full link, these will work and track just as well.

Link to an item:

<a href="http://www.amazon.com/dp/ISBN/?tag=laurenwayne-20" target="_blank">LINK</a>

Replace all the items in bold magenta:
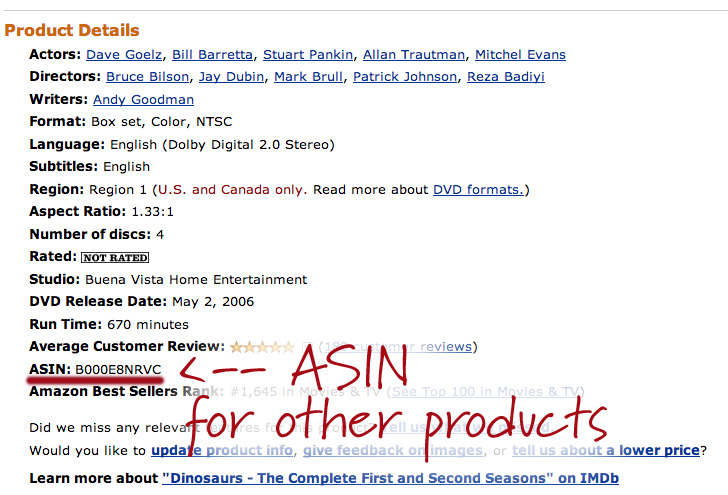
  • ISBN = Scroll down to the Product Details to grab the ISBN-10 for books or ASIN for any other product. As a shortcut, it's nearly always the first big string of numbers in the URL.

  • ISBN-10 for books: ASIN for anything else: ASIN location of Amazon Associates links for tutorial As mentioned, it's usually the first or only number in the URL as well:
  • tag = replace laurenwayne with your Associates ID tag

  • LINK = Whatever text you want for your link, whether it's the product name or some keywords in your post.

If you're not pasting your code into the HTML tab in your blogging platform, then here's just the plain link to use:

http://www.amazon.com/dp/ISBN/?tag=laurenwayne-20

The official Amazon linkage is this tremendous string, by contrast:

<a href="http://www.amazon.com/gp/product/1936608871/ref=as_li_ss_tl?ie=UTF8&tag=laurenwayne-20&linkCode=as2&camp=1789&creative=390957&creativeASIN=1936608871">Product Name</a><img src="http://www.assoc-amazon.com/e/ir?t=laurenwayne-20&l=as2&o=1&a=1936608871" width="1" height="1" border="0" alt="" style="border:none !important; margin:0px !important;" />

It's a lot harder to remember, right? It's fine if you're in the Associates interface anyway, but the short link will help you out if you're on Amazon proper and don't want to futz with Site Stripe or navigate into your account.

Link to an Amazon-hosted image:

<a href="http://www.amazon.com/dp/ISBN/?tag=laurenwayne-20" target="_blank"><img src="http://images.amazon.com/images/P/ISBN.01.LZZZZZZZ.jpg" alt="PRODUCT" title="POST" align="right" width="200" /></a>

4.08.2012

Sunday Surf: Babies, BlogHer, & the cost of blogging

Links to share, from Writing Tidbits:


How to merge pdf files in OSX

How did I not know it was SO EASY to combine PDFs in Mac?
1 DAY AGO
PDFs

Report alleged copyright infringement: Blogger - Google Help

Convenient DMCA form for Blogger/Google entities who are infringing on your copyright (such as spam blogs scraping your content).
1 MONTH AGO
blogger spam DMCA

8.22.2011

How to create footnotes in Blogger

By popular demand …


Even though there's no built-in way to create footnotes in Blogger, it's easy enough to code linked footnotes into a post in HTML view. Here's how I do it.

What it looks like for readers


This is my post text with a linked footnote at the end.1

When readers click on the footnote number, it jumps them down to the footnote. Clicking an arrow after the footnote conveniently jumps them back up to where they left off.

Footnotes are a great solution for tangential or additional text, such as caveats, resource citations, or pointless jokes. (I especially prefer the latter.) Readers can choose whether to continue reading the main text, or be delightfully distracted down to your bonus offerings, and then back up again when they're ready to resume.

The HTML code for you

You must enter this code in "Edit HTML" view in Blogger. (I have a tutorial explaining the difference between Edit HTML and Compose if you're not familiar with the two.)

WARNING: NEVER switch back to Compose view once you've inserted the footnote code in Edit HTML!

Code to put in the text where you want the footnote's number to appear:

<a href="#1" name="top1"><sup>1</sup></a>

All right, which is easier for you? I pasted it above so you can see it easily, but here's the same code in a grab box for easier copying/pasting. Take your pick!


Code to place at the bottom of your post:

<hr width="80%">
<p>
<span class="Apple-style-span" style="font-size: x-small;">
<a name="1"><b>1 </b></a>FOOTNOTE<a href="#top1"><sup>↩</sup></a>
</span>


Obviously, replace "FOOTNOTE" with the actual footnote!

Explanation of the codes

These footnotes work through a simplistic process of "name" URLs that reference each other. You tag each part of the footnote with a name. The footnote number in the text is named "top1," and the footnote number at the bottom of the post is named "1."

Then the paired URLs send readers back and forth between these "names" through the href codes. Telling the URL to go to href="#1" sends it to the post's URL but with #1 appended. That # sign tells the code to look for a name that matches what's after the #, and it finds it in our footnote named "1."

Multiple footnotes

If you want multiple footnotes, you simply need to paste the following parts of the codes again, substituting the numbers you need for the word "NUMBER."

Code to put in the text where you want another footnote's number to appear:

<a href="#NUMBER" name="topNUMBER"><sup>NUMBER</sup></a>


That's three replacements at the top, if you're counting.

Code to place at the bottom of your post for multiple footnotes:

You want to add in this line after your first footnote line as many times as you need it.

<a name="NUMBER"><b>NUMBER </b></a>FOOTNOTE<a href="#topNUMBER"><sup>↩</sup></a>

Again, replace the three instances of "NUMBER" with the number you're on.

Here's a grab code for 5 footnotes:


Styling your footnotes

Obviously, you can feel free to alter these codes cosmetically to suit your blog. This is just what I came up with. The basic structure is the "name" links, and the rest is decoration.

I used a "sup" command to make the footnote numbers superscript in the text, added an "hr" line at the bottom to separate the footnotes from the post's text, made the footnote font "x-small" in size, and used a little superscripted ↩ symbol for returning to the text location. Any of those elements could be changed as you wish. For instance, you could have your footnotes appear in a different font face or color, or change how you separate off your footnote area. If you want to copy mine as is, I don't mind, though I'd love any shout-outs to this post you'd care to give!

2.11.2011

How to add "Read More" jump tags in Blogger

My new favorite thing in Blogger? Adding "read more" tags to posts. I'd seen this feature on WordPress and other blogs before but hadn't realized it was a Blogger feature, too. I think it's been here for donkey's years, but I was slow to catch on to the benefits!

Here's a little tutorial that will explain "read more" links and let you know why and how you should add them!

What's a "read more" tag?

First things first! If you have no idea what I'm talking about, take a look at my Hobo Mama homepage (for I have not performed the same editing wonders on this site yet!).

(Click on images to see them larger.)

The "read more" link is at the bottom of the post that's been truncated. When you click on it, it links to the original article URL plus the #more tag at the end — in this case, this link: http://www.hobomama.com/2011/02/fat-and-pregnant-heartbeat-video.html#more. So if you're reading from a page and choose to "read more," you will get popped into the article at the point where you left off. On the other hand, if you click on the URL as a whole from another source (in a blog reader or from a Tweet, for instance), you'll see that the "more" tag is undetectable when the post is expanded (try it here: http://www.hobomama.com/2011/02/fat-and-pregnant-heartbeat-video.html). Then it simply shows you the post as a whole, and the "more" coding is invisible.

Other examples of a "read more" link at work can be seen in non-Blogger applications such as our WordPress-based Natural Parents Network homepage, which has a sort of magazine/excerpt vibe to it. You get a digest version of all the current posts and can click on the "Read More…" links if you're interested to, well, read more.

Why do I want "read more" tags?

Scanning and searching is easier

The biggest reason is to make pages that encompass a lot of posts less cumbersome for readers to scroll through and find what they want. This is true for your home page as well as any category/label search pages.

For instance, I've recently gone back and added in "more" tags on all my posts tagged with Elimination Communication on Hobo Mama. If you look at the category page for elimination communication now

http://www.hobomama.com/search/label/elimination%20communication

— you can easily scroll through 19 partial posts on the subject and decide whether each article is really what you're looking for. (I'm guilty of popping labels onto posts that are only distantly related in some convoluted way in my mind….)

By contrast, I went to a label where I hadn't yet added jump tags, and only six posts loaded, in their entirety. That makes it a lot harder for readers looking for a particular article to comb through your category tags, particularly if you have a lot of articles shuffled into a particular category. They have to keep clicking on "Older Posts" at the bottom of the page, again and again and again, in the hopes of finding the one article they're looking for.

I was going to show you the difference between the two ("read more" tags vs. no "read more" tags), but I plan to change all mine over as I have time. The best method I can think of, if you don't have "read more" tags yourself and you're on Blogger, is to load your own homepage or a category page and see how clunky it is to wade through it all.

More information, less space

The other benefit, and it's related, is that you can show highlights from more articles on a single page. For instance, I used to have to keep my Hobo Mama homepage at a maximum of four posts (under Settings --> Formatting --> "Show at most X posts on the main page"). My posts tend to be long and have a lot of images, so it took too long to load more than that and sometimes the multiple javascripts would interfere with certain browsers.

With the "read more" jump tags, however, I can keep each individual post down to a manageable excerpt size and therefore safely and conveniently show more total posts on a page at once, making it more likely that a visitor will see something enticing.


How do I get me some of that sweet "read more" action?

So you're convinced! Now, how to add in those "read more" tags to your own posts? Fortunately, it's easy!

(Click on images to see them larger.)
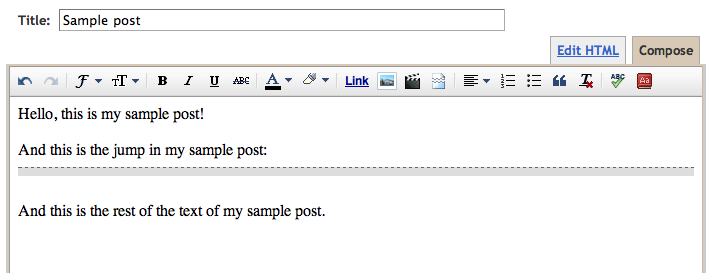
It's easiest to do in "Compose" mode1, because there's a little icon right there to press! As you can see in the top row of this screenshot, the icon looks like a page that's been ripped in half, symbolizing that a portion of the post is before the jump and a portion after.

Once you click the icon, this gray-with-black-dotted line pops into your post to show you where the jump will fall. You can delete it or copy and paste it elsewhere if you change your mind.
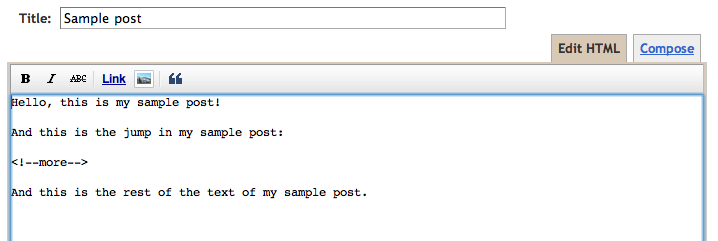

Alternatively, if you're in Edit HTML mode1 (I tend to write in HTML view, so I think that's why I didn't notice the "read more" icon for so long!), you can type in the HTML code for a jump yourself:

<!--more-->


Just copy and paste that HTML coding tidbit wherever you want your jump link to appear.

To make things easier on me, I actually created a draft post with just that code in it that I saved with a date in the future so it's always at the top of my drafts list. Then, whenever I need the "read more" code, I can just open the draft and copy and paste. Another option I just thought of is to add it to your Post Template box, which makes things even easier in the long run as you're composing new posts in Edit HTML view. Simply go to Settings --> Formatting --> Post Template, paste it in and save your settings. I pasted in <br><br><br><br><!--more--> so it wouldn't be at the very top. Then the coding will show up in every new post — just make sure to move it where you want to before you publish a post!

Jump around!

A couple final notes:

I've heard that some older or nonstandard Blogger templates don't work automatically with the "read more" tags, so you might have to update or tweak your template in that case. My Hobo Mama template was automatically outfitted with the functionality and worked with no further fiddling on my part, but this template is not working. However, I want to upgrade my template here, anyway, so I'll deal with that later. If you're also having problems, let me know and I'll try to help you out!

Since you can't conveniently add custom excerpts yet for articles in Blogger the way you can in WordPress (see this link as an example of a string of posts in WordPress that mostly have handcrafted excerpts along with selected featured images), you might want to hone your skills at writing opening paragraphs that can function as an overarching preview for the article to come. I know I'm guilty of rambling on for awhile at the beginning of my posts (it's fun!) before getting to the point. But if you know that your before-the-jump paragraphs are all readers will see to choose whether or not to click and read further, you might find yourself making sure those opening paragraphs are concise and tempting enough to lure readers in further. Along the same lines, you might want any opening images to be pertinent, since whatever is up at the top is what will show. (Of course, you choose where the jump goes, so you can ultimately arrange it however you'd like!)

Rest assured, too, that anyone clicking on a URL from another source (such as Twitter or Facebook) or following your feed in a reader or email subscription will see the full post. These "read more" tags don't affect anyone clicking on a regular post link, only people browsing your home site or a category search page. To my point of view, those are exactly the times you want readers exposed to a wide variety of articles, so that's perfect for my needs.

If you want to make sure that the "read more" tag doesn't put extra spaces and line breaks into your post, simply don't add them in! You can smush the "read more" coding right up against any other words or html, without any extra spaces or line breaks around it, and the break will happen there as planned.

Enjoy your "read more" tags — your readers will!


1 If you need a simple mini-course on the difference between Compose and Edit HTML view in Blogger, see my tutorial "How to edit HTML in Blogger."

4.05.2010

How to edit HTML in Wordpress

Dionna of Code Name: Mama and I are writing a few blogging tutorials of particular use for our Carnival of Natural Parenting participants. Today I would like to welcome Tom & Dionna, who have written a guest post about editing HTML in Wordpress, to help in pasting the carnival code blurbs. Tom is an IT guru, Dionna is a lawyer turned work-at-home mama, and together they form the natural parenting duo responsible for one amazing son. You can normally find Dionna over at Code Name: Mama where she shares information, resources, and her thoughts on natural parenting and life with a toddler.

When you are writing posts in Wordpress (for example, when you are preparing your entry for the Carnival of Natural Parenting), it is often helpful to know how to edit in HTML. This tutorial (like Lauren's earlier tutorial on editing HTML in Blogger) will show you how to:
  • add HTML code to a post and
  • copy your post's HTML for use elsewhere.

How do I add HTML code?


Most people probably use the Visual tab for writing blog posts in Wordpress (if you use the HTML tab exclusively, this mini-tutorial is stuff you already know). Let's look at the basic steps for adding HTML code to a post.

1. Identify "Visual" or "HTML":

2-1-Visual_or_HTML-300x229

You know you're in the Visual tab if you have all of these extra formatting options that work like Microsoft Word. The HTML tab has very few options available.

2-2-Visual_Post

2. Write your post in the "Visual" tab. Once you've got your post written and saved, it's time to insert the HTML code.

3. Switch to the "HTML" tab:

2-3-Switch_to_HTML

4. Paste your HTML code.

This is the screen where you can add in HTML code. Simply navigate to the area of the post where you want to insert the code and paste it in.

Let's say, for example, that you have received the intro blurb for this month's Carnival of Natural Parenting from Dionna (at Code Name: Mama) and Lauren (at Hobo Mama). The intro blurb should go at the very top of your post, so copy the code from the Carnival email, position your cursor at the beginning of the post, and paste. Voila!

If you have the ending blurb (the list of all of the Carnival participants), you'd copy and paste that at the very end of your post. Easy peasy.

A helpful hint: if you are copying HTML code from a Word document, then you are also copying all of Word's weird styling and formatting code automatically. Instead of copying and pasting straight from Word, copy it, paste it first into Notepad, TextEdit, or a similar simple text editor, then copy and paste from Notepad into Wordpress. Notepad does not retain any styling/formatting code, and Wordpress will be happier.

2-4-Paste_Code

5. Save the draft.

Before you switch back to the Visual tab to see how pretty everything looks, you should save your draft.

A word of warning: Wordpress doesn't always "work right" when you switch between Visual and HTML and go back-and-forth and switch it more and more. We don't know why. Our advice would be to switch between them, make your changes, and then "Save Draft" prior to switching back to the other tab. Without doing this (who knows why) Wordpress will "lose" the code you just typed/pasted in HTML, or it won't display your text the way it was formatted in Visual.

2-5-Save_Draft

6. Preview before you Publish.

Once it's saved, feel free to check out the Visual tab, or "Preview" your post to see how it will look on your site.


How do I copy my post's HTML code for use elsewhere?


There are at least two instances that we can think of that it would be helpful to copy/paste a blog post.

First: if you have written a long post and want to split it into several smaller pieces, you are more likely to retain all of your formatting by copying and pasting from the HTML tab rather than from the Visual tab.
Second: if you are submitting a guest post to another site, it is customary to send your post in HTML format.

And it's really quite easy. Just write and save your post, switch to the HTML tab (see Step 3 above), hit "Control + A" ("Control" = "Command" in Mac) to select all of your text, "Control + C" to copy it, and then paste it (either into an email or a Notepad document).

We hope that was helpful! If you have any questions or need clarification, please leave a comment or contact Dionna and Tom directly at Code Name: Mama.

3.21.2010

How to edit HTML in Blogger

Dionna of Code Name: Mama and I are writing a few blogging tutorials of particular use for our Carnival of Natural Parenting participants. This one will help in pasting the Carnival code blurbs!

Here's a little tutorial on how to edit HTML in Blogger when you're creating or editing a post. This is useful if you want to:

  • add HTML code to a post,
  • edit specific HTML code,
  • or copy your post's HTML to use elsewhere.


If you're used to creating your posts in the Compose mode in Blogger, you're used to a WYSIWYG (what you see is what you get) experience, and you don't need to know HTML — Blogger automatically codes everything for you.

But it's easy to switch to HTML view if you need to.

(Click on the images to see them larger.)


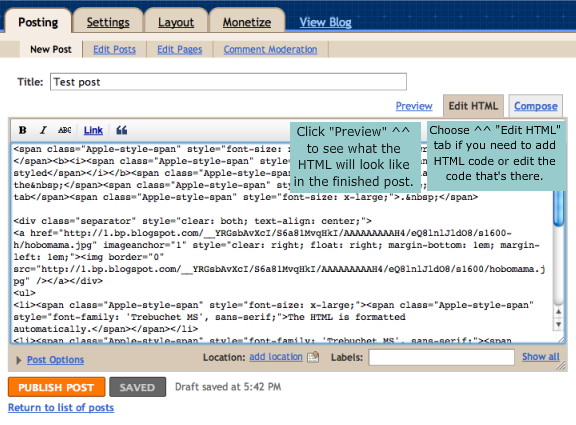
Check the tabs at the top of your post box. If you're in Compose mode (you can tell if it's in the darker tan and not underlined), whatever you type will be formatted as if you're typing into a word processor. You can add formatting like bold and italic, insert images and videos, format alignments and lists, and perform tasks like spell check.

But if you need to see or edit the HTML, click on the underlined "Edit HTML" to switch tabs.


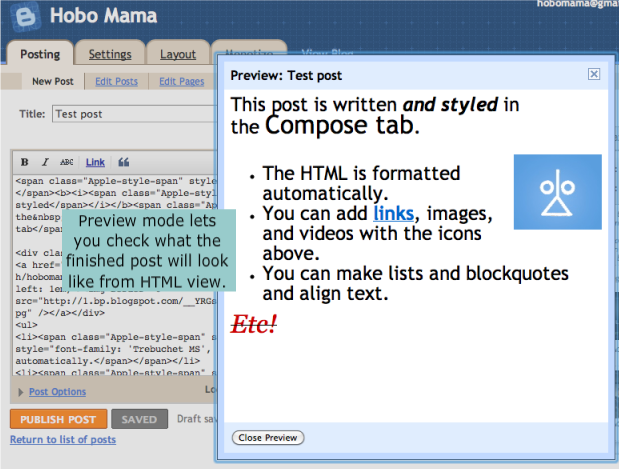
In Edit HTML mode, you can view the HTML code. If you know how to edit HTML, go for it! If you don't but have an HTML blurb you want to paste in, just search for the location you want it to go and paste it in. To make sure it all looks the way you want, either switch back to Compose mode or click on Preview.


Preview will give you a glimpse of what the code will look like in the finished post.

You can see it looks basically the same as in Compose mode. If you have a standard template, though, Preview is actually more helpful than Compose for getting a sense of what your post will look like, because the box will be constrained to your template's width and it will use your template's default font. That way it's easier to make sure images are where you want them, for instance. You can click Preview from either Edit HTML or Compose.

Hope that helps! Leave a comment if you have any further questions and I'll try to make things clearer.

For more information, check out Blogger Help's overview of the post editor.

3.07.2010

HTML signatures in Gmail: An easy how-to

Update, September 2010: Gmail has finally unveiled a rich-text signature function that replaces this method, though you can still read on for benefits and tips of creating an email signature.


I've been wanting an HTML signature in rich text for my Gmail account for when I send business emails, so I can promote my websites, Twitter account, and Facebook pages — but all in a streamlined and attractive manner.

Gmail doesn't currently support rich text or html formatting in the sig box, which is on the Settings page.

Here was the best I could do in plain text:
~*~
Lauren Wayne

www.HoboMama.com
www.HoboMamaReviews.com
www.LaurenWayne.com

www.Twitter.com/Hobo_Mama
www.Facebook.com/HoboMama
www.facebook.com/pages/Hobo-Mama/322453825286

Unwieldy, isn't it?

I don't like how lengthy the Facebook URLs are, and I don't like that the sig as a whole is a whopping 10 lines long. For Gmail to automatically parse the html, I had to keep at least the "www" part intact, which meant I had to use a plain URL rather than just, say, a blog name (www.HoboMama.com vs. Hobo Mama or HoboMama.com).

So, since I didn't like that, what did I like? Well, here's what I ended up with, using my super-cool and sneaky method:
•••
Lauren Wayne
Hobo MamaHobo Mama ReviewsLaurenWayne.com
TwitterFacebookFacebook Page

And here, my friends, is how I got there:

First of all, you need a place to edit your html. If you know how to hand-code html and preview it online, go to it. I found the easiest way in a WYSIWYG sort of way was to use a Blogger account. For my purposes, I used my standard Hobo Mama account.

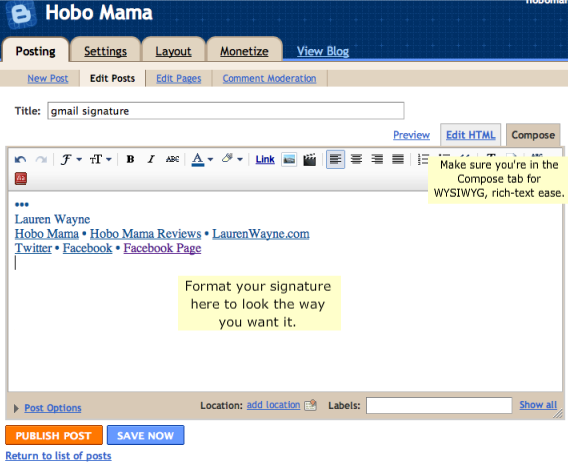
  1. In Blogger/Blogspot, create a new post. You can title it "gmail signature" or something else memorable in case you want to come back to it. You won't be publishing it, just saving it as a draft, and you can always delete it after you're done tweaking your signature if you want to keep your account clean.
  2. Click on the Compose tab. Type in your signature as you want it to look. Use the Link function to add URLs to keywords. Change fonts and colors as you wish. You can add in special characters like bullets. You could even add images, such as a company logo. In fact, you could make your whole signature just one big image if you'd rather and know how to edit image files.
  3. Copy the finished signature.


(Click on images to see them bigger.)

All right, now we head over to Gmail. As I said, you can't use any html or rich-text formatting in the signature box, so we'll skip that box. You could simply copy and paste your signature into each email individually, but that's cumbersome. The method I came up with isn't as easy as having a traditional signature, but it takes only a second or two each time you compose an email and it uses the Canned Responses feature in Gmail Labs.

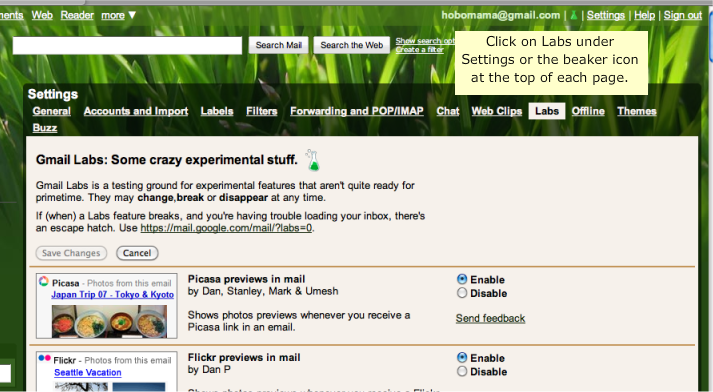
  1. Go to Settings in Gmail (top right corner).
  2. Click Labs along the top tabs.
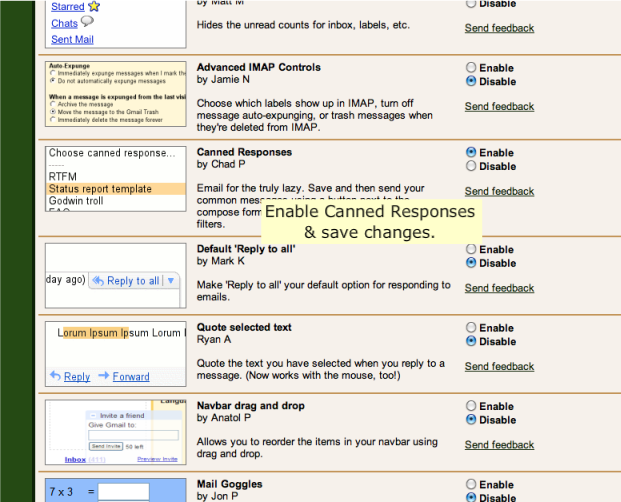
  3. Scroll down or do a search for Canned Responses and select Enable next to it (yes, "email for the truly lazy"). At the top or bottom of the Labs page, click Save Changes.
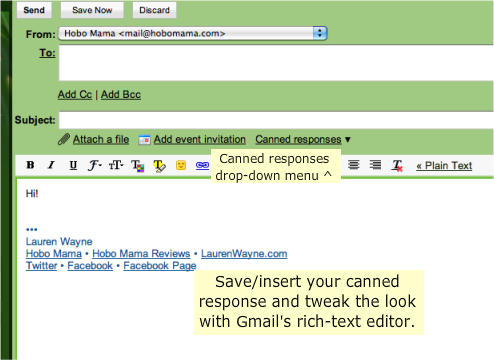
  4. Now click on Compose Mail. Make sure you've selected Rich Text as your messaging view. Paste your signature into the message box. It should paste exactly as you had it formatted in the Blogger box. You can change the font or layout further using Gmail's rich-text editing.
  5. As an optional extra, if your signature font is formatted in a way unlike the way you would like your message to be (for instance, my signature is in blue, but I prefer my message font to be in black), add in a simple line of text above your signature that you usually use to start a message. In my case, I added "Hi!" I formatted "Hi!" in my preferred black message font. [ETA: I just realized what would be even easier and more convenient would be to add how you usually CLOSE your emails, such as your name!]
  6. Now that you've enabled Canned Responses, there should be a line that says Canned Responses just above your message box. Click on Canned Responses and select Save --> New canned response... A box will pop up and ask you for a name to save it under; you can choose something like "business signature."
  7. Now you can Discard your draft message.
  8. Next time you go to email someone, either through Compose or Reply, click on Canned Responses --> Insert [business signature or whatever you called it].
  9. Voila! Your signature appears. You can tweak it in the message box if you'd like, or go back to Blogger to do major revamps. If you want to save a change, simply click on Canned Responses --> Save --> [business signature] again, and OK the warning that pops up that you're saving over a saved canned response.


I know this method isn't quite as convenient as having a signature automatically appear whenever you click Compose, but it's the most streamlined way I could find for now!

The good news is this method lets you choose which messages you want to put a signature on. You could even have multiple signatures, such as a personal one and a business one, and choose which signature you want each recipient to see. You could put your address and contact info in emails you send to publishers, for instance, but your URLs alone for emails to colleagues, just saving each signature under a different name.

Hope this tutorial helped you! Let me know, or give me your own tips.
Related Posts Plugin for WordPress, Blogger...