Showing posts with label blogger. Show all posts

4.27.2016

28 blogging tasks you can do from your phone

Do you spend more time near your smartphone than your computer? You can still get plenty of work done on your blog when you're on the go with these mobile-friendly tasks!

If you're anything like me — juggling paying work, parenting, home life, errands, fitness — you might find limited time to sit down at an actual desk to blog or work on your blog-related tasks. So here's a roundup of plenty of things you can do while you're on your smartphone or tablet.

A few of these links are affiliate links, but most are just free apps. I use what I recommend.


  1. Draft a blogpost.

    If you're a minimalist blogger (mostly plain text), you might be able to post from your smartphone using one of the blogging apps (WordPress, Blogger, Tumblr on Android & iOS), using email uploads (Blogger, WordPress.com, self-hosted WordPress), or navigating to the site on mobile.

    For me, I find the apps and mobile experience inadequate for all the images and coding and customization I love to cram into my posts, so I prefer to finalize things on desktop. BUT, I can absolutely WRITE a blogpost draft while I'm out. I just prefer to do it in email. I use Gmail's Inbox app and like that it saves my drafts well. I just pop my own address into the to field, make the subject line my title, and then Swype away in the text field. I'm Swyping this right now, matter of fact. I'd like to experiment, once I figure out the best headset, with dictating blogposts while I walk, using Dragon Dictation, the native Google voice-recognition on my phone, or another speech-to-text capability. (Here's how one person does this via Evernote.)

     
  2. Edit your drafts.

    If you have a blogpost draft you want to edit, email it to yourself or upload it to Google Docs and use the Google Drive app (Android & iOS) to access it. It has a nice autosave feature, and it will sync with your desktop version of course.

     
  3. Check and reply to email.

    I find being on my phone actually makes this easier, because brevity feels right. Bam. Email done.

     
  4. Read other blogs.

    I use Feedly for my subscriptions now, and I've learned the mobile gesture shortcuts to make the process easy. Save for later articles you want to read in depth or share, or just do it now if you have the concentration time.


3.09.2014

Sunday Surf: Google dos & don'ts for bloggers and bad romance novels

Links to share, from Writing Tidbits:

The Top Ten Signs You're Reading a Very Bad Romance Novel | Smart Bitches, Trashy Books

Hilarious list that goes all the way to 11. I particularly appreciated this one:
Number 2.5: There’s a widow who is still a virgin, despite being married to Lord Humperslut for years and years.

How is this possible? Well, sit back and we’ll tell you. The heroine married Humperslut just before he started introducing his bloodstream to metric tons of opium, and his penis was lost shortly thereafter in a tragic riding accident. His young bride is sworn to secrecy lest his reputation suffer, leaving her to misery and, of course, sexual unfulfillment.

OK, fine, we’re exaggerating a little — but only a little. Yet again, the Sacred Virginity of the Heroine rears its ugly maidenhead, and the heroine’s validity as a woman is tied up in the sanctity of her love canal. Virgin widows may have been novel plot devices back in the day, but Romancelandia is lousy with those beasts. We say it’s time to put this particular cash cow out to pasture.
5 MONTHS AGO -  60
novel writing romance novels novels genre novels writing reading 60 notes

7.14.2013

Sunday Surf: Awesome Facebook marketing, 404 pages, & schedules

Links to share, from Writing Tidbits:

29 Links to Make You Awesome at Facebook Marketing (So You Stop Spinning Your Wheels) | Constant Contact Blogs

16 HOURS AGO
facebook Social media blogging marketing

Best Time to Post on Facebook

It depends on your audience. Since most of my fans are SAHMs, I don’t think the ban on during the workday applies for me. The other tips were helpful.
1 DAY AGO -  1
facebook blogging Social media marketing 1 note

3.10.2013

Sunday Surf: Respect, comparing stats, and guarding from hackers

Links to share, from Writing Tidbits:

(It's been awhile, so I'm breaking them into separate posts.)

When Will Female Authors Get the Respect They Deserve? | BlogHer

Women write more; we read more; why don’t we get more recognition?
6 MONTHS AGO -  1
fiction writing genre novels novel writing reading writing romance novels mystery novels science fiction novels 1 note

Parenting Blog Analytics: How Do My Stats Compare? | PhD in Parenting

A look at parenting blogger stats.
6 MONTHS AGO
blogging statistics

Strocel.com | Why I Attend Blog Conferences Like BlogHer

What you can and can’t get out of BlogHer or other blogging conferences.
6 MONTHS AGO
BlogHer blogging conferences BlogHer12 blogging

Blogger introduced Permalink option to create custom URLs | My Blogger Tricks

You can now create your own URL (permalink) in Blogger. About time!
This also means figuring it out ahead of time for blog carnivals and the like will be a sight easier.
7 MONTHS AGO
Blogger blogging blogs URLs permalinks blogging tips

Have YOU Been Duped By The "ABOUT " Page Myth?

Ok, I’ve been thinking about this for awhile, but I’ve started work on rewriting my About page now!

What they really want is to discover whether you have a common interest they can connect with. Your readers want to know what you can do for them.

In other words they are tuned to the WIIFM [what’s in it for me] radio station.
7 MONTHS AGO
about page blogging blogs

Is Your True Nature, Entrepreneurial or Employee? | The Work at Home Woman

I used to wonder why everyone didn’t work for themselves. I finally figured out that not everyone wants to!
7 MONTHS AGO
working at home self-employment

Declutter the Reading List | Small Notebook

Streamline your blog reading list. I do this with entire blogs as well as individual articles (so make sure your headlines are catchy, folks!).
All you have to do is look at something and see how it makes you feel. If your initial reaction is sadness or guilt or indifference, you don’t keep it. If it makes you feel glad, you keep it. Simple, yes, but effective.
7 MONTHS AGO -  4
reading blogging decluttering simplifying organizing Google Reader RSS feeds blogs 4 notes

» If This Then That: Turning the Internet Into Your Butler Domestic Chaos

Helpful online app:
If This Then That is magical. It works on the simple premise of when one thing happens, you trigger another. You create what they call recipes, with custom triggers and outcomes. (You can also use recipes that are shared from other users.)
You could use it for anything; I have two recipes that update Twitter & Tumblr when I post a new blog entry. 
7 MONTHS AGO
apps online apps Twitter Tumblr blogging Facebook social media automation RSS feeds simplifying

Rumor Alert! Don't Share That Facebook-Page Warning. Here's Why.

Last year, Facebook started showing fans fewer page posts. The less fans interacted with a page, the fewer updates they saw from it.
Fans need to continually interact with your page. They can like, comment, share, click links, etc.
9 MONTHS AGO
facebook facebook fan pages
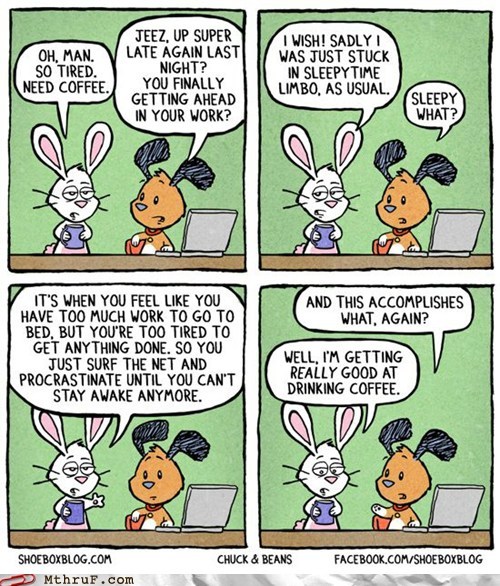
And this is what my blogging efficiency looks like.
Thanks to Jennifer for sharing!
And this is what my blogging efficiency looks like.
Thanks to Jennifer for sharing!
(Source: shoeboxblog.com)
blogging balance writing working at home


3.04.2013

Allow people to message you from Google Plus

If you've connected your Google presence to your Google+ profile, as is now the default, there's no standard way for people outside your circles to contact you if they want to drop you a line. There's a feature on the old Blogger profiles to make your email address visible, but if you've upgraded to G+, that profile is history (or soon will be, as I imagine they'll be phased out shortly).

You can't post on someone's wall outside your circles or view their email address without that person making a settings change. You can't even easily tell whether someone comes from a blog or what blog that is unless the profile is set up to loudly display that information.

What's the big deal? Well, for me personally, I run into all sorts of problems when I'm trying to contact winners for my giveaways on Blogger. People comment from their Google accounts on Blogger blogs without necessarily considering the lack of email-ability they're leaving behind. I also can't email someone to follow up on a question or comment.

It's up to you to decide how reachable you want to be on G+ and increase your visibility if that's your goal. (Obviously, if you want to remain entirely private, then that's your call.)

Fortunately, there's an easy fix to make in your settings to allow messages and emails to be sent to you without revealing your email address. To me, this is a commonsense balance between privacy and reachability.

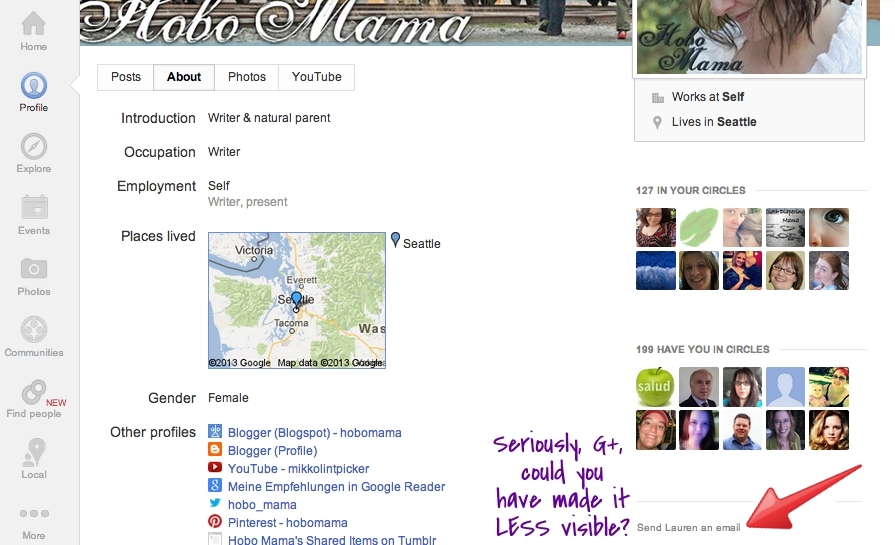
(Now, another irritation I have with Google+ is how small and hidden the links are for emailing people even if they've set up public messaging capabilities, but this tutorial will at least also show you where to look!)

Click any images to embiggen.


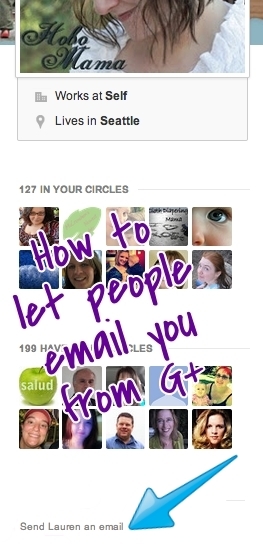
See that teensy-weensy line way down there on your right sidebar? For me, it says "Send Lauren an email." That's where, if you have the email function enabled, users can click on it to send you an email. This happens without revealing your email address, so I think it's a good call to enable (unless you're trying really hard to avoid being contacted by [certain] people).

8.21.2012

How to schedule a post in Blogger {updated}

Dionna of Code Name: Mama and I are writing a few blogging tutorials of particular use for our Carnival of Natural Parenting participants. This one will help in scheduling your article to post on Carnival day!

This is an updated version for the new Blogger interface. If you're still using the old Blogger interface, visit this post instead.


Here's a little tutorial on how to schedule a post in Blogger (Blogspot) for a specific time and day.

This is useful if you want a post to go live at a certain time but will not be available to hit the publish button yourself (such as if you want your Carnival post to go live just after midnight but you'll be asleep by then).

It can also help your blog maintain a businesslike image if you schedule all or certain important posts to go live at a predictable time each day or week (such as a giveaway linky that readers can count on to show up at 9:00 a.m. each Thursday, for example).

(Note to my Carnival friends: You do not have to schedule your post; it's just a how-to in case you want to for your own convenience.)

8.20.2012

How to find (or change) your permalink in Blogger {updated}

Dionna of Code Name: Mama and I are writing a few blogging tutorials of particular use for our Carnival of Natural Parenting participants. This one will help in determining your post URL in advance!

This is an updated post for the new Blogger interface. If you're still using the old Blogger interface, go to this post instead.


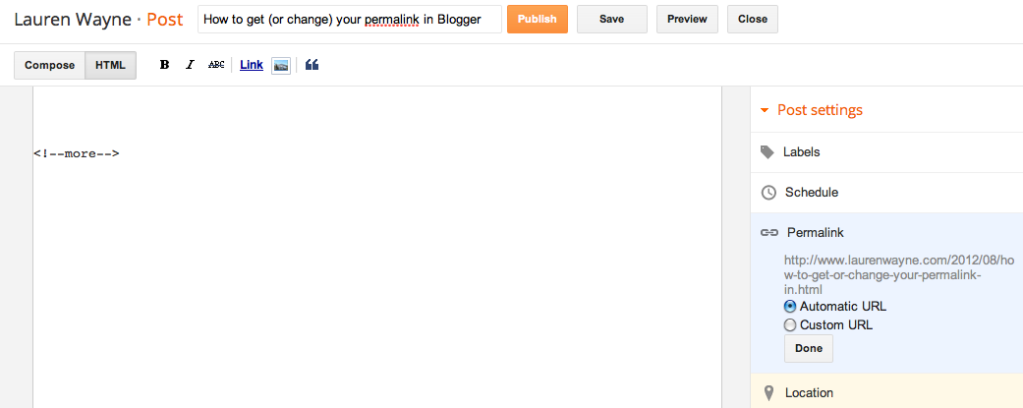
Here's a little tutorial on how to determine your post's permalink in Blogger (Blogspot) before you've published a post. This is useful if you want to figure out ahead of time what your URL will be once you've published. You can also choose your own custom permalink if you wish.

Find your predetermined URL

Blogger has finally made this easy for us — yea! Here's how you find your permalink in the new interface:

Click any picture to embiggen.

In any post, go to your Post Settings in the right sidebar. (If it's not already expanded, which is the default, click to expand it.)

Click on Permalink.

You'll see that Automatic URL is the default selection. If you're happy with that, simply copy and paste the URL that appears there to give to anyone who needs your permalink ahead of time (such as in a blog carnival).

Note: If you're planning a post for the future, the month (or year, if applicable) will change to whenever it's published. Therefore, if you're scheduling a post that will take place in a future month, be sure to fill in the correct month (and year) when copying/pasting the URL. You can schedule your post first before copying/pasting to make sure the permalink will be correct.

And that's all — you're done! You don't need to read on unless you want to.

Create a custom URL

If you want to be fancier and craft your own URL, you can now do so!

This can be very beneficial for SEO. (Just saying that phrase made me feel like a spammer.) You can include the keywords that search engines would look for, or make the URL memorable to you, or even include a funny joke within it. (I won't judge.)

12.02.2011

FeedBurner feed too big? How to fix it

My recent FeedBurner woe:


Click any image to embiggen.


The past few days, I noticed signs that my RSS feed for Hobo Mama wasn't updating, though it took me awhile to believe it.

I caught glimpses first in CommentLuv entries when I commented on other sites. It kept pulling up my "Gratitude Challenge" post from Thursday, Thanksgiving Day, even though I subsequently posted on Sunday, Tuesday, and Wednesday. I didn't really think much of it the first few times, or the first couple days — I just used Ping-o-Matic to give my feed a little boost and figured it would fix itself.

But after it had been a week, I noticed the delay wasn't just in CommentLuv. It was in the sidebar widgets on my other sites; it was in Google Reader; and — most obviously, now that I looked for it — the delay was on my feed's page itself.

I went to FeedBurner, through which I burn all my feeds, for the answer. I clicked right through to the humorously named "Troubleshootize" tab, hoping the humor didn't mean they wouldn't take this plight seriously.

10.18.2011

Meta description + meta keyword for Blogger templates

Jorje had a good blogging question today. I thought I'd post the answer for anyone else looking to improve SEO (search engine optimization).

For those on Blogger, … they posted this this morning:

Please recheck your XML template, and fill meta description + meta keyword with your blog description and keyword, it's very important to promote your blog :)

Jorje wanted to know where to find the meta tags.

Head to your template!


(Click on any image to see it larger.)


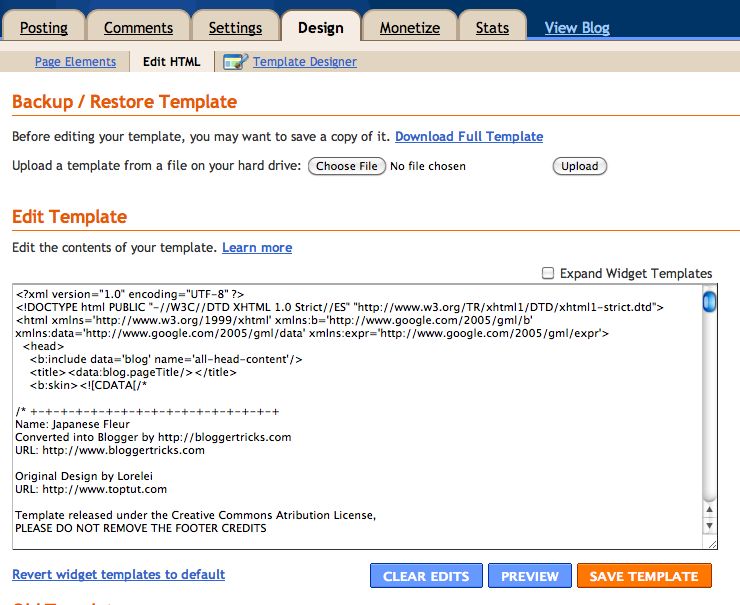
Go to Design --> Edit HTML.

Before working on your template, Download Full Template to save a backup. That way, you can revert to your previous version if something goes horribly wrong.

You make your changes in the big text box, and click Save Template when you're done.

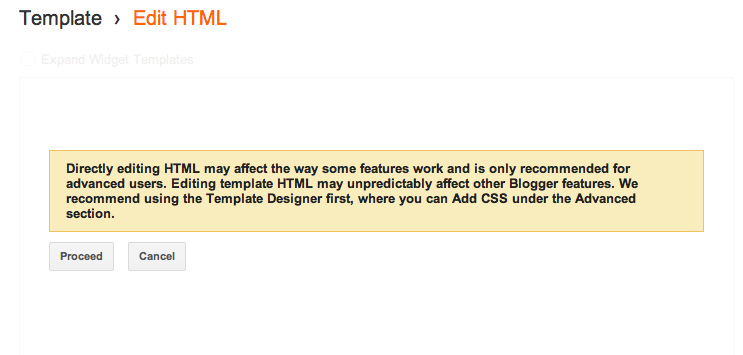
Here's where to go if you're in the new Blogger interface:


Go to Template --> Edit HTML.

You will now get a warning that you should do no such thing:


Again, back up your template before proceeding.

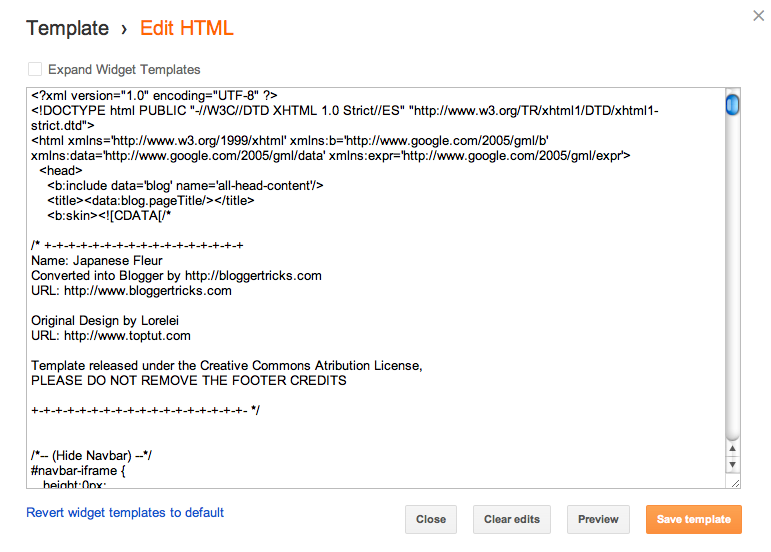
Then you'll be in the same sort of window:


Now that you know where to go, here's what you do once you get there.

8.22.2011

How to create footnotes in Blogger

By popular demand …


Even though there's no built-in way to create footnotes in Blogger, it's easy enough to code linked footnotes into a post in HTML view. Here's how I do it.

What it looks like for readers


This is my post text with a linked footnote at the end.1

When readers click on the footnote number, it jumps them down to the footnote. Clicking an arrow after the footnote conveniently jumps them back up to where they left off.

Footnotes are a great solution for tangential or additional text, such as caveats, resource citations, or pointless jokes. (I especially prefer the latter.) Readers can choose whether to continue reading the main text, or be delightfully distracted down to your bonus offerings, and then back up again when they're ready to resume.

The HTML code for you

You must enter this code in "Edit HTML" view in Blogger. (I have a tutorial explaining the difference between Edit HTML and Compose if you're not familiar with the two.)

WARNING: NEVER switch back to Compose view once you've inserted the footnote code in Edit HTML!

Code to put in the text where you want the footnote's number to appear:

<a href="#1" name="top1"><sup>1</sup></a>

All right, which is easier for you? I pasted it above so you can see it easily, but here's the same code in a grab box for easier copying/pasting. Take your pick!


Code to place at the bottom of your post:

<hr width="80%">
<p>
<span class="Apple-style-span" style="font-size: x-small;">
<a name="1"><b>1 </b></a>FOOTNOTE<a href="#top1"><sup>↩</sup></a>
</span>


Obviously, replace "FOOTNOTE" with the actual footnote!

Explanation of the codes

These footnotes work through a simplistic process of "name" URLs that reference each other. You tag each part of the footnote with a name. The footnote number in the text is named "top1," and the footnote number at the bottom of the post is named "1."

Then the paired URLs send readers back and forth between these "names" through the href codes. Telling the URL to go to href="#1" sends it to the post's URL but with #1 appended. That # sign tells the code to look for a name that matches what's after the #, and it finds it in our footnote named "1."

Multiple footnotes

If you want multiple footnotes, you simply need to paste the following parts of the codes again, substituting the numbers you need for the word "NUMBER."

Code to put in the text where you want another footnote's number to appear:

<a href="#NUMBER" name="topNUMBER"><sup>NUMBER</sup></a>


That's three replacements at the top, if you're counting.

Code to place at the bottom of your post for multiple footnotes:

You want to add in this line after your first footnote line as many times as you need it.

<a name="NUMBER"><b>NUMBER </b></a>FOOTNOTE<a href="#topNUMBER"><sup>↩</sup></a>

Again, replace the three instances of "NUMBER" with the number you're on.

Here's a grab code for 5 footnotes:


Styling your footnotes

Obviously, you can feel free to alter these codes cosmetically to suit your blog. This is just what I came up with. The basic structure is the "name" links, and the rest is decoration.

I used a "sup" command to make the footnote numbers superscript in the text, added an "hr" line at the bottom to separate the footnotes from the post's text, made the footnote font "x-small" in size, and used a little superscripted ↩ symbol for returning to the text location. Any of those elements could be changed as you wish. For instance, you could have your footnotes appear in a different font face or color, or change how you separate off your footnote area. If you want to copy mine as is, I don't mind, though I'd love any shout-outs to this post you'd care to give!

2.11.2011

How to add "Read More" jump tags in Blogger

My new favorite thing in Blogger? Adding "read more" tags to posts. I'd seen this feature on WordPress and other blogs before but hadn't realized it was a Blogger feature, too. I think it's been here for donkey's years, but I was slow to catch on to the benefits!

Here's a little tutorial that will explain "read more" links and let you know why and how you should add them!

What's a "read more" tag?

First things first! If you have no idea what I'm talking about, take a look at my Hobo Mama homepage (for I have not performed the same editing wonders on this site yet!).

(Click on images to see them larger.)

The "read more" link is at the bottom of the post that's been truncated. When you click on it, it links to the original article URL plus the #more tag at the end — in this case, this link: http://www.hobomama.com/2011/02/fat-and-pregnant-heartbeat-video.html#more. So if you're reading from a page and choose to "read more," you will get popped into the article at the point where you left off. On the other hand, if you click on the URL as a whole from another source (in a blog reader or from a Tweet, for instance), you'll see that the "more" tag is undetectable when the post is expanded (try it here: http://www.hobomama.com/2011/02/fat-and-pregnant-heartbeat-video.html). Then it simply shows you the post as a whole, and the "more" coding is invisible.

Other examples of a "read more" link at work can be seen in non-Blogger applications such as our WordPress-based Natural Parents Network homepage, which has a sort of magazine/excerpt vibe to it. You get a digest version of all the current posts and can click on the "Read More…" links if you're interested to, well, read more.

Why do I want "read more" tags?

Scanning and searching is easier

The biggest reason is to make pages that encompass a lot of posts less cumbersome for readers to scroll through and find what they want. This is true for your home page as well as any category/label search pages.

For instance, I've recently gone back and added in "more" tags on all my posts tagged with Elimination Communication on Hobo Mama. If you look at the category page for elimination communication now

http://www.hobomama.com/search/label/elimination%20communication

— you can easily scroll through 19 partial posts on the subject and decide whether each article is really what you're looking for. (I'm guilty of popping labels onto posts that are only distantly related in some convoluted way in my mind….)

By contrast, I went to a label where I hadn't yet added jump tags, and only six posts loaded, in their entirety. That makes it a lot harder for readers looking for a particular article to comb through your category tags, particularly if you have a lot of articles shuffled into a particular category. They have to keep clicking on "Older Posts" at the bottom of the page, again and again and again, in the hopes of finding the one article they're looking for.

I was going to show you the difference between the two ("read more" tags vs. no "read more" tags), but I plan to change all mine over as I have time. The best method I can think of, if you don't have "read more" tags yourself and you're on Blogger, is to load your own homepage or a category page and see how clunky it is to wade through it all.

More information, less space

The other benefit, and it's related, is that you can show highlights from more articles on a single page. For instance, I used to have to keep my Hobo Mama homepage at a maximum of four posts (under Settings --> Formatting --> "Show at most X posts on the main page"). My posts tend to be long and have a lot of images, so it took too long to load more than that and sometimes the multiple javascripts would interfere with certain browsers.

With the "read more" jump tags, however, I can keep each individual post down to a manageable excerpt size and therefore safely and conveniently show more total posts on a page at once, making it more likely that a visitor will see something enticing.


How do I get me some of that sweet "read more" action?

So you're convinced! Now, how to add in those "read more" tags to your own posts? Fortunately, it's easy!

(Click on images to see them larger.)
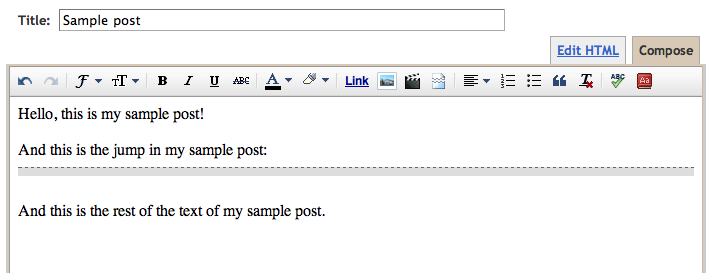
It's easiest to do in "Compose" mode1, because there's a little icon right there to press! As you can see in the top row of this screenshot, the icon looks like a page that's been ripped in half, symbolizing that a portion of the post is before the jump and a portion after.

Once you click the icon, this gray-with-black-dotted line pops into your post to show you where the jump will fall. You can delete it or copy and paste it elsewhere if you change your mind.
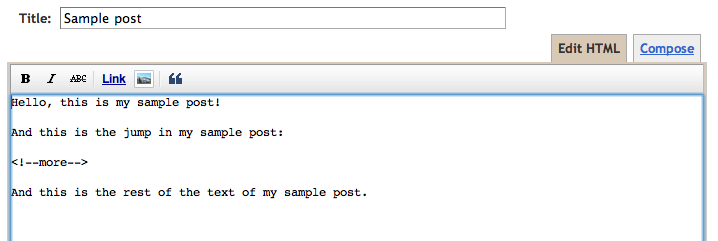

Alternatively, if you're in Edit HTML mode1 (I tend to write in HTML view, so I think that's why I didn't notice the "read more" icon for so long!), you can type in the HTML code for a jump yourself:

<!--more-->


Just copy and paste that HTML coding tidbit wherever you want your jump link to appear.

To make things easier on me, I actually created a draft post with just that code in it that I saved with a date in the future so it's always at the top of my drafts list. Then, whenever I need the "read more" code, I can just open the draft and copy and paste. Another option I just thought of is to add it to your Post Template box, which makes things even easier in the long run as you're composing new posts in Edit HTML view. Simply go to Settings --> Formatting --> Post Template, paste it in and save your settings. I pasted in <br><br><br><br><!--more--> so it wouldn't be at the very top. Then the coding will show up in every new post — just make sure to move it where you want to before you publish a post!

Jump around!

A couple final notes:

I've heard that some older or nonstandard Blogger templates don't work automatically with the "read more" tags, so you might have to update or tweak your template in that case. My Hobo Mama template was automatically outfitted with the functionality and worked with no further fiddling on my part, but this template is not working. However, I want to upgrade my template here, anyway, so I'll deal with that later. If you're also having problems, let me know and I'll try to help you out!

Since you can't conveniently add custom excerpts yet for articles in Blogger the way you can in WordPress (see this link as an example of a string of posts in WordPress that mostly have handcrafted excerpts along with selected featured images), you might want to hone your skills at writing opening paragraphs that can function as an overarching preview for the article to come. I know I'm guilty of rambling on for awhile at the beginning of my posts (it's fun!) before getting to the point. But if you know that your before-the-jump paragraphs are all readers will see to choose whether or not to click and read further, you might find yourself making sure those opening paragraphs are concise and tempting enough to lure readers in further. Along the same lines, you might want any opening images to be pertinent, since whatever is up at the top is what will show. (Of course, you choose where the jump goes, so you can ultimately arrange it however you'd like!)

Rest assured, too, that anyone clicking on a URL from another source (such as Twitter or Facebook) or following your feed in a reader or email subscription will see the full post. These "read more" tags don't affect anyone clicking on a regular post link, only people browsing your home site or a category search page. To my point of view, those are exactly the times you want readers exposed to a wide variety of articles, so that's perfect for my needs.

If you want to make sure that the "read more" tag doesn't put extra spaces and line breaks into your post, simply don't add them in! You can smush the "read more" coding right up against any other words or html, without any extra spaces or line breaks around it, and the break will happen there as planned.

Enjoy your "read more" tags — your readers will!


1 If you need a simple mini-course on the difference between Compose and Edit HTML view in Blogger, see my tutorial "How to edit HTML in Blogger."

1.12.2011

Choosing who can comment in Blogger: Allowing the option of name and URL

Dionna of Code Name: Mama and I are writing a few blogging tutorials of particular use for our Carnival of Natural Parenting participants. This topic is loosely related to the carnival, because certain options allow for easier commenting on Blogger blogs.

Do you want to adjust your comment settings in Blogger to determine which readers can comment?

Choosing what permissions to grant commenters (from requiring registration to allowing anonymous commenters) can affect how easy it is for people to comment — and, therefore, how likely readers will be to convert to commenters. Specifically, you might receive more comments if you allow commenters to type in their own name and URL or comment anonymously, because it can be appealing for certain commenters.

Everything has its pros and cons, of course, which we'll cover in a bit. For now, here's where you find the options, what they mean, and what they look like in action.

The four commenting permission options in Blogger

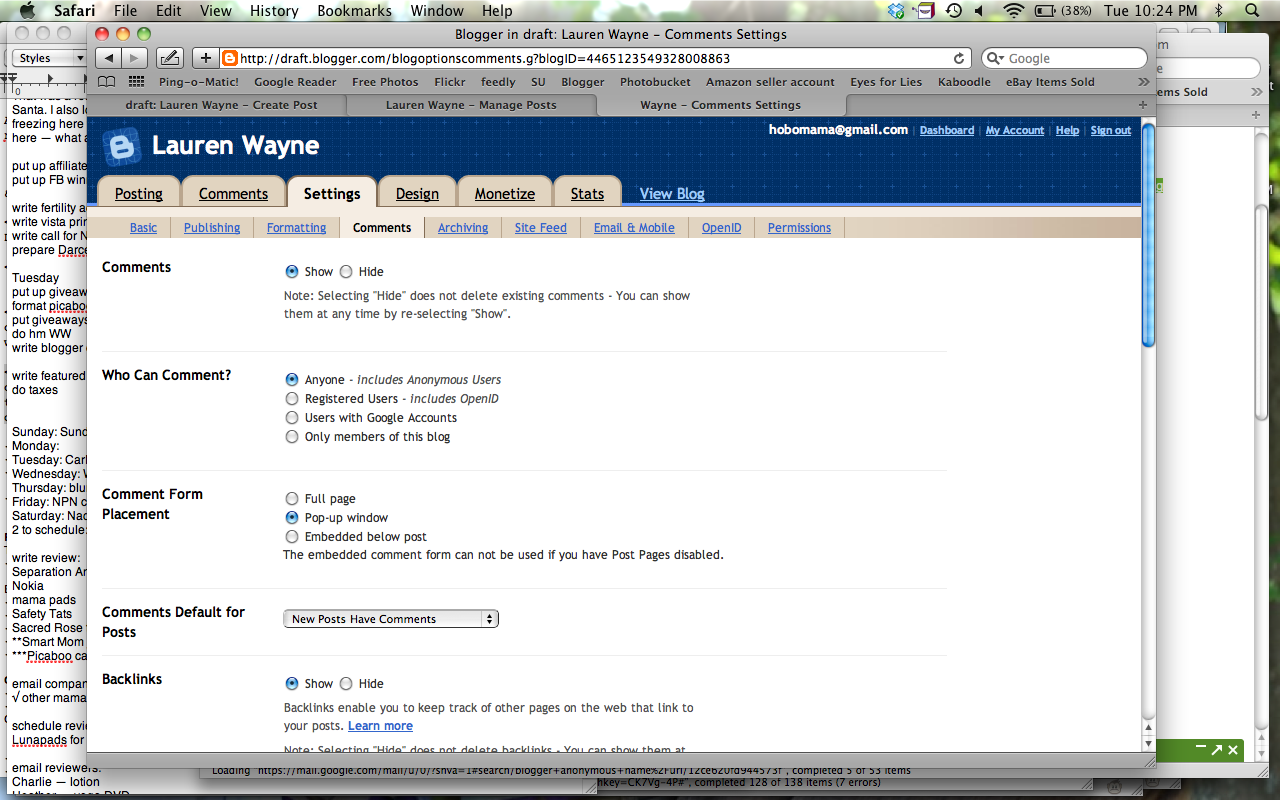
Blogger has four permissions options for its commenting system. Go to your Dashboard, then choose the Settings tab, then Comments. (There's a main tab labeled "Comments," as well, but we want the sub-tab under Settings.)


Look for "Who Can Comment?"

Here are the options. Start from the bottom up to go from most restrictive to least:

  1. "Only members of this blog" — Commenters have to be contributors or administrators of the blog and must be logged in to Blogger to comment.
  2. "Users with Google Accounts" — This is the default for Blogger. Anyone commenting must have a Google account and sign in to Google.
  3. "Registered Users  - Includes OpenID" — This opens up commenting to people who don't have a Google/Blogger account but still requires that they identify themselves in some way by logging in with an outside account. This expands the accounts commenters can sign in, in addition to Google, with LiveJournal, WordPress, TypePad, and AIM. Commenters choose their preferred account, enter their URL or username, and then OpenID takes them to a separate page to authorize with their password.
  4. "Anyone - Includes Anonymous Users" — This is the most open of all the commenting options, and is the only one that allows for Name and URL entry. It also is the only one that allows anonymous commenters.

Once you decide which option you prefer, select the little circle next to your choice. Then scroll to the end of the page and make sure to click Save Settings.

Here's what they look like in action, both from the perspective of the commenter, and what a comment looks like live when it's published. Then we'll talk a little bit more about why you might choose each of the four options.

What the commenting options look like


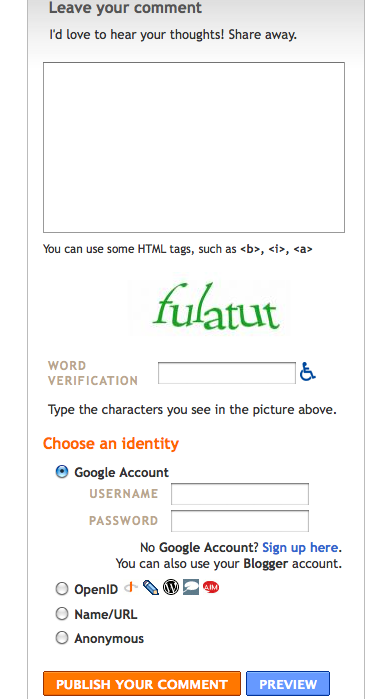
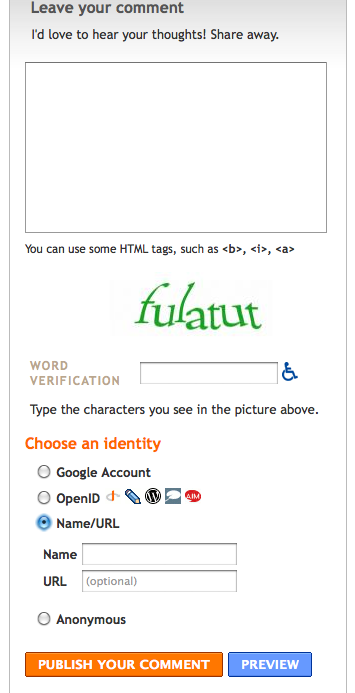
Here is what each option looks like, first from the commenter's perspective on the comment form, and then live once published. (Your comment form might look different, depending on which form option you chose, but the permissions options will be the same.) In these examples with the comment form, I've selected option #4 up above, allowing all users, including name/URL and anonymous. If you've selected a more limited option, you simply won't see the extra options on the comment form, and Blogger will give a special message if only Google accounts are permitted to let commenters know that anonymous comments are not allowed.


The first option is to use a Blogger/Google account. (This is the only option you'll see for #1 and #2 in the permissions options above, and this option will remain visible for #3 and #4.) Commenters can sign in on the comment form; if they're already signed in, their Google profile name will already show up in place of the username/password sign-in section and they can opt to sign out if desired.

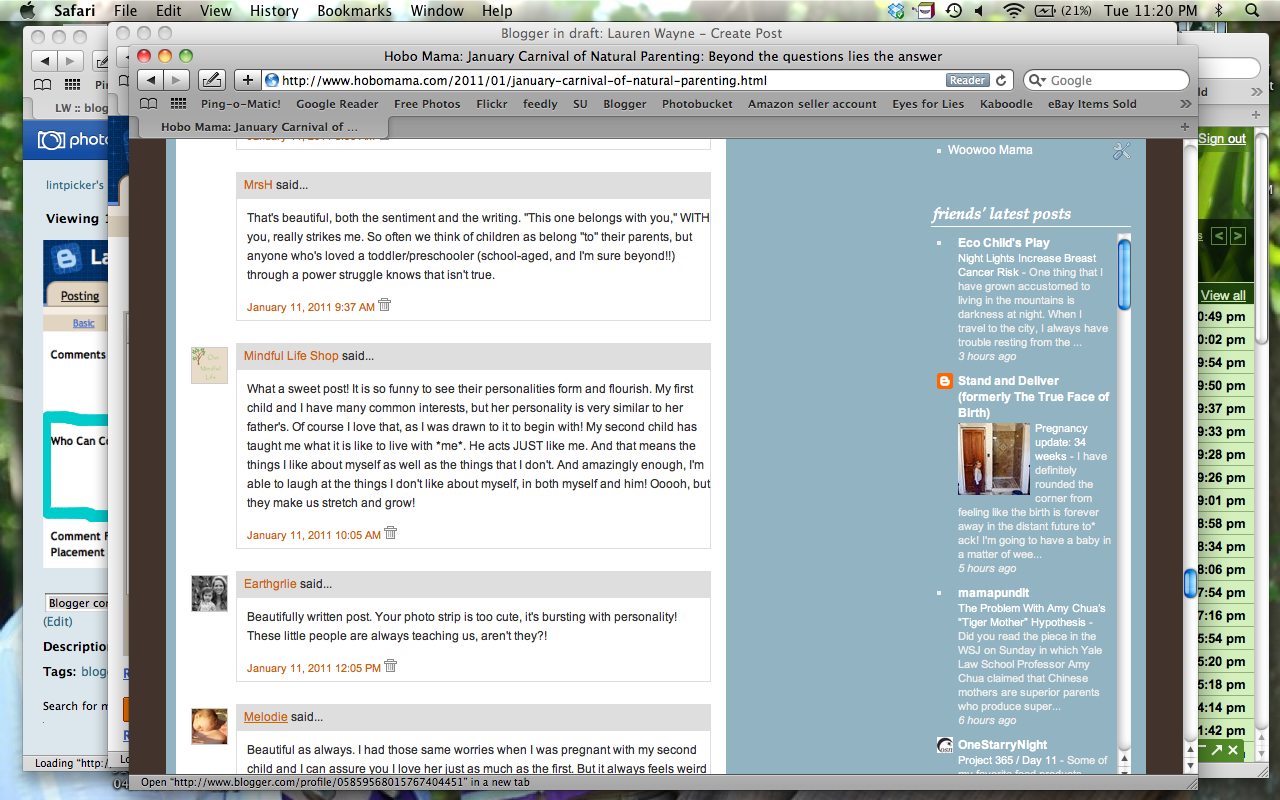
Live, the comment will show the display name they chose for their Google/Blogger profile, as well as any avatar they uploaded, and it will link to the profile. The profile can then direct a reader to the commenter's blog and other information. Here's what it looks like in action:


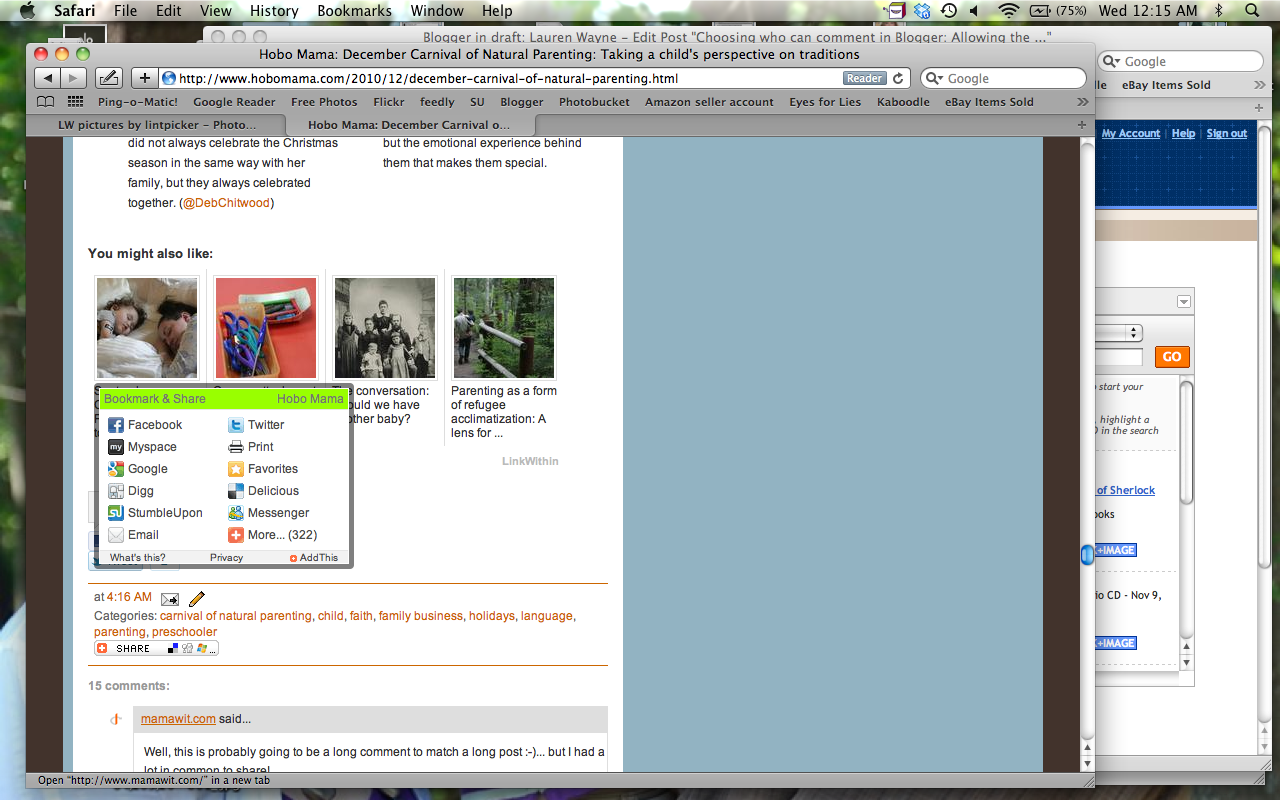
I was hovering my mouse over the link, so the linked profile is shown in the bar along the bottom.


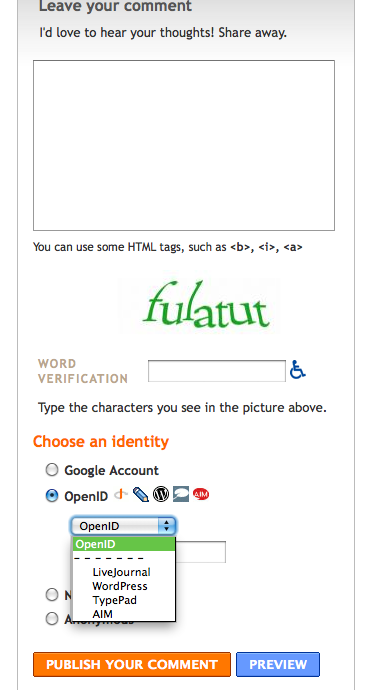
As mentioned before, OpenID allows commenters to sign in with LiveJournal, WordPress, TypePad, or AIM. (This corresponds to permissions option #3 as well as #4 from above.)

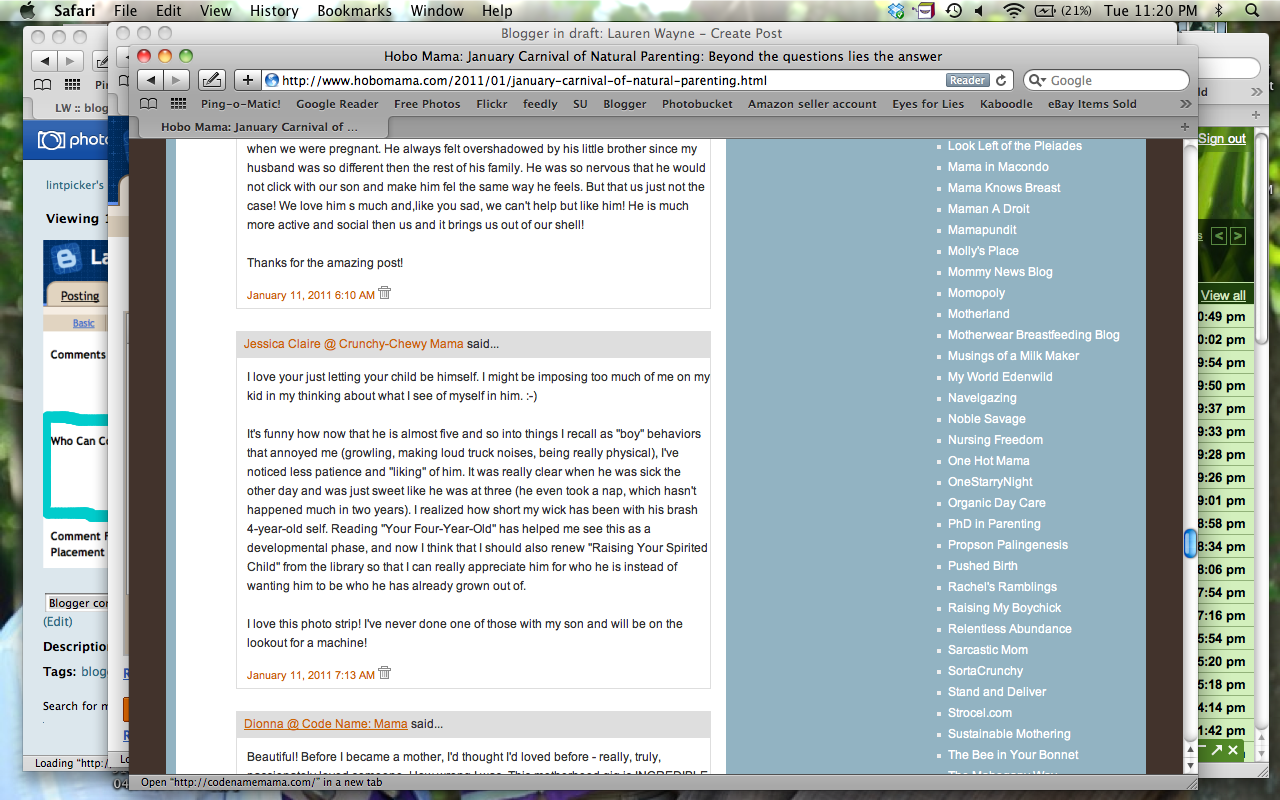
Here's what an OpenID comment looks like online:


You can see the OpenID icon next to the person's name, and that their registered website is linked up.


This is the Name/URL option. Entering a URL is optional. Therefore, a person can comment, for all intents and purposes, anonymously using this option by entering a name (or pseudonym) in the Name field but no URL below. (This you will see only with permissions option #4 above.)


This is what name and URL look like published. The name for the commenter shows whatever the commenter has entered in the Name field, there's no avatar associated, and the linked site is whatever was entered into the URL field. Again, commenters can choose not to enter a URL, in which case the name would show up without any link, similar to Anonymous below.


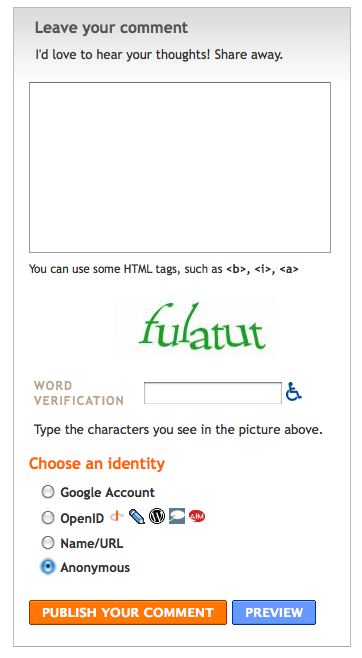
This is the completely Anonymous option. No information is taken from the commenter at all. (This also you will see only with permissions option #4.)


This is what an anonymous comment looks like. As you can see, there's no linking at all, and it's fully anonymous. Name/URL comments without a URL will look the same, with whatever name was entered into the Name field in place of "Anonymous."


Pros and cons of the four options


You have to consider your own comment policy when choosing your permissions options. How open or restricted do you want your blog to be to commenters?

I'll go through each of the four options and describe why you might choose each.
  1. "Only members of this blog" — This would be useful, as far as I can see, only on a private or semi-private group blog — for instance, if you started a blog so that a group could share ideas with each other, or if your family had a blog where each member could post pictures and updates but you weren't inviting public exposure. You will obviously limit the comments you receive, because no uninvited outsiders can comment at all. This can be useful if you want to keep discussion limited to team members.
  2. "Users with Google Accounts" — This is a good option if you want to have a safeguard up for who can comment. It's likely to keep the laziest spammers and trolls away, because it requires signing into an established Google account. However, it doesn't guarantee that you as the blogger will know where commenters are coming from; Google profiles can be marked as hidden. For commenters who have their own sites, it doesn't give as much instant gratification in terms of linking to their blogs, because it's a two-step process: Click on profile link, then click on the website from the profile (if linked there). Google profiles aren't that customizable, either. A plus for commenters is that many, many people have Google accounts now, so it's likely they'll already be signed in to one, making commenting straightforward. It will, however, exclude anyone who doesn't have a Google account and doesn't want to create one, or who doesn't want the Google account publicized, even with a hidden profile.
  3. "Registered Users - Includes OpenID" — OpenID allows bloggers from other platforms to log in as authorized users and leave a comment. This will give some traceability to comments, which again reduces the likelihood of spam or troll comments. A downside for commenters is that OpenID isn't as readily understood as the other commenting options. Because it goes to an extra page for logging in, there can be fear (sometimes justifiable) that a comment draft will be lost before the log-in process is completed (or if it cannot be completed, due to a mistyped password or the like). It also doesn't allow for personalized avatars next to the commenter's name, just the default OpenID icon.
  4. "Anyone - Includes Anonymous Users" — This, the most open of all the commenting options, will greatly please bloggers who wish to have a clear link to their own website, and will also relieve genuine commenters who don't have a handy account to log into to comment. However, it also opens you up to the most troll and spam comments, due to the ease of the anonymous functions. See below for some further thoughts on this. Some blogs might be conducive to supporting anonymous commenters, such as if you regularly write about sensitive subjects and wish for there to be frank conversation, if you want numbers of commenters over quality of discussion, or if you want ease of quick and repeated commenting, such as for a giveaway site. (Again, setting your comment policy will help you determine your own goals.) You will probably attract the most commenters with this option, because it allows for the easiest commenting and the most possibilities for commenters to choose from.

Here's my opining on the four options. I used to allow #3, the Registered Users option with OpenID. However, I eventually switched to #4, for the purpose of allowing Name/URL comments. However, I dislike that I can't turn off anonymous comments separately. I feel like there should be an option before #4 that allows a WordPress-like comment option (name and email address required, with URL as an optional field), but no anonymous users. Sure, trolls and the like could still enter a fake or unused email address and a pseudonym (or "anonymous"), but at least they'd be traceable to some extent, and the accountability would, I think, cut down on the nasties.

I'd also like to be able to track and manage IP addresses from commenters, so that I can block repeat offenders, whitelist the good guys, and identify problem commenters from the back end.

(As we're making our wish lists, take a second to vote on Blogger ideas you like best, and let's cross our fingers they're implemented soon!)

If you are in the same boat of wanting to open your blog to the most commenters you can but would rather avoid spam and trolls, there are a few actions you can take, in rough order from most difficult to easiest:

  1. Switch to WordPress or an alternate blogging platform. This isn't a sarcastic joke; I know people who have switched for the comments alone. For me personally, it's not worth it. I'm comfortable with Blogger — to the extent that I switched this blog from WordPress. But switching to WordPress would indeed give you WordPress-like commenting features!
  2. Install an alternative commenting system. The two I know of for Blogger are Disqus and IntenseDebate. I went back and forth on the idea of one or the other, and even tried them out on a test blog, but they both had their drawbacks as well. Also, you'll want to be fairly confident with fooling around with your template's html and other settings if you want to install outside comments (which means you're probably not reading my tutorials, see?). For now, I'm sitting tight and waiting for Blogger to improve…
  3. Heighten your moderation of comments in Blogger. The good news is, Blogger has finally implemented a spam filter, so many spam comments are indeed caught in that net now (not all, but the most obvious and offensive ones generally are). You can add to your defenses by going to Dashboard --> Settings --> Comments again and scroll down to the sections marked "Comment moderation" and "Show word verification for comments?" I'll go through these options more thoroughly in a future post, but for now, just know that you can choose whether comments post automatically, or whether you get to review them ahead of time (either in email or in your main Comments tab). Know, too, that you can at any time delete a comment that doesn't square with your policy, and you can mark spam comments as such to improve the filtering over time. For word verification, you can choose whether commenters must type in a random "word" to comment, as seen in the comment form screenshots above. This greatly cuts down on the amount of automated robo-spam. You can also turn off comments entirely on certain posts, such as after a determined number of days or if you're receiving more spam than usual on particular posts. There are pros and cons to all these comment moderation choices, so I'll discuss that in more detail later. Basically, the fewer restrictions you have, the easier it is for people to comment, and the more freely they are likely to comment. This includes genuine readers with insightful things to say — and spammers selling you their latest pills, as well as mean anonymous types swooping in to flame you and scurry. It depends, again, on how open you wish to be, what environment you want to cultivate on your blog, and how hands-on you want to be about your comment moderating.


So, those are the current options Blogger has for allowing types of comments. Here's hoping for even more options in the future!

What commenting options have you enabled on your blog, whether on Blogger or another platform? What commenting options make you most likely to comment?
Related Posts Plugin for WordPress, Blogger...