Showing posts with label blogging tutorials. Show all posts

6.09.2016

Why blogging is dead (and why it is not)

I began blogging eight and a half years ago, and I feel like I no longer even recognize the landscape. Having spoken with many fellow bloggers, I know I'm not alone in feeling disconnected and like maybe blogging as we knew it has played out.

Here are the reasons why we (and perhaps you) feel that way, and at the end, the ways blogging is continuing on into the future — altered but still alive.


WHY OLD-SCHOOL BLOGGING IS DEAD

We used to blog for community — now we blog for search engines.


I remember when I got my first commenters on my blog and how thrilling it was. I joined blogging carnivals, posted others' blog buttons, and chatted with authors and readers on Twitter.

I came to know my audience from their commenting and sharing, and they were real people to me. I could put names to many of them.

The change isn't just the audience growing larger, it's that it's grown quieter. The community (mine, at least) has dissipated. Comments and shares have moved to social media and, often, behind my back (not in a bad way, just in a private way).

I check my analytics and see: People are still reading. But they're not necessarily interested in ME. No, I don't blame them (I'm not that narcissistic), but it's a sign that they're not dedicated followers of my blog but rather searchers who've stumbled on a single post of interest to them and then backed away once the information was secured. These readers aren't watching my children grow up or asking my opinion on things. My folksy, homey posts go virtually unseen. Instead, most visitors come to read a few evergreen fact posts: DIYs mostly. I'm not bitter, and I welcome any readers, but it's a sign of the change.

Commenting has moved to social media.


And specifically to Facebook, where it is now incredibly hard for a blogger to get posts seen without paying advertising money, and sometimes even with. I don't bother much anymore with posting links on Facebook, because the views are abysmal (1-10% of my followers, if I'm lucky). If it's something very important to me, I'll occasionally pay to promote it. I've mostly stopped sharing other people's fine links on Facebook, even though I used to love doing so, because no one will see them, and it just hurts my overall page metrics, making it even less likely within the Facebook algorithm that my posts will be seen in the future.

People definitely do a lot of their link reading on Facebook, so this seems counterintuitive. If so many people are reading shared links on Facebook, then surely sharing links on Facebook still works? But it doesn't for most links, only for a (relatively) few viral ones, usually from big-name news sources or very lucky bloggers. (I've had a post or two go viral on Facebook, and it's always been a surprise.) Unless a link gets a lot of traction immediately, Facebook buries it in the feed, so bloggers can no longer rely on their business pages to drum up traffic.

4.27.2016

28 blogging tasks you can do from your phone

Do you spend more time near your smartphone than your computer? You can still get plenty of work done on your blog when you're on the go with these mobile-friendly tasks!

If you're anything like me — juggling paying work, parenting, home life, errands, fitness — you might find limited time to sit down at an actual desk to blog or work on your blog-related tasks. So here's a roundup of plenty of things you can do while you're on your smartphone or tablet.

A few of these links are affiliate links, but most are just free apps. I use what I recommend.


  1. Draft a blogpost.

    If you're a minimalist blogger (mostly plain text), you might be able to post from your smartphone using one of the blogging apps (WordPress, Blogger, Tumblr on Android & iOS), using email uploads (Blogger, WordPress.com, self-hosted WordPress), or navigating to the site on mobile.

    For me, I find the apps and mobile experience inadequate for all the images and coding and customization I love to cram into my posts, so I prefer to finalize things on desktop. BUT, I can absolutely WRITE a blogpost draft while I'm out. I just prefer to do it in email. I use Gmail's Inbox app and like that it saves my drafts well. I just pop my own address into the to field, make the subject line my title, and then Swype away in the text field. I'm Swyping this right now, matter of fact. I'd like to experiment, once I figure out the best headset, with dictating blogposts while I walk, using Dragon Dictation, the native Google voice-recognition on my phone, or another speech-to-text capability. (Here's how one person does this via Evernote.)

     
  2. Edit your drafts.

    If you have a blogpost draft you want to edit, email it to yourself or upload it to Google Docs and use the Google Drive app (Android & iOS) to access it. It has a nice autosave feature, and it will sync with your desktop version of course.

     
  3. Check and reply to email.

    I find being on my phone actually makes this easier, because brevity feels right. Bam. Email done.

     
  4. Read other blogs.

    I use Feedly for my subscriptions now, and I've learned the mobile gesture shortcuts to make the process easy. Save for later articles you want to read in depth or share, or just do it now if you have the concentration time.


3.24.2016

Optimizing your blog images for Pinterest: 9 tips {Updated!}

Since things have changed so much since the last time I wrote about this topic, I figured an update was in order for the way Pinterest works with blog images now.

Many bloggers report amazing traffic from Pinterest if you leverage the platform just right, garnering viral repins and multiple clicks through to a blog. Here are ways to fine-tune your blog images to be Pinterest-friendly.

  1. Include an image in every post.

    If you want to be pinned, this is a must. Technically, a pinner can skirt around this by uploading an image to use as a placeholder for your post, but how dedicated are your readers really? Even if you're a writer, a words person, not a graphics person (I get it — I do!), you need an image in your blogpost. And even if you're not on Pinterest yourself — even if you never set foot in the app or have an account — your blogposts could be gaining traction there as soon as someone pins them. So it's worth making your posts pinnable! The minimum size, by the way, is 100X200 pixels, which is teensy and not going to play well on Pinterest. Read on.

     
  2. Use the standard Pinterest size for best results.

    The largest pin size is 735 pixels wide, and the longest pin that can be read in mobile without clicking on an "expand pin" button is 1102 pixels long. So there's your optimal pin size: 735x1102. (You can round it to 1100 if that's easier to remember, and it doesn't actually need to be exact.) That's the width that will pop up when you click on a pin on desktop. You can technically make your pins infinity long, so if you have more to include (such as in an infographic or a step-by-step pictorial tutorial), then go for it. The whole length will be shown on desktop, but be aware that the whole length won't show automatically on mobile without an extra click.

    Examples of how pins look on desktop & mobile:

    Pins can show as super long on desktop.

    Longer pins will be truncated on mobile.


2.02.2016

Download all your Tweets

I came across this article on BlogHer explaining the easy way you can now download your entire Twitter archive. Even if you've been tweeting forever, it's nearly instantaneous and well worth the stroll back down memory lane.

For no good reason, I wrote this post back in 2013 and then never published it. I think I just wanted to add more cute Tweets to it, or maybe delete some. Who knows. I officially give up and am letting it loose into the world! I checked, and downloading your archive all still works the same, AND these Tweets below are hecka entertaining. So, enjoy, and let me know what your favorite old Tweets are if you do this! Newsflash: I have a new author Twitter handle I'd love to have you follow as well: @LaurenWaynecom

In the article, Diane asks what your first Tweet ever was. Mine were RTs — good links but a boring story for the purposes of this post. But my third Tweet made me chuckle:


Still true.

1.24.2014

How to increase your Facebook page fans and interaction


How to increase your Facebook page fans and interaction == LaurenWayne.com
In the past year, I increased my fan count on Hobo Mama by over 1,000 fans, from 3,500 to more than 4,900. (Don't bother looking at my Lauren Wayne page. I'm concentrating on one page at a time. Yeah, that's it.)

Here are my ideas for increasing your Facebook page fan count and interactions, for what that's worth (with all the Facebook changes making it harder for pages to get views, it might be worth less and less…). I'm indebted with gratitude to Jennifer of Hybrid Rasta Mama and Laura of Authentic Parenting, who have a gazillion followers each (ok, 11,000+) and mentored me, passing along most of the following tips.

  • Post at least daily. Some people post every hour, some once a day. When I am being hardcore at building my fan base, I post about 4 times a day, with at least 2 hours in between posts if possible, and keeping them all within daytime hours in U.S. timezones. (This depends on your audience, of course, so you can experiment and see what your FB insights tell you about when the most engagement happens on your page.)

  • Ask questions! Ask silly, goofy things, like "What did you have for lunch?" I kid you not. I thought this was so dumb, but I swear you'll get a million people responding. Ok, maybe I don't swear it since I'm exaggerating. But it's funny how the banal questions tend to get the biggest response.

  • Do roll calls: "Where do you live?" "How old are your kids?" "I'm looking for new pages to follow. If you have a Facebook page for your blog, tag your page in the comments!"

10.24.2013

Where to find free images for blog posts

Where to find free images for blog posts == LaurenWayne.com

You know that punching up your blog articles with pictures lends a thousand-plus words to your text — but you also want to make sure the photographs and drawings you find are legally yours to use under copyright law and ethical guidelines. You generally can't just grab a photo off Google Image Search or someone else's blog without permission.

There are many stock sites that will allow you to purchase photos, but bloggers rarely want to spend cash for their frequent and frequently ill-paid postings.

So: Here are my top 10 resources for royalty-free, payment-free, copyright-legal, fair-use images for your blog posts.

3.04.2013

Allow people to message you from Google Plus

If you've connected your Google presence to your Google+ profile, as is now the default, there's no standard way for people outside your circles to contact you if they want to drop you a line. There's a feature on the old Blogger profiles to make your email address visible, but if you've upgraded to G+, that profile is history (or soon will be, as I imagine they'll be phased out shortly).

You can't post on someone's wall outside your circles or view their email address without that person making a settings change. You can't even easily tell whether someone comes from a blog or what blog that is unless the profile is set up to loudly display that information.

What's the big deal? Well, for me personally, I run into all sorts of problems when I'm trying to contact winners for my giveaways on Blogger. People comment from their Google accounts on Blogger blogs without necessarily considering the lack of email-ability they're leaving behind. I also can't email someone to follow up on a question or comment.

It's up to you to decide how reachable you want to be on G+ and increase your visibility if that's your goal. (Obviously, if you want to remain entirely private, then that's your call.)

Fortunately, there's an easy fix to make in your settings to allow messages and emails to be sent to you without revealing your email address. To me, this is a commonsense balance between privacy and reachability.

(Now, another irritation I have with Google+ is how small and hidden the links are for emailing people even if they've set up public messaging capabilities, but this tutorial will at least also show you where to look!)

Click any images to embiggen.


See that teensy-weensy line way down there on your right sidebar? For me, it says "Send Lauren an email." That's where, if you have the email function enabled, users can click on it to send you an email. This happens without revealing your email address, so I think it's a good call to enable (unless you're trying really hard to avoid being contacted by [certain] people).

2.18.2013

9 tips for affiliate earning success & an invitation!


One way I earn (a little bit of) money as a blogger is through affiliate sales, an aspect that's increased a lot in the past couple years as I've refined my affiliate techniques.

Affiliate marketing for bloggers is using text links, image ads, and posts that direct your readers to certain stores with whom you have an affiliate relationship. When a reader clicks your link and then buys something at the affiliate store, you as a blogger get a certain percentage back. Amazon Associates (see our bloggers' links here and link up if you haven't already!) is the most well-known program available to bloggers (and a profitable one), but there are many more besides. If you're not familiar with affiliate programs at all, check out this article at Acceleration Partners.

Today I'm going to offer you some of my go-to tips for affiliate marketing as well as recommend my top-earning affiliate programs to you to join.

Best tips for affiliate marketing success

  • 1. An ad in the sidebar isn't going to cut it:
    As soon as I started blogging in 2007, I put affiliate image ads in my sidebar. I'm able to track those through the various programs, and I'll give you the hard facts here: TWO of those ads have ever been clicked on and then followed by a sale. Plenty more have been clicked on; don't get me wrong. But very, very, very, very few of those clicks resulted in any money to me.

    Takeaway: If you're trying to define ad space on your blog, feel free to put up some affiliate image ads. That way, potential advertisers can see where ads go, and your blog looks professional (as long as you're not overwhelming readers with ads all over the place). However, once you get paying ads from real live sponsors, do not allow those affiliate ads to take up prime ad real estate. Take 'em down. They're not earning you anything, trust me.

2.04.2013

Basic links for Amazon Associates to copy & paste

From this:


to this:


Here are some very easy codes to use to make Amazon links from any Amazon item page. If you don't feel like signing into your Amazon Associates account to get the full link, these will work and track just as well.

Link to an item:

<a href="http://www.amazon.com/dp/ISBN/?tag=laurenwayne-20" target="_blank">LINK</a>

Replace all the items in bold magenta:
  • ISBN = Scroll down to the Product Details to grab the ISBN-10 for books or ASIN for any other product. As a shortcut, it's nearly always the first big string of numbers in the URL.

  • ISBN-10 for books: ASIN for anything else: ASIN location of Amazon Associates links for tutorial As mentioned, it's usually the first or only number in the URL as well:
  • tag = replace laurenwayne with your Associates ID tag

  • LINK = Whatever text you want for your link, whether it's the product name or some keywords in your post.

If you're not pasting your code into the HTML tab in your blogging platform, then here's just the plain link to use:

http://www.amazon.com/dp/ISBN/?tag=laurenwayne-20

The official Amazon linkage is this tremendous string, by contrast:

<a href="http://www.amazon.com/gp/product/1936608871/ref=as_li_ss_tl?ie=UTF8&tag=laurenwayne-20&linkCode=as2&camp=1789&creative=390957&creativeASIN=1936608871">Product Name</a><img src="http://www.assoc-amazon.com/e/ir?t=laurenwayne-20&l=as2&o=1&a=1936608871" width="1" height="1" border="0" alt="" style="border:none !important; margin:0px !important;" />

It's a lot harder to remember, right? It's fine if you're in the Associates interface anyway, but the short link will help you out if you're on Amazon proper and don't want to futz with Site Stripe or navigate into your account.

Link to an Amazon-hosted image:

<a href="http://www.amazon.com/dp/ISBN/?tag=laurenwayne-20" target="_blank"><img src="http://images.amazon.com/images/P/ISBN.01.LZZZZZZZ.jpg" alt="PRODUCT" title="POST" align="right" width="200" /></a>

1.11.2013

3 easy ways to make your blog Pinterest-friendly


The pinners are everywhere, and they want to pin your post!

Here are my top three ways to get pinned and repinned on Pinterest!

1. You need an image in your post!

Preferably big and pretty. Pinterest is visual, and the people who use it tend to like their boards to look nice. If your post has no image (or just a video), Pinterest will refuse to let it be pinned. So, seriously: You need at least one photo or illustration in your post!


11.12.2012

What not to name your blog

eraser place holders
What you can name your blog is Lola. I totally approve.

In roaming around the parenting blogosphere, I've seen my share of ill-fitting blog names and usernames (such as on Twitter or forums) that don't grow with the blog or the blogger. This idea list is not meant to snicker at anyone who chose a name poorly, just to offer some guidance as you name — or rename — your blog. I will focus primarily on parenting blogs since that's my realm, but many of these suggestions can apply when choosing any blog or username.

Don't go current.

Yes, when you selected your Twitter handle Rebecca23, you were 23 — but guess what? You'll be 24 next year. And then even older the next! Shocking, I know. Try to pick names that will stand the test of time. More on this same theme in subsequent rules.

Don't name it after your children.

I can't tell you how many blogs I see named "My Two Angels" or usernames like "MommyofAiden." And then said mommy has another angel or two, or Aiden becomes a big brother, and now the header has the "two" crossed out and "four" written in on top, or "Plus Annabelle" is scrawled alongside Aiden. I know it's tempting to declare your passion for your offspring. But if you're not sure sure sure you're "done," don't slight your future kidlets for the current one(s). (This can also extend, sadly enough, to naming based on a present partner, or even a pet. I'd keep things focused on you, since you're the one aspect of your blog that will stay put.)

8.21.2012

How to schedule a post in Blogger {updated}

Dionna of Code Name: Mama and I are writing a few blogging tutorials of particular use for our Carnival of Natural Parenting participants. This one will help in scheduling your article to post on Carnival day!

This is an updated version for the new Blogger interface. If you're still using the old Blogger interface, visit this post instead.


Here's a little tutorial on how to schedule a post in Blogger (Blogspot) for a specific time and day.

This is useful if you want a post to go live at a certain time but will not be available to hit the publish button yourself (such as if you want your Carnival post to go live just after midnight but you'll be asleep by then).

It can also help your blog maintain a businesslike image if you schedule all or certain important posts to go live at a predictable time each day or week (such as a giveaway linky that readers can count on to show up at 9:00 a.m. each Thursday, for example).

(Note to my Carnival friends: You do not have to schedule your post; it's just a how-to in case you want to for your own convenience.)

8.20.2012

How to find (or change) your permalink in Blogger {updated}

Dionna of Code Name: Mama and I are writing a few blogging tutorials of particular use for our Carnival of Natural Parenting participants. This one will help in determining your post URL in advance!

This is an updated post for the new Blogger interface. If you're still using the old Blogger interface, go to this post instead.


Here's a little tutorial on how to determine your post's permalink in Blogger (Blogspot) before you've published a post. This is useful if you want to figure out ahead of time what your URL will be once you've published. You can also choose your own custom permalink if you wish.

Find your predetermined URL

Blogger has finally made this easy for us — yea! Here's how you find your permalink in the new interface:

Click any picture to embiggen.

In any post, go to your Post Settings in the right sidebar. (If it's not already expanded, which is the default, click to expand it.)

Click on Permalink.

You'll see that Automatic URL is the default selection. If you're happy with that, simply copy and paste the URL that appears there to give to anyone who needs your permalink ahead of time (such as in a blog carnival).

Note: If you're planning a post for the future, the month (or year, if applicable) will change to whenever it's published. Therefore, if you're scheduling a post that will take place in a future month, be sure to fill in the correct month (and year) when copying/pasting the URL. You can schedule your post first before copying/pasting to make sure the permalink will be correct.

And that's all — you're done! You don't need to read on unless you want to.

Create a custom URL

If you want to be fancier and craft your own URL, you can now do so!

This can be very beneficial for SEO. (Just saying that phrase made me feel like a spammer.) You can include the keywords that search engines would look for, or make the URL memorable to you, or even include a funny joke within it. (I won't judge.)

8.17.2012

How to schedule a post on your Facebook page


You can now schedule posts on your Facebook fan page (for a blog or company) or your personal Facebook page right in the native interface — no external application needed. This is helpful for several reasons:
  1. Posts that are natively entered into Facebook get more pageviews in the new Facebook news feed sorting. In contrast, if you have an RSS feed automated through Networked Blogs, for instance, chances are few people will see that post.
  2. Building traffic on your Facebook page requires frequent posting of links, status updates, photos, and questions — but it can be nearly impossible to do this consistently all day, every day. Plus, it helps to spread out your updates evenly throughout the day. Scheduling allows you to put in scheduling work when you have the time (whether that's daily or weekly or however it works for you), and then have links and updates unfold throughout the day.
  3. Unlike with external applications, Facebook's scheduling feature functions just like a normal status update: You can tag other pages, enter links, select thumbnails, etc. The only downside is so far you can't schedule a "share."
  4. The scheduling feature could be a little less odd, but overall, it's easy to operate. Read on for how!

Thanks to Momma Jorje for this tip! She's the scheduling queen.


Click any image to embiggen.

First you have to set a starting date for your page, if you haven't already. From your Admin Panel at the top of your Facebook page, click Edit Page and then in the dropdown menu, select Update Info.

(You can see I do a lot with this Facebook page.)

Under Basic Information, add a Start Date and Start Type. Save your changes.

Now you're ready to schedule!
Enter the information, link, picture, etc., you want to schedule. Have it look exactly as you want it to post. In the lower lefthand corner, click the clock icon.

3.12.2012

Publish your blog on Kindle


Want to offer your blog subscription for sale on Amazon? It's easy and free.

Why put your blog on the Kindle?

Some people read blogs on Kindle or other wireless ebook devices. For a subscription fee of 99 cents (U.S.), these readers can have your blog automatically downloaded to their devices every time you update with a new post.

You split the fee with Amazon. And by "split," I mean they get 70% and you get 30%. Hey, it's something, right?

This program is currently open only to those with a bank account in the United States and United Kingdom.

How do you publish your blog on Kindle?

Glad you asked. (You're so helpful that way.) Simply go to Amazon's Kindle Publishing sign-up page and follow the instructions there.

12.02.2011

FeedBurner feed too big? How to fix it

My recent FeedBurner woe:


Click any image to embiggen.


The past few days, I noticed signs that my RSS feed for Hobo Mama wasn't updating, though it took me awhile to believe it.

I caught glimpses first in CommentLuv entries when I commented on other sites. It kept pulling up my "Gratitude Challenge" post from Thursday, Thanksgiving Day, even though I subsequently posted on Sunday, Tuesday, and Wednesday. I didn't really think much of it the first few times, or the first couple days — I just used Ping-o-Matic to give my feed a little boost and figured it would fix itself.

But after it had been a week, I noticed the delay wasn't just in CommentLuv. It was in the sidebar widgets on my other sites; it was in Google Reader; and — most obviously, now that I looked for it — the delay was on my feed's page itself.

I went to FeedBurner, through which I burn all my feeds, for the answer. I clicked right through to the humorously named "Troubleshootize" tab, hoping the humor didn't mean they wouldn't take this plight seriously.

11.29.2011

How to take a blogging break … but keep your blog going

Today I would like to welcome Dionna from Code Name: Mama, who has written a guest post about taking a rest from your blog while keeping up your readership.


Lauren's note: When I was expecting Alrik, I was brainstorming ways to continue my blog for the sake of my readers and my advertisers while taking a highly valued babymoon. Now Dionna's in the same boat! For you it might be a vacation or family trip or just some needed time to disconnect from the screen. These are Dionna's ideas for stepping away from the blog but keeping up a basic amount of posting.

New babies, vacations, outside obligations, blogging burn-out. All bloggers need a break sometimes — it can even be healthy to plan a regular break into your annual blogging schedule. If you're worried about losing readers and subscribers during your absence, here are some tips that might help ease your mind.

1. Republish your own guest posts.

Have you had guest posts published at other sites? Run those! Unless you made a deal to the contrary, you still retain the copyright. Just be sure to check the other site's guest post policy to make sure you're within its exclusivity terms.1 Include a note that it's been republished from a post previously seen on the host blog, with the appropriate link.

2. Repost old posts.

Readership changes from month to month, year to year. If you've been blogging awhile, surely there are old posts you can rerun. If you republish posts from when you were a beginning blogger with less of a following, you may be pleasantly surprised by the increased response to old posts. Include a note again mentioning that it's been republished (and possibly edited) for any hardcore archive delvers among your readers.

3. Book guest posters who will promote their own posts.

If you're going to be AWOL from your blog, you'll likely also be taking a hiatus from social media. Call on guest posters you trust to promote their own posts on their blog, Twitter, and Facebook and to respond to commenters. Don't hesitate to tell them that part of the deal is they need to interact, since you'll be taking a break.

4. Skip regularly scheduled posts.

Do you have a habitual post you put up every week (Wordless Wednesday, recipes on Friday, Sunday Surf)? Skip it, and don't feel guilty AT ALL.

5. Schedule some quick shots.

Try to schedule a few posts ahead, but don't make them be ambitious. There's something to be said for short, 1-2 paragraph posts — think of them as the blogging equivalent to a witty or insightful status update.

6. Warn your readers.

Let your readers know in advance you will be taking a break. Turn it into a post asking for guest posters! Your readers will understand, and they will welcome you back when you return.

Dionna is a lawyer turned work-at-home mama of an amazing son and an incredible new daughter. You can normally find Dionna over at Code Name: Mama where she shares information, resources, and her thoughts on natural parenting, consensual living, eclectic learning, and compassionate advocacy.

Photo courtesy sylvie szafranski on flickr (cc)


1 For example, here is the guest post "exclusivity" policy for Natural Parents Network: "While contributors to Natural Parents Network maintain the copyright to all their work, we ask that you not post your submission anywhere else (including your own blog) whether paid or unpaid, for 90 days after publication on Natural Parents Network. This exclusivity adds value for our readers without our asking you to give us copyright on your work. Similarly, we will wait 90 days to republish any previously published article."

10.18.2011

Meta description + meta keyword for Blogger templates

Jorje had a good blogging question today. I thought I'd post the answer for anyone else looking to improve SEO (search engine optimization).

For those on Blogger, … they posted this this morning:

Please recheck your XML template, and fill meta description + meta keyword with your blog description and keyword, it's very important to promote your blog :)

Jorje wanted to know where to find the meta tags.

Head to your template!


(Click on any image to see it larger.)


Go to Design --> Edit HTML.

Before working on your template, Download Full Template to save a backup. That way, you can revert to your previous version if something goes horribly wrong.

You make your changes in the big text box, and click Save Template when you're done.

Here's where to go if you're in the new Blogger interface:


Go to Template --> Edit HTML.

You will now get a warning that you should do no such thing:


Again, back up your template before proceeding.

Then you'll be in the same sort of window:


Now that you know where to go, here's what you do once you get there.

8.22.2011

How to create footnotes in Blogger

By popular demand …


Even though there's no built-in way to create footnotes in Blogger, it's easy enough to code linked footnotes into a post in HTML view. Here's how I do it.

What it looks like for readers


This is my post text with a linked footnote at the end.1

When readers click on the footnote number, it jumps them down to the footnote. Clicking an arrow after the footnote conveniently jumps them back up to where they left off.

Footnotes are a great solution for tangential or additional text, such as caveats, resource citations, or pointless jokes. (I especially prefer the latter.) Readers can choose whether to continue reading the main text, or be delightfully distracted down to your bonus offerings, and then back up again when they're ready to resume.

The HTML code for you

You must enter this code in "Edit HTML" view in Blogger. (I have a tutorial explaining the difference between Edit HTML and Compose if you're not familiar with the two.)

WARNING: NEVER switch back to Compose view once you've inserted the footnote code in Edit HTML!

Code to put in the text where you want the footnote's number to appear:

<a href="#1" name="top1"><sup>1</sup></a>

All right, which is easier for you? I pasted it above so you can see it easily, but here's the same code in a grab box for easier copying/pasting. Take your pick!


Code to place at the bottom of your post:

<hr width="80%">
<p>
<span class="Apple-style-span" style="font-size: x-small;">
<a name="1"><b>1 </b></a>FOOTNOTE<a href="#top1"><sup>↩</sup></a>
</span>


Obviously, replace "FOOTNOTE" with the actual footnote!

Explanation of the codes

These footnotes work through a simplistic process of "name" URLs that reference each other. You tag each part of the footnote with a name. The footnote number in the text is named "top1," and the footnote number at the bottom of the post is named "1."

Then the paired URLs send readers back and forth between these "names" through the href codes. Telling the URL to go to href="#1" sends it to the post's URL but with #1 appended. That # sign tells the code to look for a name that matches what's after the #, and it finds it in our footnote named "1."

Multiple footnotes

If you want multiple footnotes, you simply need to paste the following parts of the codes again, substituting the numbers you need for the word "NUMBER."

Code to put in the text where you want another footnote's number to appear:

<a href="#NUMBER" name="topNUMBER"><sup>NUMBER</sup></a>


That's three replacements at the top, if you're counting.

Code to place at the bottom of your post for multiple footnotes:

You want to add in this line after your first footnote line as many times as you need it.

<a name="NUMBER"><b>NUMBER </b></a>FOOTNOTE<a href="#topNUMBER"><sup>↩</sup></a>

Again, replace the three instances of "NUMBER" with the number you're on.

Here's a grab code for 5 footnotes:


Styling your footnotes

Obviously, you can feel free to alter these codes cosmetically to suit your blog. This is just what I came up with. The basic structure is the "name" links, and the rest is decoration.

I used a "sup" command to make the footnote numbers superscript in the text, added an "hr" line at the bottom to separate the footnotes from the post's text, made the footnote font "x-small" in size, and used a little superscripted ↩ symbol for returning to the text location. Any of those elements could be changed as you wish. For instance, you could have your footnotes appear in a different font face or color, or change how you separate off your footnote area. If you want to copy mine as is, I don't mind, though I'd love any shout-outs to this post you'd care to give!

2.11.2011

How to add "Read More" jump tags in Blogger

My new favorite thing in Blogger? Adding "read more" tags to posts. I'd seen this feature on WordPress and other blogs before but hadn't realized it was a Blogger feature, too. I think it's been here for donkey's years, but I was slow to catch on to the benefits!

Here's a little tutorial that will explain "read more" links and let you know why and how you should add them!

What's a "read more" tag?

First things first! If you have no idea what I'm talking about, take a look at my Hobo Mama homepage (for I have not performed the same editing wonders on this site yet!).

(Click on images to see them larger.)

The "read more" link is at the bottom of the post that's been truncated. When you click on it, it 
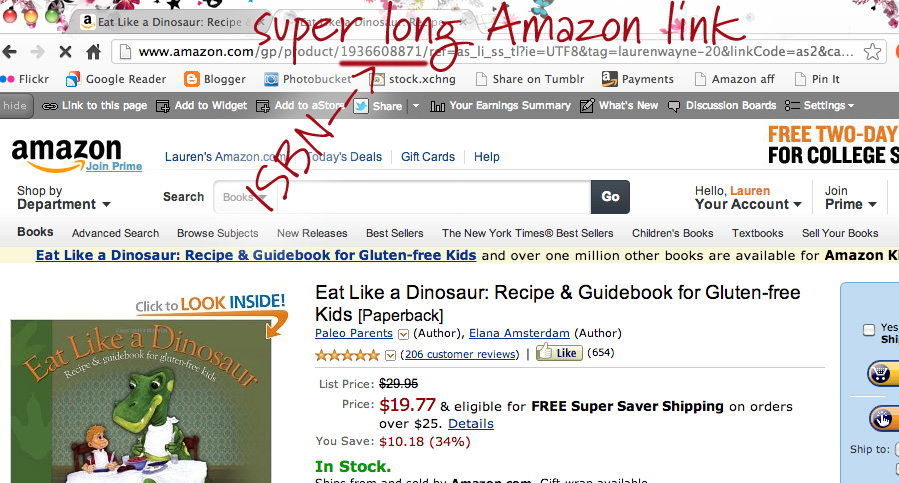
links to the original article URL plus the #more tag at the end — in this case, this link: http://www.hobomama.com/2011/02/fat-and-pregnant-heartbeat-video.html#more. So if you're reading from a page and choose to "read more," you will get popped into the article at the point where you left off. On the other hand, if you click on the URL as a whole from another source (in a blog reader or from a Tweet, for instance), you'll see that the "more" tag is undetectable when the post is expanded (try it here: http://www.hobomama.com/2011/02/fat-and-pregnant-heartbeat-video.html). Then it simply shows you the post as a whole, and the "more" coding is invisible.

Other examples of a "read more" link at work can be seen in non-Blogger applications such as our WordPress-based Natural Parents Network homepage, which has a sort of magazine/excerpt vibe to it. You get a digest version of all the current posts and can click on the "Read More…" links if you're interested to, well, read more.

Why do I want "read more" tags?

Scanning and searching is easier

The biggest reason is to make pages that encompass a lot of posts less cumbersome for readers to scroll through and find what they want. This is true for your home page as well as any category/label search pages.

For instance, I've recently gone back and added in "more" tags on all my posts tagged with Elimination Communication on Hobo Mama. If you look at the category page for elimination communication now

http://www.hobomama.com/search/label/elimination%20communication

— you can easily scroll through 19 partial posts on the subject and decide whether each article is really what you're looking for. (I'm guilty of popping labels onto posts that are only distantly related in some convoluted way in my mind….)

By contrast, I went to a label where I hadn't yet added jump tags, and only six posts loaded, in their entirety. That makes it a lot harder for readers looking for a particular article to comb through your category tags, particularly if you have a lot of articles shuffled into a particular category. They have to keep clicking on "Older Posts" at the bottom of the page, again and again and again, in the hopes of finding the one article they're looking for.

I was going to show you the difference between the two ("read more" tags vs. no "read more" tags), but I plan to change all mine over as I have time. The best method I can think of, if you don't have "read more" tags yourself and you're on Blogger, is to load your own homepage or a category page and see how clunky it is to wade through it all.

More information, less space

The other benefit, and it's related, is that you can show highlights from more articles on a single page. For instance, I used to have to keep my Hobo Mama homepage at a maximum of four posts (under Settings --> Formatting --> "Show at most X posts on the main page"). My posts tend to be long and have a lot of images, so it took too long to load more than that and sometimes the multiple javascripts would interfere with certain browsers.

With the "read more" jump tags, however, I can keep each individual post down to a manageable excerpt size and therefore safely and conveniently show more total posts on a page at once, making it more likely that a visitor will see something enticing.


How do I get me some of that sweet "read more" action?

So you're convinced! Now, how to add in those "read more" tags to your own posts? Fortunately, it's easy!

(Click on images to see them larger.)

It's easiest to do in 
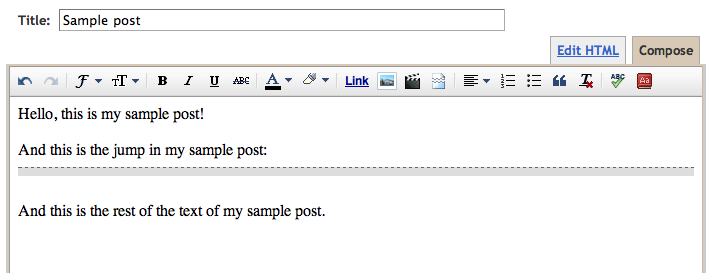
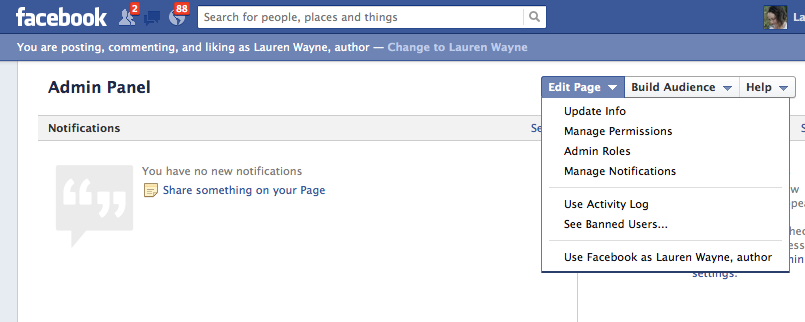
"Compose" mode1, because there's a little icon right there to press! As you can see in the top row of this screenshot, the icon looks like a page that's been ripped in half, symbolizing that a portion of the post is before the jump and a portion after.

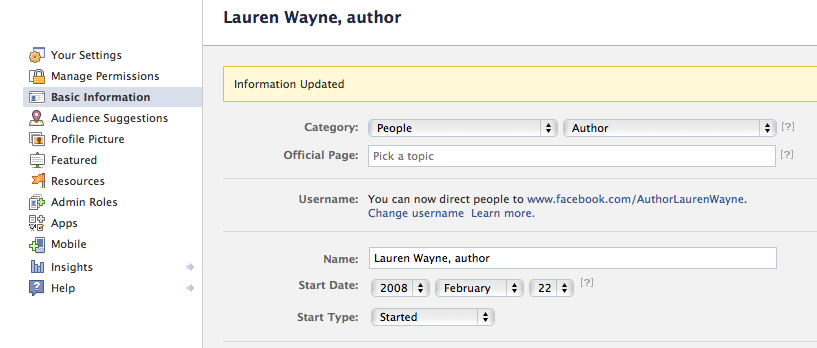
Once you click the icon, this gray-with-black-dotted line pops into your post to show you where the jump will fall. You can delete it or copy and paste it elsewhere if you change your mind.


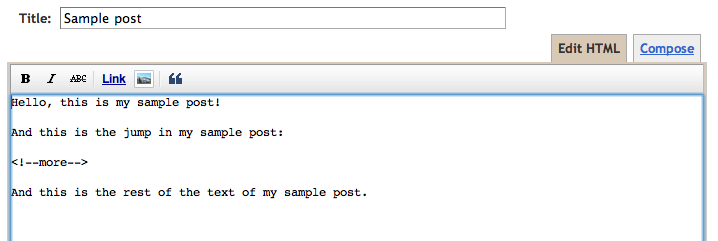
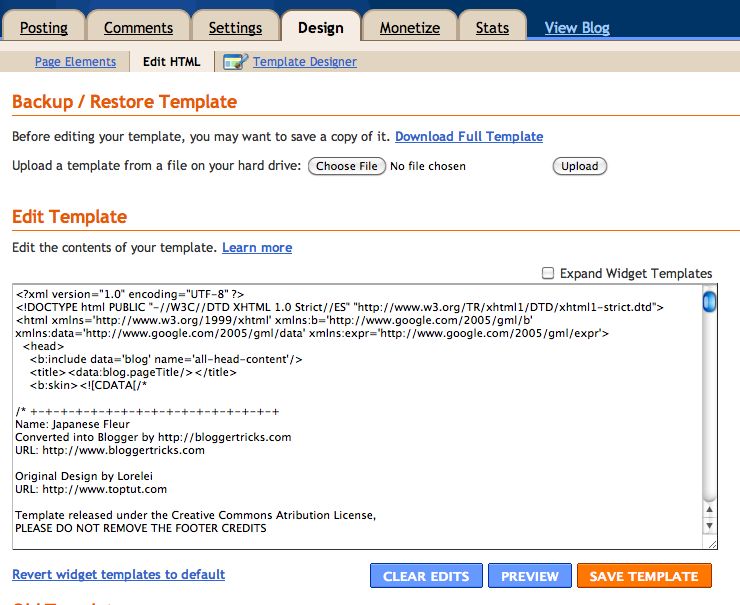
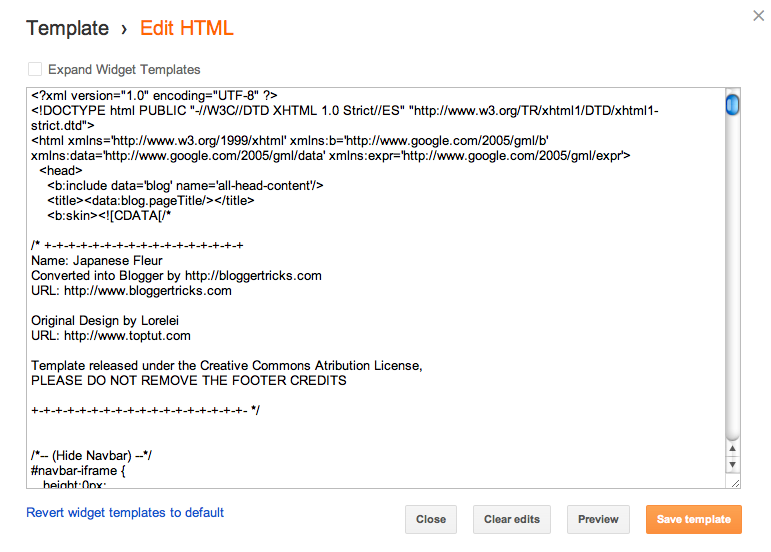
Alternatively, if you're in Edit HTML mode1 (I tend to write in HTML view, so I think that's why I didn't notice the "read more" icon for so long!), you can type in the HTML code for a jump yourself:

<!--more-->


Just copy and paste that HTML coding tidbit wherever you want your jump link to appear.

To make things easier on me, I actually created a draft post with just that code in it that I saved with a date in the future so it's always at the top of my drafts list. Then, whenever I need the "read more" code, I can just open the draft and copy and paste. Another option I just thought of is to add it to your Post Template box, which makes things even easier in the long run as you're composing new posts in Edit HTML view. Simply go to Settings --> Formatting --> Post Template, paste it in and save your settings. I pasted in <br><br><br><br><!--more--> so it wouldn't be at the very top. Then the coding will show up in every new post — just make sure to move it where you want to before you publish a post!

Jump around!

A couple final notes:
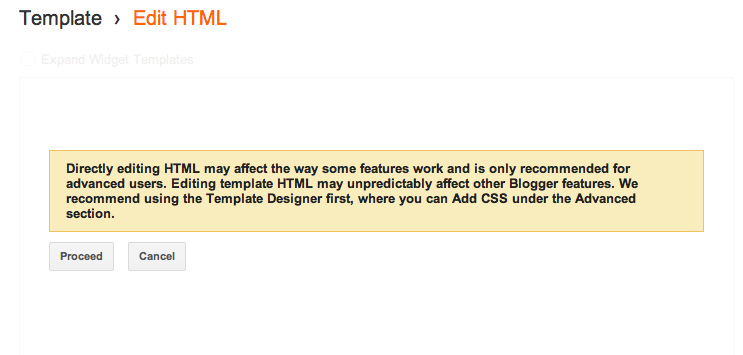
I've heard that some older or nonstandard Blogger templates don't work automatically with the "read more" tags, so you might have to update or tweak your template in that case. My Hobo Mama template was automatically outfitted with the functionality and worked with no further fiddling on my part, but this template is not working. However, I want to upgrade my template here, anyway, so I'll deal with that later. If you're also having problems, let me know and I'll try to help you out!

Since you can't conveniently add custom excerpts yet for articles in Blogger the way you can in WordPress (see this link as an example of a string of posts in WordPress that mostly have handcrafted excerpts along with selected featured images), you might want to hone your skills at writing opening paragraphs that can function as an overarching preview for the article to come. I know I'm guilty of rambling on for awhile at the beginning of my posts (it's fun!) before getting to the point. But if you know that your before-the-jump paragraphs are all readers will see to choose whether or not to click and read further, you might find yourself making sure those opening paragraphs are concise and tempting enough to lure readers in further. Along the same lines, you might want any opening images to be pertinent, since whatever is up at the top is what will show. (Of course, you choose where the jump goes, so you can ultimately arrange it however you'd like!)

Rest assured, too, that anyone clicking on a URL from another source (such as Twitter or Facebook) or following your feed in a reader or email subscription will see the full post. These "read more" tags don't affect anyone clicking on a regular post link, only people browsing your home site or a category search page. To my point of view, those are exactly the times you want readers exposed to a wide variety of articles, so that's perfect for my needs.

If you want to make sure that the "read more" tag doesn't put extra spaces and line breaks into your post, simply don't add them in! You can smush the "read more" coding right up against any other words or html, without any extra spaces or line breaks around it, and the break will happen there as planned.

Enjoy your "read more" tags — your readers will!


1 If you need a simple mini-course on the difference between Compose and Edit HTML view in Blogger, see my tutorial "How to edit HTML in Blogger."

Related Posts Plugin for WordPress, Blogger...