Showing posts with label wordpress. Show all posts

4.27.2016

28 blogging tasks you can do from your phone

Do you spend more time near your smartphone than your computer? You can still get plenty of work done on your blog when you're on the go with these mobile-friendly tasks!

If you're anything like me — juggling paying work, parenting, home life, errands, fitness — you might find limited time to sit down at an actual desk to blog or work on your blog-related tasks. So here's a roundup of plenty of things you can do while you're on your smartphone or tablet.

A few of these links are affiliate links, but most are just free apps. I use what I recommend.


  1. Draft a blogpost.

    If you're a minimalist blogger (mostly plain text), you might be able to post from your smartphone using one of the blogging apps (WordPress, Blogger, Tumblr on Android & iOS), using email uploads (Blogger, WordPress.com, self-hosted WordPress), or navigating to the site on mobile.

    For me, I find the apps and mobile experience inadequate for all the images and coding and customization I love to cram into my posts, so I prefer to finalize things on desktop. BUT, I can absolutely WRITE a blogpost draft while I'm out. I just prefer to do it in email. I use Gmail's Inbox app and like that it saves my drafts well. I just pop my own address into the to field, make the subject line my title, and then Swype away in the text field. I'm Swyping this right now, matter of fact. I'd like to experiment, once I figure out the best headset, with dictating blogposts while I walk, using Dragon Dictation, the native Google voice-recognition on my phone, or another speech-to-text capability. (Here's how one person does this via Evernote.)

     
  2. Edit your drafts.

    If you have a blogpost draft you want to edit, email it to yourself or upload it to Google Docs and use the Google Drive app (Android & iOS) to access it. It has a nice autosave feature, and it will sync with your desktop version of course.

     
  3. Check and reply to email.

    I find being on my phone actually makes this easier, because brevity feels right. Bam. Email done.

     
  4. Read other blogs.

    I use Feedly for my subscriptions now, and I've learned the mobile gesture shortcuts to make the process easy. Save for later articles you want to read in depth or share, or just do it now if you have the concentration time.


10.10.2010

Uploading a new blog button without changing the button code

UPDATE 2017: Due to Photobucket's banning on third-party hosting, this will no longer work on Photobucket unless you pay for the highest-tier account (which you shouldn't bother). This will still work if you use a dedicated image hosting service — I chose Amazon S3 for now. You can use the same tips below, which I've updated to show my new image URLs.

If you have a blog button or badge (a little square logo advertising your site) hosted on Photobucket, you might have been in the tricky position of wanting to change the button without making everyone who has your button already change the button code on their blog.

There is a relatively simple(ish) way to make it a bit harder on your end but easy-peasy and seamless to everyone else. The next time their pages load, your new button will appear, with no effort on their part. Much easier than sending out pleas to change the code, yes?

The trick is to upload your new button to your web hosting site using the same file name, which will therefore give it the same URL as the old button.

Note: This trick will not, as far as I know, work if you've uploaded your image to Blogger or Flickr, and I don't know if it works on WordPress-hosted images. Which frankly is a good enough reason to advise you to use Photobucket[your own hosting service] for important images, so you have more control. If you host your own images on a server, then the following tips can still apply — but you probably already knew how to do this.

How to keep a direct link in Photobucket[your own hosting service]

For instance, here is the HoboMama.com blog button:

Visit Hobo Mama Natural Parenting Blog button for HoboMama.com


Here is the direct link for that image:
http://images.hobomama.com/hobo-mama-button-200x200.jpg

The piece of information after the last slash is the name of the image file, so hobo-mama-button-200x200.jpg

If you wanted to upload a new picture but keep the same direct link URL, here's what to do, in this order (very important):

  1. Create the new image in your photo-editing software and save it with the same name as the original (e.g., hobo-mama-button-200x200.jpg).
  2. Go to Photobucket[your own hosting service] and find the image you want to replace. Click "delete" on the old image, acknowledging that you will be breaking all the links that are looking for this image (but only temporarily!). Make sure you have a backup of the image on your computer in case you want it in the future. (Optional: You can always re-upload it to Photobucket[your own hosting service] with a different file name [for instance, rename it hobo-mama-button-200x200-archive.jpg before uploading] if you want it archived online.)
  3. Upload your new image to Photobucket[your own hosting service], in the same folder as the old one. The new direct link will be the same as the old one (http://images.hobomama.com/hobo-mama-button-200x200.jpg), as long as you were careful to name your file the same as the old file.

It's important to delete the old image before uploading the new image. Otherwise, Photobucket[your own hosting service] will rename the new file slightly to differentiate between the two and the direct link will be different.

And, again, if you have different folders within Photobucket[your own hosting service], make sure to upload to the same folder, since that becomes part of the URL as well (Elements/ in my example).

This trick comes in handy for regular blog buttons, but also for advertisements and giveaways. Say you wanted to advertise on someone else's blogs, such as for your Etsy shop. You might make your ad seasonal but do all the changes on your end. So, you could create an ad with summer products, and then easily switch it out to winter products later in the year. As long as you kept the file name the same (e.g., hobo-mama-ad.jpg) and deleted the old ad image, you wouldn't have to have your advertisement hosts change their code at all to be current.

Or, for a special giveaway event, such as some review blogs do — a baby shower bash or a holiday-themed event — you could name your button for that something like hobo-mama-reviews-giveaway-event.jpg and then just keep updating the image but under the same name each time. That way, your event button on people's blogs would never be out of date!

Hope that helps, and that all your bloggy fans will appreciate the new image that magically appears on their screens!

10.09.2010

How to make a blog button grab box

If you have a blog button or badge now (a little square logo advertising your site), do you want to know how to make a little box so people can grab the code? Like so:

Visit Hobo Mama Natural Parenting Blog button for HoboMama.com


It's actually really easy. All you need to do is figure out the code for the button, and then place it within this placeholder code:

<form><textarea rows="5" cols="20" readonly="readonly"> INSERT BLOG BUTTON CODE HERE </textarea></form>

You can alter the size of the grab box by experimenting with different numbers for rows and cols (columns). The "readonly" command is optional, but it prevents people from accidentally deleting or editing the code in the box as they're copying and pasting.

Tomorrow I'll give you a tip on updating your image without making your fans change their button code. And if you missed yesterday's post on creating the code, check it out here.

10.08.2010

How to make a blog button code

Do you want a blog button or badge, a little square logo to advertise your site, business, or giveaways? Once you have a basic image uploaded to an image host, it's easy enough to figure out the code.

Visit Hobo Mama Natural Parenting Blog button for HoboMama.com

Here's my basic button code:

<div align="center"><a href="http://www.HoboMama.com" target="_blank" title="Hobo Mama"><img src="http://images.hobomama.com/hobo-mama-button-200x200.jpg" width="150" height="150" alt="Hobo Mama: A Natural Parenting Blog" /></a></div>

From the top down, here are the elements in my button code. You can feel free to copy what you like.
  1. I've chosen to center mine, which is the opening and closing div tags.
  2. Then I have a link to my website: <a href="http://www.HoboMama.com" target="_blank" title="Hobo Mama"> I've chosen target="_blank" so that it opens in a new window when someone clicks on it, and I put my website name in the title tag, so that anyone hovering a mouse over the image will see what page it links to. (You can try it on the top image to see what I mean.)
  3. Now it's time for the real point of this code, which is the image for the button itself: <img src="http://images.hobomama.com/hobo-mama-button-200x200.jpg" width="150" height="150" alt="Hobo Mama: A Natural Parenting Blog" />
    • The src tag is where you put the direct link to your button. (I recommend using Photobucket or [Photobucket no longer possible as of 2017] self-hosting the image, because you'll have some control over changing the file in the future if you ever want to alter the image without changing the button code.)
    • The width and height are how big you want your button to appear, and of course the people who grab your button can alter the size as they wish. A 125x125 is a good standard size. I made mine a little larger — for attention, I guess. You can see from the file name that the button image is actually 200x200, so that fans could make the button as large as that without degrading the quality. I recommend making your button image similarly a bit oversized in case of zealous fans!
    • The alt tag lets you give your image a name, so that it will show up in search engine results. I recommend putting a good, brief description of your blog here. It will also help fans who have lots of buttons keep track of which one's yours when they're looking at the code alone.
  4. Then make sure to close off all the tags you opened: </a></div>
Make sure you test out the button before giving the code to anyone else. Try publishing it in a blog post or your sidebar and make sure the image shows up the way you want it, and that if you click on it, it goes to the right page. Tomorrow I'll have a post on putting your code into a grab box so your fans can get your code for themselves!

6.12.2010

Get rid of "You are posting comments too quickly" in WordPress

Here's another easy tutorial for me to write, because I'm not writing it.

I happened across this post from 3 Kids and Us when I was looking for information about that annoying WordPress message that greets me whenever I'm entering a giveaway:
You are posting comments too quickly. Slow down.
That chaps my hide, because — dang it — I want to post my giveaway entries quickly! I don't need to dilly-dally and think about whether I'm following someone on Google Friend Connect. It's especially annoying if I'm just copying and pasting a repeated comment for multiple entries, say 3 entries for grabbing a button — I really don't need time to consider. Come on, just post my comment already, WordPress!

Thank goodness, Cat from 3 Kids and Us knows the solution, so click on over to read about installing the Disable Check Comment Flood plug-in — and then, please, if you are a WordPress giveaway host, do it. Cat also gives advice on how to prevent comment spam after installing this plug-in.

This isn't a problem in Blogger, by the by, where I can post comments as fast my merry fingers can paste them on in.

6.02.2010

Install the DoFollow Plugin for Wordpress

Today I would like to welcome Tom (aka CodeNamePapa), who has written a guest post about how to give your fellow bloggers and Carnival participants a little link love on your site. Tom is an IT guru, and he is one half of the natural parenting duo responsible for one amazing son. You can normally find Tom's wife Dionna over at Code Name: Mama where she shares information, resources, and her thoughts on natural parenting and life with a toddler.

[Editor's note: If you are a Blogger user, stay tuned for a follow-up post on DoFollow for Blogger.]

Hello. I'm here to talk about something you may or may not spend a lot of time thinking about: the inner workings of your comments' links for self-hosted Wordpress sites.1

I could make this the shortest guest post ever and simply say, "Do your commenters a favor and install the DoFollow plugin from Semiologic." But, since I enjoy being "a tech nerd" (or whatever Dionna calls me) I've written plenty more on the subject at hand — if you'd like to have some background information (or don't want to install plugins willy-nilly) please read on.

NoFollow vs. DoFollow for Wordpress blog comments


I'm going to break this post up into three sections:
  1. How do Google's bots search/scan my site, and what is PageRank?
  2. What is NoFollow?
  3. What is DoFollow?

1. Google bots & PageRank:

In a nutshell, part of how Google and other search engines work is as follows:
  • Google has computers (aka "bots") set up to scan the internet for new pages and content.
  • Eventually, a bot will scan your site.
  • Once the bot has seen enough, it will use the links it finds and skip to the next page/article/site to scan.
  • The bot uses links that may be pointing internally to your own site or they may point externally to someone else's site.
"PageRank" is Google's algorithm that determines how important/popular your site is.2 A small part of the formula involves how many pages link to YOUR page. For example, if you have a brand-new site, you'll have low PageRank because no one else knows about your site yet. Older sites or sites that everyone knows about will have higher PageRank because they have more content, and more sites link to that content.

The description above is super-simplified and not a complete explanation of how it works (no one actually knows how it works — except maybe Morpheus), but for this post it will suffice in order to explain the next two points.

2. What is NoFollow?

NoFollow was created about 5 years ago to combat comment spam. Since it was implemented, the default Wordpress setup adds a "nofollow" attribute to any links in a comment. As a search bot reads through your site, it will see the links in comments — but once it sees rel="nofollow" it will ignore the link and move on.

The benefit of this is that should spam comments exist on your site, Google won't use those spammy links as evidence that the spam site has important content, and the spam site won't have its PageRank raised. Why does that matter? Because if a spam site has high PageRank, it could conceivably start appearing higher on a search results page when YOU use Google to find something. I think we can agree that it's a good thing for spam sites not to be boosted in search results.

NoFollow keeps the web a little safer by not rewarding spammers for getting their links displayed on your site and scanned by the search bots. This page — http://codex.wordpress.org/Nofollow — does a lot better job of explaining it in-depth.

You may be wondering, "What about real sites from real people? Shouldn't real sites from loyal readers experience the benefit that a link on my site would provide?" This is where the Do Follow plugin comes in.

3. What is DoFollow?

A link that is considered "dofollow" (i.e. a link that does not have a "nofollow" tag) would tell the Google bot "follow this link and have fun crawling that page, too." The link itself doesn't need to say rel="dofollow" — the bots will follow any link unless it's told not to (i.e. unless the link says rel="nofollow").

What plugin do we recommend to get rid of "nofollow" in comment links? We are using the Do Follow plugin from Semiologic. The plugin simply strips the "nofollow" tag from links in comments, thereby making that link "Do Follow" just like any links you'd place within your own content.

Further explanation can be found on Semiologic's site. You can install the plugin from your Wordpress Admin panel (Plugins, Add New, search for "Do Follow", and Install).

4. Don't Let Spammers Off So Easily

By using the DoFollow plugin, there is a slight risk that a spam link could be scanned by a search bot. Of course, there are additional steps available to keep this from ever happening.

One step is to configure Wordpress to hold all comments for moderation — this means you will sort out manually what comments are spam and which are real. You can also configure Wordpress to automatically approve a comment if that commenter has gotten a comment approved previously (these options are available in your Wordpress Admin screen under Settings, Discussion).

The best way to do the bulk of comment filtering is with the Akismet plugin. It's a tool that has saved us from countless hours sifting through comments to decide which are real and which are spam.

How do you install Akismet? Well, once Wordpress installs, Akismet is already installed, too! All you have to do at that point is activate Akismet from the plugins panel. If you are a Wordpress.com user (meaning they host your site for you) Akismet is running in the background 24/7 without your having to do anything.

Give a Little Link Love to Fellow Bloggers


By installing the DoFollow plugin (or similar), you are giving a little bit of link love to bloggers who take the time to leave comments on your site. Will it encourage people to comment? Probably not3 — but it's one small way you can thank those who provide feedback on your writing.

Have you installed DoFollow or a similar program? Have you noticed any differences?


1 If you are a Wordpress.com user (you host your site through Wordpress.com rather than just using their blogging software on your own privately-owned site), it does not look like you can install plugins of this type.
2 To see what your PageRank is, just visit the PageRank Checker.
3Although you can find various badges and lists to advertise yourself as a DoFollow blog if you think it would inspire your readers.

5.20.2010

How to use FeedBurner to maximize your blog — Part 2: Advanced goodies

Paige of the Baby Dust Diaries is a NASA research librarian by day — and mother to Aellyn and inspiring blogger — well, I was going to say "by night," but let's say be accurate and say all the time. She has volunteered to write a few guest posts on topics that come naturally to her in her line of work. Visit Paige over at The Baby Dust Diaries for more on natural parenting, breastfeeding, gentle discipline, infertility, and life with a miracle baby.

How To Use FeedBurner To Maximize Your Blog — Part 2: Advanced Goodies

By Paige of The Baby Dust Diaries

In Part 1 we looked at the basics of why and how to start using FeedBurner. In this article we'll look at some cool things you can do now that you have a FeedBurner account.

1. FeedFlare

FeedFlare allows readers to share your post directly from their feed reader by putting social media sites directly in your feed. This service is not activated by default, but it is easy to use.

Click on the Optimize tab in FeedBurner and select FeedFlare.

FeedFlare screen on FeedBurner


In the list, select which services you want to include in your feed (there is also a site option which I won't look at in this article). Scroll down to the bottom to see what it will look like in your feed.

FeedFlare Preview and Ordering Screen in FeedBurner


You can click and drag to rearrange your FeedFlares. I think going with the most used services is smart. You can add hundreds more that have been created by users. The one I recommend adding is Twitter which you can add by copying this URL: http://www.feedburner.com/fb/static/flareunits/twitthis.xml into the Add More FeedFlare box

Flare Unit screen for FeedFlare


Once you like the FeedFlares you've chosen and their order click on Activate.

activate FeedFlare in FeedBurner


2. BuzzBoost

Now we can get really fancy. My favorite service in FeedBurner is BuzzBoost. It seems like such a simple thing but it can be really powerful if you know how to use it. What BuzzBoost does is give you HTML code that will embed your blog's feed in any website in which you can put HTML. With one piece of code the feed will update automatically.

So, how does this help? Have you ever wanted to have a static page or widget on your blog with your posts on a particular topic? For example, I have pages on my blog on some of my main topics. For example, I blog a lot about Infertility and I have a static page with some introductory text and then I wanted to show my most recent posts related to Infertility. If you click on the page you can see I have a list of my Infertility blog posts. One way to do this is to manually type in the post title with link and a description each time you make a new topical post. Who wants to do that? BuzzBoost will do it for you automatically!

All you need to know is that you blogging platform has RSS feeds for each of your tags, labels, or categories and how to form them.

How To Find A Specific RSS Feed

In Blogger: Each of your labels has its own feed of the form http://xxx.blogspot.com/feeds/posts/default/-/labelname

For example, when I was on blogger I had the following feed for my label "infertility": http://babydustdiaries.blogspot.com/feeds/posts/default/-/infertility

In Wordpress: Each of your categories has its own feed of the form http://xxx.wordpress.com/category/categoryname/feed/

For example, in Wordpress I have the following feed for my category "infertility" http://www.babydustdiaries.com/category/infertility/feed/

Each of your tags also has its own feed of the form
http://xxx.wordpress.com/tag/tagname/feed/

For example, I have the following feed for my tag "cosleeping"
http://www.babydustdiaries.com/tag/cosleeping/feed/

I have less experience with Typepad, but this page has some instructions on how to get a category specific feed.

Now BuzzBoost the Feed

Ok you have your specific feed — now we want to BuzzBoost it! Log in to FeedBurner and click on the Publicize tab and choose BuzzBoost.

There are a number of settings you can choose for your feed once you Activate the service.

Buzz Boost feed settings in FeedBurner


You can preview what your feed will look like:

BuzzBoost preview of feed in FeedBurner


Once you are happy with how it looks you can copy the code provided:

BuzzBoost HTML code to copy into web page


This code can then be pasted right into the page or Text/HTML widget on your blog. Note: If you normally blog in a visual mode you will need to convert to HTML or Code view to paste the script. (Here's how to get to Edit HTML view in WordPress and in Blogger.)

Voila! Now each time you post something new with that cateogry, label, or tag it will automatically add it to your list!

You might find yourself using this in a number of different ways. Many bloggers have a list of essential posts or favorite posts. You could do this dynamically just by creating a "favorite" tag when you post. You can also embed it directly in a post if you want to load related posts. For example, in my How Did You Find Me post I used Buzz Boost to summarize my posts based on my Google Analytics keywords.

3. Socialize

You can also use Feedburner to send your feed items to your Twitter account. This means that each time you publish a post it will be tweeted automatically. There are many other services to do this (like Twitterfeed.com and this plugin for wordpress) but what I like about using FeedBurner is the options it provides.

Go to Publicize > Socialize

Add your twitter account and choose your options. I really like that it includes a "leave room for retweets" since you want people to easily be able to pass the word about your posts this makes sure that the tweet is short enough to allow a "RT @yourname" to fit before it for retweeting purposes. You can also add hashtags and any additional text.

Select Twitter account screen in FeedBurner


Next you can choose how to order the items and how many new items to post. Note, this only looks for *new* items so you don't have to worry about spamming your twitter followers with multiple, repeat posts. For most bloggers there would only be one new post at a time. You can also use the keyword filter to only tweet items on a specific topic category or label from your blog.

Posting feed on Twitter with FeedBurner


You can see a preview of what your tweets will look like. Don't forget to activate the service.

Sample Preview of Tweets


That's it. Now all of your new posts will go to Twitter automatically!

I hope this helps you save time while maximizing the power of your blog. If you have any questions, I'd be happy to help! Contact me by commenting here or email me at babydustdiaries (at) gmail (dot) com.

5.18.2010

How to use FeedBurner to maximize your blog — Part 1: The basics

Paige of the Baby Dust Diaries is a NASA research librarian by day — and mother to Aellyn and inspiring blogger — well, I was going to say "by night," but let's say be accurate and say all the time. She has volunteered to write a few guest posts on topics that come naturally to her in her line of work. Visit Paige over at The Baby Dust Diaries for more on natural parenting, breastfeeding, gentle discipline, infertility, and life with a miracle baby.

How To Use FeedBurner To Maximize Your Blog — Part 1: The Basics

By Paige of The Baby Dust Diaries

In my day job I create, manage, and teach others how to maximize social media at NASA. Every time I write something like this article about utilizing Twitter, in my mind I'm writing a version for all my blog friends. Since Lauren and Dionna have put such great tutorials here to help specifically for the Carnival of Natural Parenting, I thought it might be nice to share some of the tools I use for blogging as well.

One of the tools I think every blogger should use is FeedBurner. FeedBurner is now owned by Google, but I've been using it since its inception and it just gets better and better. The main goal of FeedBurner is to maximze your blog's RSS feed — allowing people multiple ways to easily subscribe to your content. It actually does much more than that!

Manage Your Feed

If you do nothing else from this article you should definitely do this. Sign your blog's feed up for FeedBurner and change your subscription links to reflect this. First I'll explain why and then exactly how to do this.

Why?

First, it makes it easier for readers to subscribe to your blog. Instead of seeing raw xml like this (click on pictures to see them larger):

raw xml feed data

Your readers will see a friendly page with multiple options for subscribing to your feed including email:

subscribe to Feedburner feed page

Second, it makes your blog's feed free from the specific blog platform you are using. For example if you are on Blogger your feed address is something like http://www.babydustdiaries.com/atom.xml and if you are on Wordpress it looks like http://www.babydustdiaries.com/?feed=rss2. Now, first some RSS readers don't accept all formats, so a feed that ends in atom.xml might not be compatible. More importantly if you ever need to move your blog (like I recently had to from Blogger to Wordpress) all of your readers would need to be notified and go out of their way to resubscribe to your feed.

With FeedBurner you are given a custom feed address similar to http://feeds.feedburner.com/TheBabyDustDaires that will never change. This means when I went from Blogger to Wordpress it was transparent to my readers who were already subscribed. They didn't have to do anything!

How?


It couldn't be easier to sign up for FeedBurner (and it's free!). FeedBurner will even "discover" your feed if you don't know the URL.
  1. You can sign in to FeedBurner with your Google account (the same if you have Gmail, or a Google Reader Account) or you can create an account.
  2. Once you are in, just put the URL of your blog (e.g. http://myblog.blogspot.com) in the FeedBurner box and hit enter. You will then be prompted to give your feed a name and custom addressFeedburner feed info screen
    You want to write down this URL since we'll be using it in a moment. (And you can always find it again at the top of your feed's page under Edit Feed Details.) Click Next.
  3. Next FeedBurner asks if you want to track usage of your feed. You can choose what is important to you here and you can always change your mind later. Click Next.
  4. Now we want to direct your blog's feed to the new address.

    In Blogger:

    From your Dashboard go to Settings > Site Feed and then enter your FeedBurner address (inlcuding the http://) in to the Post Feed Redirect URL box.

    In TypePad:

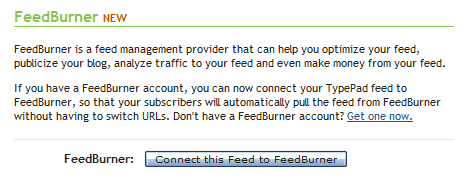
    From your Dashboard go to Configure > Feeds section.Typepad Feeds Tab

    Click on Connect this Feed to FeedBurner.

    Connect TypePad feed to FeedBurner

    Enter your FeedBurner username and password and click Sign In.

    FeedBurner sign in on TypePad

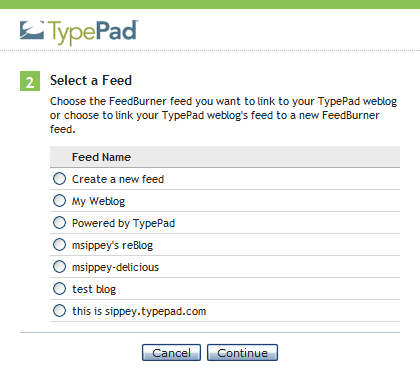
    Select the FeedBurner feed you just created and click Continue.

    Select a TypePad feed

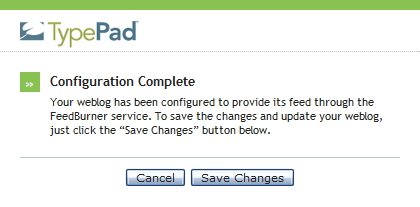
    Click Save Changes.

    Configuration of FeedBurner feed in TypePad complete

    In Wordpress:

    You can use the following method for self-hosted or Wordpress.com hosted blogs. Self-hosted blogs can also use this plugin. Feedburner has what they call a "Chicklet" or image tag that directs users to your feed.

    In FeedBurner click on the Publicize tab.

    Publicize in FeedBurner

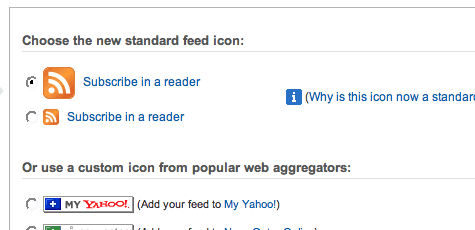
    Locate and click the Chicklet Chooser service.

    The form shown below loads into the right side of the screen:

    Chicklet Chooser in FeedBurner

    This form contains several options for buttons that promote (and link to) your FeedBurner feed.

    Click the radio button next to the button you want to display on your site.

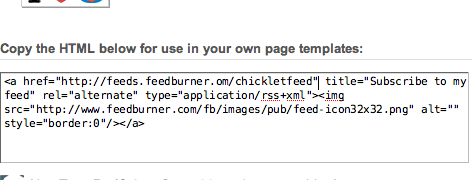
    Copy the HTML shown in the bottom section of the Chicklet Chooser. You will paste this HTML into your WordPress site template.

    Chicklet html code from FeedBurner

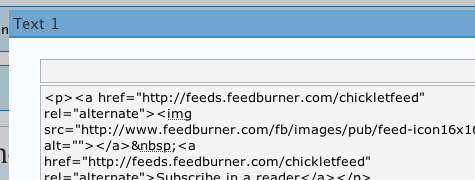
    From the WordPress Dashboard, click the Appearance and then the Widgets option. Drag the text widget from the Available Widgets area to your Sidebar. Click the right side of the widget to expand it.

    Paste the code you copied from FeedBurner in an earlier step into the content field.

    Paste code from FeedBurner into WordPress Widget

    Click Save Changes.

    This Chicklet method also works on many other platforms. You can use a custom image instead of one of the ones they offer by hosting your own image and changing the code for the <img src="http://this is the URL for your image">.

That's the basics of using FeedBurner for your blog! Stay tuned for Part 2 for some advanced FeedBurner goodies!

If you have any questions I'd be happy to help! Contact me by commenting here or email me at babydustdiaries (at) gmail (dot) com.

4.07.2010

How to schedule a post and get its permalink in WordPress

Dionna of Code Name: Mama and I are writing a few blogging tutorials of particular use for our Carnival of Natural Parenting participants. Today I would like to welcome Tom & Dionna, who have written a guest post about scheduling a post in Wordpress and figuring out what its URL will be, to help in posting to the carnival and emailing us the link. Tom is an IT guru, Dionna is a lawyer turned work-at-home mama, and together they form the natural parenting duo responsible for one amazing son. You can normally find Dionna over at Code Name: Mama where she shares information, resources, and her thoughts on natural parenting and life with a toddler.

Here is a tutorial on how to schedule a post in Wordpress and figure out what its permalink (URL) will be (this post complements Lauren's earlier post for Blogger users on figuring out a post URL in advance and scheduling a post in Blogger).

*This tutorial assumes your permalinks are in date and/or title format.

These tips will come in handy if you want to:

  • have your carnival entry post at a certain time while you're not otherwise available
  • email us the post URL in advance (such as when using the carnival's monthly Google form)


How do I schedule a post?

Before you can determine what your permalink will be, you must schedule your post. If you try to get the permalink before scheduling the post, your permalink will be incorrect. Here are the steps to schedule your post:

1. Add a new post:

1-1-AddNew

2. Edit scheduling.

This is the important step — to get your permalink with the correct date and title, you have to schedule this post for the date you want it to publish. Click "Edit" (next to "Publish immediately") to start this process.

1-2-Edit_Scheduling

3. Confirm the date.

Put the correct date/time in place for your post to publish, then click OK to confirm. For example, if you are scheduling a post for the Carnival of Natural Parenting, the Carnival is always live on the second Tuesday of each month.

1-3-Confirm_Date


How do I determine what my post's permalink will be?


4. Title the post.

Go ahead and title your post now. Your post title can be edited later if need be, but know that doing so will also change your permalink.

1-4-Title_Post

5. My permalink is wrong!

As you type, your permalink will auto-fill underneath the title window - but wait! That permalink has the wrong date! We'll fix this in Step 6...

1-5-Permalink_Wrong

6. Save the draft.

Saving the draft will update the permalink with the correct "date" and title embedded.

1-6-Save_Draft

7. My permalink is now correct!

Check it out, the permalink updated with the "correct" date — the one you specified in your Scheduling window.

1-7-Permalink_Correct

8. Overview screenshot.

At this point, here's a shot of my test post — notice the permalink is right, the "Schedule For" area shows the correct time, etc. Click this image for a full-size view.

1-8-Final_Picture

We hope that was helpful! If you have any questions or need clarification, please leave a comment or contact Dionna and Tom directly at Code Name: Mama.

4.05.2010

How to edit HTML in Wordpress

Dionna of Code Name: Mama and I are writing a few blogging tutorials of particular use for our Carnival of Natural Parenting participants. Today I would like to welcome Tom & Dionna, who have written a guest post about editing HTML in Wordpress, to help in pasting the carnival code blurbs. Tom is an IT guru, Dionna is a lawyer turned work-at-home mama, and together they form the natural parenting duo responsible for one amazing son. You can normally find Dionna over at Code Name: Mama where she shares information, resources, and her thoughts on natural parenting and life with a toddler.

When you are writing posts in Wordpress (for example, when you are preparing your entry for the Carnival of Natural Parenting), it is often helpful to know how to edit in HTML. This tutorial (like Lauren's earlier tutorial on editing HTML in Blogger) will show you how to:
  • add HTML code to a post and
  • copy your post's HTML for use elsewhere.

How do I add HTML code?


Most people probably use the Visual tab for writing blog posts in Wordpress (if you use the HTML tab exclusively, this mini-tutorial is stuff you already know). Let's look at the basic steps for adding HTML code to a post.

1. Identify "Visual" or "HTML":

2-1-Visual_or_HTML-300x229

You know you're in the Visual tab if you have all of these extra formatting options that work like Microsoft Word. The HTML tab has very few options available.

2-2-Visual_Post

2. Write your post in the "Visual" tab. Once you've got your post written and saved, it's time to insert the HTML code.

3. Switch to the "HTML" tab:

2-3-Switch_to_HTML

4. Paste your HTML code.

This is the screen where you can add in HTML code. Simply navigate to the area of the post where you want to insert the code and paste it in.

Let's say, for example, that you have received the intro blurb for this month's Carnival of Natural Parenting from Dionna (at Code Name: Mama) and Lauren (at Hobo Mama). The intro blurb should go at the very top of your post, so copy the code from the Carnival email, position your cursor at the beginning of the post, and paste. Voila!

If you have the ending blurb (the list of all of the Carnival participants), you'd copy and paste that at the very end of your post. Easy peasy.

A helpful hint: if you are copying HTML code from a Word document, then you are also copying all of Word's weird styling and formatting code automatically. Instead of copying and pasting straight from Word, copy it, paste it first into Notepad, TextEdit, or a similar simple text editor, then copy and paste from Notepad into Wordpress. Notepad does not retain any styling/formatting code, and Wordpress will be happier.

2-4-Paste_Code

5. Save the draft.

Before you switch back to the Visual tab to see how pretty everything looks, you should save your draft.

A word of warning: Wordpress doesn't always "work right" when you switch between Visual and HTML and go back-and-forth and switch it more and more. We don't know why. Our advice would be to switch between them, make your changes, and then "Save Draft" prior to switching back to the other tab. Without doing this (who knows why) Wordpress will "lose" the code you just typed/pasted in HTML, or it won't display your text the way it was formatted in Visual.

2-5-Save_Draft

6. Preview before you Publish.

Once it's saved, feel free to check out the Visual tab, or "Preview" your post to see how it will look on your site.


How do I copy my post's HTML code for use elsewhere?


There are at least two instances that we can think of that it would be helpful to copy/paste a blog post.

First: if you have written a long post and want to split it into several smaller pieces, you are more likely to retain all of your formatting by copying and pasting from the HTML tab rather than from the Visual tab.
Second: if you are submitting a guest post to another site, it is customary to send your post in HTML format.

And it's really quite easy. Just write and save your post, switch to the HTML tab (see Step 3 above), hit "Control + A" ("Control" = "Command" in Mac) to select all of your text, "Control + C" to copy it, and then paste it (either into an email or a Notepad document).

We hope that was helpful! If you have any questions or need clarification, please leave a comment or contact Dionna and Tom directly at Code Name: Mama.
Related Posts Plugin for WordPress, Blogger...