4.25.2011

Writing contest for NPN cloth diapering book! The deadline approaches.


Are you a writer who also happens to love cloth diapers? Woot!

We need your high-quality and informative writing for the upcoming Natural Parents Network book, The Natural Parent's Guide to Cloth Diapering!

Submissions are due April 30.

We hope this book will be like a Cloth Diapers 101 class for anyone interested in finding out more about the subject — as well as an advanced course for those with particular questions and troubleshooting needs.

We invite you to submit one or more chapters having to do with any aspect of cloth diapering.

Please, as you're submitting, remember that this will be a chapter in a printed book. We want your best writing — please edit any blog posts to fit into a book's format and style, and please be thorough in what information you give. We want NPN's guide to be the "last word" in cloth diapering, and we will be judging submissions based on quality of writing and completeness of information.

Available Chapters

4.14.2011

Blogging and taxes


Well, it's that time of year for U.S. citizens — tax time! Bloggers are kind of a special lot when it comes to taxes, which can make figuring out how to file tricky.

I've recently read some good articles about bloggers and taxes:
I'm combining what I've read there with my own experience doing our family's taxes (currently an online sales business as well as my income, such as it is, from blogging), and managing the Natural Parents Network finances, to write about some of the special situations affecting bloggers:

Please, please take what I'm about to say seriously: I am not a tax expert. I am not an accountant or tax professional of any kind. I was an English major, for crying out loud. Please use the information in this article solely as a springboard for you to do your own research regarding your specific tax situation. If you're fortunate enough to have a CPA or other expert to turn to, perfect. If you don't, you can call the IRS directly to ask any specific questions or go in person to a local Taxpayer Assistance Center. You can also use IRS.gov to find specific tax forms, publications, and regulations.

4.04.2011

The most important tasks for bloggers — and what is not important?

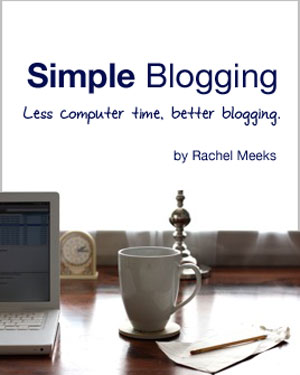
I've been reading Simple Blogging: Less Computer Time, Better Blogging, an ebook by Rachel Meeks of Small Notebook (and — full warning — I went ahead and signed up for the affiliate account, because I am an affiliate junky).

Even before downloading it, I had started thinking about what's essential for bloggers to do, and what can be trimmed. Part of this is in preparation for nesting and my babymoon period. Part of this is my general drive to simplify clutter out of my life. Part of this is my knowledge that sabbath rests are necessary to my wellbeing. Part of this is a long time coming, just because I've been feeling overwhelmed by how much time blogging takes up for me.

This article by Melodie — "My Kids Have Taught Me That It’s Time To Stop Blogging" — when she reluctantly yet joyfully decided to step away from Breastfeeding Moms Unite! was also a catalyst. Blogging is not a job for me in the sense that I earn much money from it. For the amount of time I put into it, I've calculated that I'm earning about 40 cents an hour. Hmm. Forty cents for an hour I could be spending writing my novels, caring for my home, helping my husband in our family business (which makes considerably more per hour), or, not to be all maudlin about it, enjoying my kid's (and, soon, kids') fleeting and precious childhood.

Now, blogging has become a passion of mine, and I recognize that the point of blogging does not have to rest on earnings. I so very much enjoy the community that has surrounded me in this blogging journey, and a lot of what I do as a blogger is with the intent of giving back to that community, and that makes me happy. That said, when I'm feeling stressed and on edge and staying up till 5 in the morning to finish linking up Wordless Wednesday posts for two sites or beating myself up because I have yet to finish a product review I've had three months to write and still don't really feel like doing or hiding fitfully from the overflowing email inbox that's overwhelming me with Tasks To Do, I have to ask myself: Is this what I'm actually passionate about?

So I thought I'd ask YOU — fellow blog readers, fellow blog authors — what you consider to be the essentials of blogging, and what a blogger can let slide.

I put together a little poll to select and then rank and then compare basic blogging tasks:

4.01.2011

Poem-a-Day Challenge begins, no April Fooling!


Oh, me, oh, my! How did I forget that this is the first day of the 2011 PAD Challenge?

Who's with me?

The object of the game is to write a poem each day in the month of April. Robert Lee Brewer at Poetic Asides will provide a daily prompt to put you in the mood.

3.14.2011

How to purge your email inbox


I am NOT an expert on reducing email clutter and controlling what comes in each day. Best to start with a caveat. That said, I recently cleared my personal Gmail account from over 2,000 unread messages (you read that correctly) to 42.


Here are a few of the tips and tricks that I sometimes follow to help me keep a handle on inbox overload (some of which I should really attend to more often!).

2.11.2011

How to add "Read More" jump tags in Blogger

My new favorite thing in Blogger? Adding "read more" tags to posts. I'd seen this feature on WordPress and other blogs before but hadn't realized it was a Blogger feature, too. I think it's been here for donkey's years, but I was slow to catch on to the benefits!

Here's a little tutorial that will explain "read more" links and let you know why and how you should add them!

What's a "read more" tag?

First things first! If you have no idea what I'm talking about, take a look at my Hobo Mama homepage (for I have not performed the same editing wonders on this site yet!).

(Click on images to see them larger.)

The "read more" link is at the bottom of the post that's been truncated. When you click on it, it links to the original article URL plus the #more tag at the end — in this case, this link: http://www.hobomama.com/2011/02/fat-and-pregnant-heartbeat-video.html#more. So if you're reading from a page and choose to "read more," you will get popped into the article at the point where you left off. On the other hand, if you click on the URL as a whole from another source (in a blog reader or from a Tweet, for instance), you'll see that the "more" tag is undetectable when the post is expanded (try it here: http://www.hobomama.com/2011/02/fat-and-pregnant-heartbeat-video.html). Then it simply shows you the post as a whole, and the "more" coding is invisible.

Other examples of a "read more" link at work can be seen in non-Blogger applications such as our WordPress-based Natural Parents Network homepage, which has a sort of magazine/excerpt vibe to it. You get a digest version of all the current posts and can click on the "Read More…" links if you're interested to, well, read more.

Why do I want "read more" tags?

Scanning and searching is easier

The biggest reason is to make pages that encompass a lot of posts less cumbersome for readers to scroll through and find what they want. This is true for your home page as well as any category/label search pages.

For instance, I've recently gone back and added in "more" tags on all my posts tagged with Elimination Communication on Hobo Mama. If you look at the category page for elimination communication now

http://www.hobomama.com/search/label/elimination%20communication

— you can easily scroll through 19 partial posts on the subject and decide whether each article is really what you're looking for. (I'm guilty of popping labels onto posts that are only distantly related in some convoluted way in my mind….)

By contrast, I went to a label where I hadn't yet added jump tags, and only six posts loaded, in their entirety. That makes it a lot harder for readers looking for a particular article to comb through your category tags, particularly if you have a lot of articles shuffled into a particular category. They have to keep clicking on "Older Posts" at the bottom of the page, again and again and again, in the hopes of finding the one article they're looking for.

I was going to show you the difference between the two ("read more" tags vs. no "read more" tags), but I plan to change all mine over as I have time. The best method I can think of, if you don't have "read more" tags yourself and you're on Blogger, is to load your own homepage or a category page and see how clunky it is to wade through it all.

More information, less space

The other benefit, and it's related, is that you can show highlights from more articles on a single page. For instance, I used to have to keep my Hobo Mama homepage at a maximum of four posts (under Settings --> Formatting --> "Show at most X posts on the main page"). My posts tend to be long and have a lot of images, so it took too long to load more than that and sometimes the multiple javascripts would interfere with certain browsers.

With the "read more" jump tags, however, I can keep each individual post down to a manageable excerpt size and therefore safely and conveniently show more total posts on a page at once, making it more likely that a visitor will see something enticing.


How do I get me some of that sweet "read more" action?

So you're convinced! Now, how to add in those "read more" tags to your own posts? Fortunately, it's easy!

(Click on images to see them larger.)
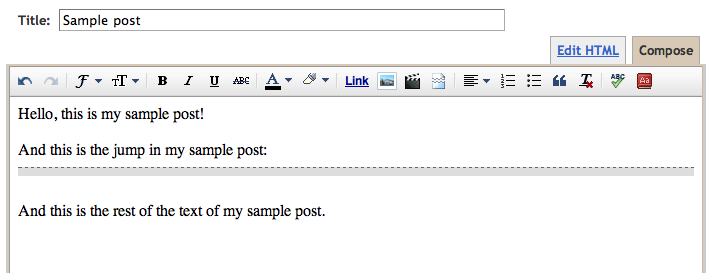
It's easiest to do in "Compose" mode1, because there's a little icon right there to press! As you can see in the top row of this screenshot, the icon looks like a page that's been ripped in half, symbolizing that a portion of the post is before the jump and a portion after.

Once you click the icon, this gray-with-black-dotted line pops into your post to show you where the jump will fall. You can delete it or copy and paste it elsewhere if you change your mind.
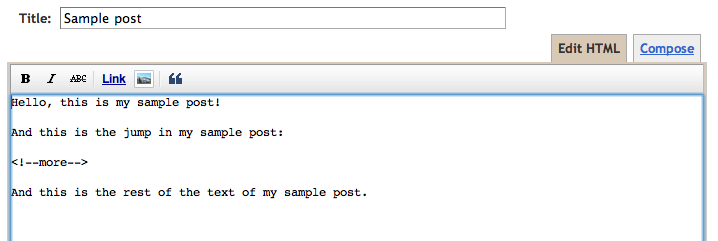

Alternatively, if you're in Edit HTML mode1 (I tend to write in HTML view, so I think that's why I didn't notice the "read more" icon for so long!), you can type in the HTML code for a jump yourself:

<!--more-->


Just copy and paste that HTML coding tidbit wherever you want your jump link to appear.

To make things easier on me, I actually created a draft post with just that code in it that I saved with a date in the future so it's always at the top of my drafts list. Then, whenever I need the "read more" code, I can just open the draft and copy and paste. Another option I just thought of is to add it to your Post Template box, which makes things even easier in the long run as you're composing new posts in Edit HTML view. Simply go to Settings --> Formatting --> Post Template, paste it in and save your settings. I pasted in <br><br><br><br><!--more--> so it wouldn't be at the very top. Then the coding will show up in every new post — just make sure to move it where you want to before you publish a post!

Jump around!

A couple final notes:

I've heard that some older or nonstandard Blogger templates don't work automatically with the "read more" tags, so you might have to update or tweak your template in that case. My Hobo Mama template was automatically outfitted with the functionality and worked with no further fiddling on my part, but this template is not working. However, I want to upgrade my template here, anyway, so I'll deal with that later. If you're also having problems, let me know and I'll try to help you out!

Since you can't conveniently add custom excerpts yet for articles in Blogger the way you can in WordPress (see this link as an example of a string of posts in WordPress that mostly have handcrafted excerpts along with selected featured images), you might want to hone your skills at writing opening paragraphs that can function as an overarching preview for the article to come. I know I'm guilty of rambling on for awhile at the beginning of my posts (it's fun!) before getting to the point. But if you know that your before-the-jump paragraphs are all readers will see to choose whether or not to click and read further, you might find yourself making sure those opening paragraphs are concise and tempting enough to lure readers in further. Along the same lines, you might want any opening images to be pertinent, since whatever is up at the top is what will show. (Of course, you choose where the jump goes, so you can ultimately arrange it however you'd like!)

Rest assured, too, that anyone clicking on a URL from another source (such as Twitter or Facebook) or following your feed in a reader or email subscription will see the full post. These "read more" tags don't affect anyone clicking on a regular post link, only people browsing your home site or a category search page. To my point of view, those are exactly the times you want readers exposed to a wide variety of articles, so that's perfect for my needs.

If you want to make sure that the "read more" tag doesn't put extra spaces and line breaks into your post, simply don't add them in! You can smush the "read more" coding right up against any other words or html, without any extra spaces or line breaks around it, and the break will happen there as planned.

Enjoy your "read more" tags — your readers will!


1 If you need a simple mini-course on the difference between Compose and Edit HTML view in Blogger, see my tutorial "How to edit HTML in Blogger."

1.25.2011

Google Reader shared items: Your public feed for reading recommendations

Do you want an easy way to share blog posts and online articles with your friends and readers?

Google Reader has a way to share items and create a public feed with all your reading recommendations.

I first heard about this idea from Paige of Baby Dust Diaries, in a footnote on her Sunday Surf. (If she has an awesome, longer tutorial somewhere I'm missing, she or someone can let me know!)

In this how-to, I'll pass on what I learned from Paige and teach you how to set up your own Shared Items feed in Google Reader, add to it easily from Google Reader, and publish the feed to your blog.

In a future how-to, I'll talk about some further Google Reader goodies, including a way to add items to your shared feed from outside Reader, and even if you're not subscribed to a feed for an article you want to reference. I'll also talk about how to show off a public feed on your blog or other site.

Absolute basics

You need to have a Google Reader account and be subscribed to your favorite blogs. I'm going to skip ahead at this point and assume you've got that part figured out, but if you need help, let me know and I can do a separate tutorial!

Add to your shared items

(Click on any image to see it larger.)

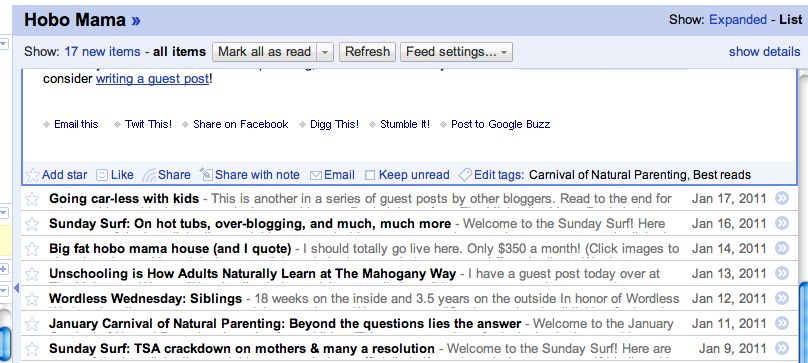
Whenever you open an article in Google Reader and scroll to the end, you'll see these options. The two relevant ones are "Share" and "Share with note."

To add an article to your shared items, simply click on either share option.

"Share" will add it automatically to your shared items. The little feed icon will turn orange.

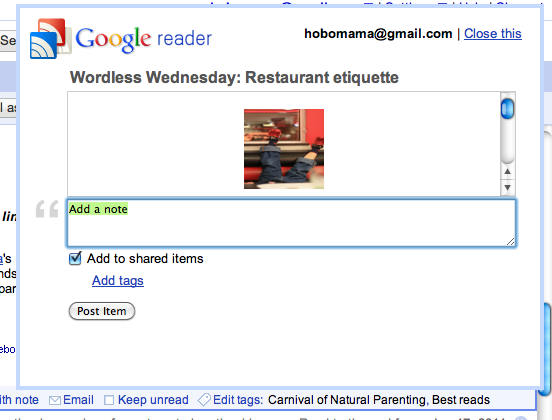
"Share with note" lets you add a comment to your item. A box pops up like so:


You type in your comment and click "Post Item."

(Notice you could also add a note but uncheck "Add to shared items," if you wanted a private note to yourself.)

"Your shared items" in Reader

(Remember, click on any image to see it larger.)

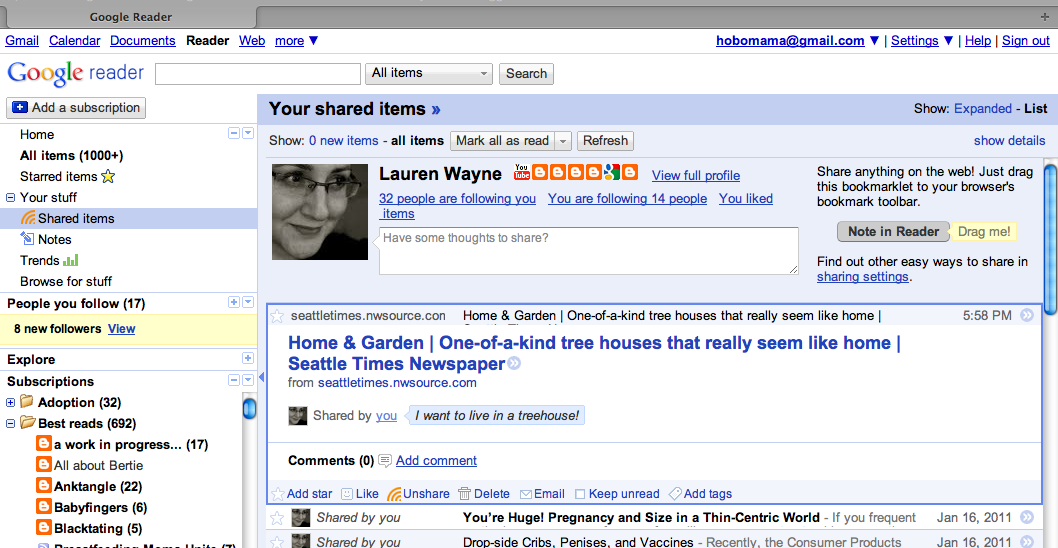
To see the items you've shared, go to "Your stuff" in the left sidebar. If there's a plus-sign (+) next to "Your stuff," click on it to show the drop-down menu. Select "Shared Items." If you want to see only the items you've left notes on, click on "Notes."

You can see an article I shared and the note I wrote to go along with it in the blue box ("I want to live in a treehouse!").

(In case you're wondering, I blurred out my feeds because I give them weird names ;) and, yes, I have more than 1,000 unread items, which means I've broken the Google counters.)

How to unshare an item

If you want to take back your share, look at the bottom of the post where the orange icon is. The word will now say "Unshare," so just click it again to remove it from your shared items.

If you wrote a note, click "Delete" next to the little trash can instead (the icon that used to be a pencil and paper).

(Look at the picture above to see both the "Unshare" and "Delete" icons.)

Make your shared items public!

So now you've shared them, but who's seeing them? We have to go mess with the settings to make sure it's all the people you want!

The link for Sharing Settings is http://www.google.com/reader/view/#friends-manager-page. It's linked on various pages, such as toward the top of "Shared items" and "People you follow."

You can also navigate there (it's a little hard to find, but in case they change that link!) by going this route:


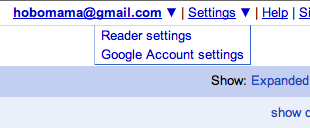
Click "Settings" in the top right header, and wait for the drop-down menu. Select "Reader settings."

(Remember, click on any image to see it larger.)


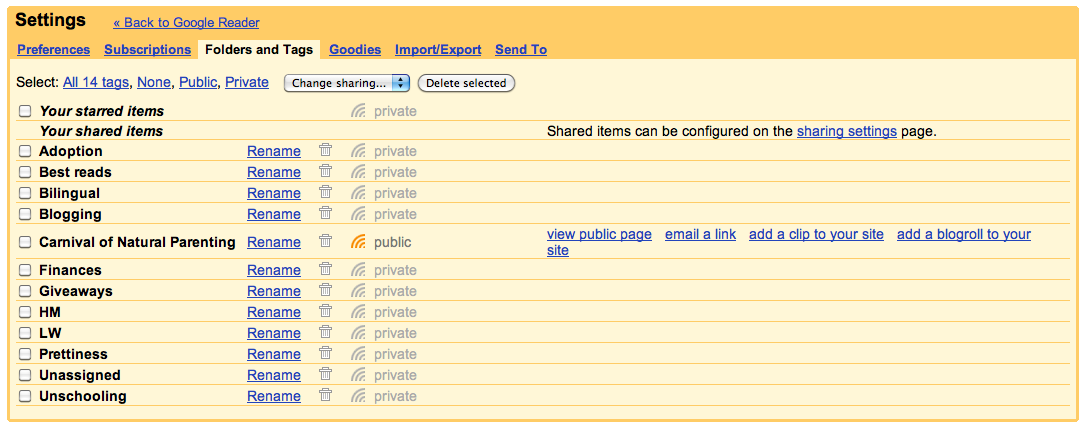
Click the tab that reads "Folders and Tags." There you can see the message next to "Your shared items," "Shared items can be configured on the sharing settings page," and "sharing settings" is linked. Ta-da!


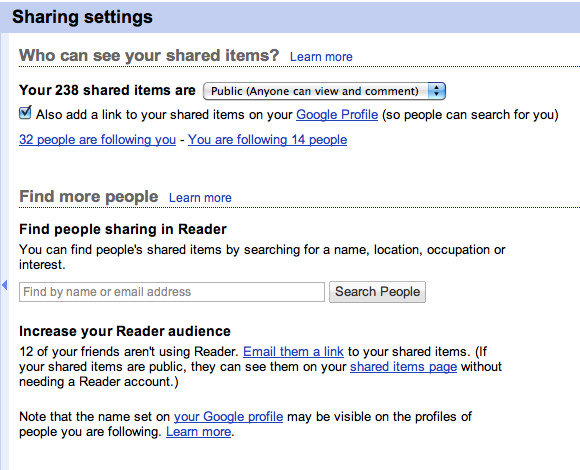
The top option lets you choose whether your shared items are "Protected" (you choose which groups can view them, based on your Google Contacts) or "Public" (open to anyone online). You can also see whose recommendations you're following, and who's following yours, and you can search for new public shared item feeds to track.

Set your style


Now that you have a public feed, you also get to style your Shared Items page, on the same "Shared settings" page. There are four (rather limited) options, so choose whichever one makes you happiest.

You can also choose a custom URL (such as http://www.google.com/reader/shared/hobomama), which makes it easier to tell friends about your new public feed.

We'll talk more about emailing the link below, and we'll get into adding a clip to your blog in a future installment, but feel free to play around!

Your public feed

Now when you click either on "Preview your shared items page in a new window" or paste or type that new URL into a window, you will see what your public sees.


Reader pulls information from your Google profile (such as your name and links to other public accounts), so make sure your Google profile is displaying information the way you want it.

Share your shared items!

Now you can hand out the URL of your public feed (e.g., http://www.google.com/reader/shared/hobomama) to let people know to follow along or subscribe.

People can also follow you in Google Reader by entering your name under "Find more people" on the "Sharing settings" page. They'll then click on "People you follow" in the left sidebar to see your shared items mingled with the items of other public feeds.

In "Sharing settings," there are two opportunities to email a link to your shared feed to your friends. They don't even need a Google account (just internet access) to view your shared items feed. If they do have a Google account, you could recommend that they follow you in Reader.

Have fun and start sharing!

And stay tuned for advanced Google Reader goodies!

Incidentally, feel free to follow my shared items public feed! I share articles about parenting, blogging, and writing, along with other fun tidbits, such as about treehouse living. You can also follow me in Google Reader by entering "Lauren Wayne" under "Find more people" on the "Sharing settings" page and finding my cute little face.
Related Posts Plugin for WordPress, Blogger...